


 To let this example work you need to do the following things.
configure lifecycle for the employees table
download Flexlib for the dragable and closeable Tabs. These guys did a perfect job.
Here is the source code of java side and here is the Flex code
These are the things I needed to do.
<mx:DataService id="ds" destination="employee" message="messageHandler(event.message)"/>
<mx:ArrayCollection id="employeeArray" />
Step 1 fill the employeeArray
  public function init():void{
   ds.autoCommit=false;
   ds.autoSyncEnabled = true;
   ds.addEventListener(ResultEvent.RESULT, resultHandler);
   ds.addEventListener(DataServiceFaultEvent.FAULT, faultHandler);
   ds.addEventListener(DataConflictEvent.CONFLICT, conflictHandler);
   var token:AsyncToken = AsyncToken(ds.fill(employeeArray));
   token.kind = "fill";
  }
private function resultHandler(event:ResultEvent):void
{
 if (event.token.kind == "fill")
 {
  // fill tree
  sortEmployees();
  refreshTree();
 }
}

private function sortEmployees():void {
 var deptSortField:SortField = new SortField();
 deptSortField.name = "departmentId";
 deptSortField.numeric = true;
 var firstNameSortField:SortField = new SortField();
 firstNameSortField.name = "firstName";
 firstNameSortField.numeric = false;

 /* Create the Sort object and add the SortField object created earlier to the array of fields to sort on. */
 var employeeDataSort:Sort = new Sort();
 employeeDataSort.fields = [deptSortField,firstNameSortField];

 /* Set the ArrayCollection object's sort property to our custom sort, and refresh the ArrayCollection. */
  employeeArray.sort = employeeDataSort;
  employeeArray.refresh();
}
   public function refreshTree():void{
           mainXML = new XMLDocument();
           var rootXML:XMLNode = mainXML.createElement("root");
           rootXML.attributes.type = "root";

           for ( var i:int = 0 ; i < employeeArray.length ; i++ ) {

              var department:int   = employeeArray.getItemAt(i).departmentId;
              var search:Array = rootXML.childNodes;
              var deptXML:XMLNode = null;

              if ( search.length > 0 ) {
                for ( var b:int =0 ; b < search.length ; b++ ) {
                  if ( search[b].attributes.id == department.toString()) {
                   deptXML = search[b];
                   break;
                  }
                }
              }
              if ( deptXML==null ) {
            deptXML = mainXML.createElement("department");
            deptXML.attributes.label = department;
            deptXML.attributes.type  = "dept";
            deptXML.attributes.id    = department.toString();
            rootXML.appendChild(deptXML);
              }
              var firstName:String = employeeArray.getItemAt(i).firstName;
              var lastName:String  = employeeArray.getItemAt(i).lastName;
              var employee:int     = employeeArray.getItemAt(i).employeeId;

              var elementXML:XMLNode = mainXML.createElement("employee");
              elementXML.attributes.label = firstName+" "+lastName;
              elementXML.attributes.type = "emp";
              elementXML.attributes.id = employee;
              deptXML.appendChild(elementXML);
           }
           mainXML.appendChild(rootXML);
           myXml = new XML(mainXML.toString());

           tree.dataProvider = myXml;
           openAllNodes();
    }
 private function filterEmployees():void {
  employeeArray.filterFunction = processFilter;
  employeeArray.refresh();
 }

 private function removeFilterEmployees():void {
   employeeArray.filterFunction = null;
   employeeArray.refresh();
 }


 private function processFilter(employee:Object):Boolean {
   return parseInt(employee.employeeId) == searchEmployeId;
 }

// update
     var employeeLocal:Object = null;
     // search the employee
     searchEmployeId = employeeId;
     filterEmployees();
     // if found we can update the department.
     if ( employeeArray.length == 1 ) {
        employeeLocal = employeeArray.getItemAt(0);
     }
     removeFilterEmployees();

     employeeLocal.departmentId = departmentId;
     employeeLocal.email = email;
     employeeLocal.firstName = firstName;
     employeeLocal.lastName = lastName;
     employeeLocal.jobId  = jobId ;
     employeeLocal.hireDate =  hireDate;


     ds.commit();
     var token:AsyncToken = AsyncToken(ds.fill(employeeArray));
     token.kind = "fill";

// insert
  employee = new Employee();
  employee.employeeId = employeeId;
  employee.departmentId = departmentId;
  employee.email = email;
  employee.firstName = firstName;
  employee.lastName = lastName;
  employee.jobId  = jobId ;
  employee.hireDate =  hireDate;
  employeeArray.addItem(employee);
  ds.commit();
  var token:AsyncToken = AsyncToken(ds.fill(employeeArray));
  token.kind = "fill";
 In my case Web cache will listen on port 80 and 7778.
Now we can add the application servers ( original servers)
 Define a website url for which you want to load balance, I will use the Enterprise Manager Website /em
 The site is /em/
Add a site to server mapping where we connect the site em to the availible AS server Now we have to make sure that a new web session is always run on the same original server else we cannot log in.
 Use for the em website as session JSESSIONID and OC4J-based as binding mechanism. We are now ready with Web Cache. The only thing still to do is to add a virtual hsot to the httpd.conf of the Application Servers. We have to do this else the em website is redirected to one of the application server instead of the load balancer adress.
XPCND7010XMP.work.local:7777 is the application server on port 7777.
NameVirtualHost XPCND7010XMP.work.local:7777
<VirtualHost XPCND7010XMP.work.local:7777>
ServerName XPCND7010XMP.work.local
Port 80
</VirtualHost>
On the application servers you don't need the http servers anymore so you can disable.
<notification-server interface="ipv4">
      <port local="6100" remote="6200" request="5003"/>
      <ssl enabled="true" wallet-file="$ORACLE_HOME/opmn/conf/ssl.wlt/default"/>
      <topology>
         <discover list="*233.0.0.2:1500"/>
      </topology>
</notification-server>

package nl.ordina.flex.adfbc;

import java.math.BigDecimal;
import java.sql.Date;

import nl.ordina.flex.model.dataaccess.EmployeesViewImpl;
import nl.ordina.flex.model.dataaccess.EmployeesViewRowImpl;

public class Employee {

    private Integer employeeId;
    private String firstName;
    private String lastName;
    private String email;
    private String phoneNumber;
    private Date   hireDate;
    private String jobId;
    private Double  salary;
    private Integer commissionPct;
    private Integer managerId;
    private Integer departmentId;


    public Employee() {
    }


    public Object getAttribute(String attribute) {
        if ( attribute.equalsIgnoreCase("firstname")) {
            return firstName;
        }
        if ( attribute.equalsIgnoreCase("lastname")) {
            return lastName;
        }
        if ( attribute.equalsIgnoreCase("departmentId")) {
            return departmentId;
        }
        if ( attribute.equalsIgnoreCase("managerId")) {
            return managerId;
        }

        return null;
    }

    public Employee transform( EmployeesViewRowImpl row) {
        Employee emp = new Employee();
        emp.setEmployeeId(row.getEmployeeId().intValue());
        emp.setFirstName(row.getFirstName());
        emp.setLastName(row.getLastName());
        if ( row.getCommissionPct() != null) emp.setCommissionPct(row.getCommissionPct().intValue());
        if ( row.getDepartmentId() != null) emp.setDepartmentId(row.getDepartmentId().intValue());
        if ( row.getEmail() != null) emp.setEmail(row.getEmail());
        if ( row.getHireDate() != null) emp.setHireDate(row.getHireDate());
        if ( row.getJobId() != null) emp.setJobId(row.getJobId());
        if ( row.getManagerId() != null) emp.setManagerId(row.getManagerId().intValue());
        if ( row.getPhoneNumber() != null) emp.setPhoneNumber(row.getPhoneNumber());
        if ( row.getSalary() != null) emp.setSalary(row.getSalary().doubleValue());
        return emp;
    }

    public EmployeesViewRowImpl transform(EmployeesViewImpl view, Employee employee) {
        EmployeesViewRowImpl row = (EmployeesViewRowImpl)view.createRow();
        row.setEmployeeId(new BigDecimal(employee.getEmployeeId()));
        if ( employee.getFirstName() != null) row.setFirstName(employee.getFirstName());
        row.setLastName(employee.getLastName());
        if ( employee.getCommissionPct() != 0) row.setCommissionPct(new BigDecimal(employee.getCommissionPct()));
        if ( employee.getDepartmentId() != null) row.setDepartmentId(new BigDecimal(employee.getDepartmentId()));
        if ( employee.getEmail() != null) row.setEmail(employee.getEmail());
        row.setHireDate(employee.getHireDate());
        row.setJobId(employee.getJobId());
        if ( employee.getManagerId() != 0) row.setManagerId(new BigDecimal(employee.getManagerId()));
        if ( employee.getPhoneNumber() != null) row.setPhoneNumber(employee.getPhoneNumber());
        if ( !employee.getSalary().isNaN()) row.setSalary(new BigDecimal(employee.getSalary()));
        return row;
    }


    public void setEmployeeId(Integer employeeId) {
        this.employeeId = employeeId;
    }

    public Integer getEmployeeId() {
        return employeeId;
    }

    public void setFirstName(String firstName) {
        this.firstName = firstName;
    }

    public String getFirstName() {
        return firstName;
    }

    public void setLastName(String lastName) {
        this.lastName = lastName;
    }

    public String getLastName() {
        return lastName;
    }

    public void setEmail(String email) {
        this.email = email;
    }

    public String getEmail() {
        return email;
    }

    public void setPhoneNumber(String phoneNumber) {
        this.phoneNumber = phoneNumber;
    }

    public String getPhoneNumber() {
        return phoneNumber;
    }

    public void setHireDate(Date hireDate) {
        this.hireDate = hireDate;
    }

    public Date getHireDate() {
        return hireDate;
    }

    public void setJobId(String jobId) {
        this.jobId = jobId;
    }

    public String getJobId() {
        return jobId;
    }

    public void setSalary(Double salary) {
        this.salary = salary;
    }

    public Double getSalary() {
        return salary;
    }

    public void setCommissionPct(Integer commissionPct) {
        this.commissionPct = commissionPct;
    }

    public Integer getCommissionPct() {
        return commissionPct;
    }

    public void setManagerId(Integer managerId) {
        this.managerId = managerId;
    }

    public Integer getManagerId() {
        return managerId;
    }

    public void setDepartmentId(Integer departmentId) {
        this.departmentId = departmentId;
    }

    public Integer getDepartmentId() {
        return departmentId;
    }
}
package nl.ordina.flex.adfbc;

import java.math.BigDecimal;
import java.util.ArrayList;
import java.util.List;

import nl.ordina.flex.model.dataaccess.EmployeesViewImpl;
import nl.ordina.flex.model.dataaccess.EmployeesViewRowImpl;
import nl.ordina.flex.model.service.EmployeeModuleImpl;

import oracle.jbo.client.Configuration;

public class EmployeeService {

    private EmployeeModuleImpl am;
    private static EmployeeService instance = null;

    public EmployeeService() {
        am = (EmployeeModuleImpl)Configuration.createRootApplicationModule("nl.ordina.flex.model.service.EmpoyeeModule", "EmployeeModuleLocal");
    }

    public static EmployeeService getInstance() {
        if(instance == null) {
           instance = new EmployeeService();
        }
        return instance;
     }


    public List getEmployees()  {
        List list = new ArrayList();
        Employee emp = new Employee();
        EmployeesViewImpl empView = am.getEmployeesView1();
        empView.executeQuery();
        while (empView.hasNext()) {
           EmployeesViewRowImpl row = (EmployeesViewRowImpl) empView.next();
           list.add(emp.transform(row));
        }
        return list;
    }


    public Employee getEmployee(Integer employeeId) {
        EmployeesViewImpl view = am.getEmployeesView1();
        Employee emp = new Employee();
        view.setid(new BigDecimal(employeeId));
        view.executeQuery();

        if ( view.hasNext()) {
          EmployeesViewRowImpl row = (EmployeesViewRowImpl)view.next();
          view.setid(null);
          view.executeQuery();
          return emp.transform(row);
        } else {
            view.setid(null);
            view.executeQuery();
            return null;
        }
    }

    public Employee create(Employee employee)  {
        EmployeesViewImpl view = am.getEmployeesView1();
        Employee emp = new Employee();

        view.insertRow(emp.transform(view,employee));
        am.getDBTransaction().commit();
        return employee;
    }

    public static String capitalize(String s) {
        if (s.length() == 0) return s;
        return s.substring(0, 1).toUpperCase() + s.substring(1);
    }


    public boolean update(Employee employee, List changes) {
        EmployeesViewImpl view = am.getEmployeesView1();
        view.setid(new BigDecimal(employee.getEmployeeId()));
        view.executeQuery();
        if ( view.hasNext()) {
          EmployeesViewRowImpl row = (EmployeesViewRowImpl)view.next();

          for (int i = 0 ; i < changes.size(); i++ ) {
              String attribute = capitalize(changes.get(i).toString());
              Object value     = employee.getAttribute(attribute);
              row.setAttribute(attribute,value);
          }
          am.getDBTransaction().commit();
          view.setid(null);
          view.executeQuery();

          return true;
        } else {
            view.setid(null);
            view.executeQuery();
            return false;
        }
    }

    public boolean delete(Employee employee) {
        EmployeesViewImpl view = am.getEmployeesView1();
        view.setid(new BigDecimal(employee.getEmployeeId()));
        view.executeQuery();
        view.setid(null);
        if ( view.hasNext()) {
          EmployeesViewRowImpl row = (EmployeesViewRowImpl)view.next();
          row.remove();
          am.getDBTransaction().commit();
          view.setid(null);
          view.executeQuery();
          return true;
        } else {
            view.setid(null);
            view.executeQuery();
            return false;
        }
    }
}
package nl.ordina.flex.adfbc;

import java.util.List;
import java.util.Collection;
import java.util.Map;

import flex.data.DataSyncException;
import flex.data.assemblers.AbstractAssembler;

public class EmployeeAssembler extends AbstractAssembler {

 public Collection fill(List fillArgs) {
  EmployeeService service = EmployeeService.getInstance();
  return service.getEmployees();
 }

 public Object getItem(Map identity) {
  EmployeeService service = EmployeeService.getInstance();
  return service.getEmployee((Integer)identity.get("employeeId"));
 }

 public void createItem(Object item) {
  EmployeeService service = EmployeeService.getInstance();
  service.create((Employee) item);
 }

 public void updateItem(Object newVersion, Object prevVersion, List changes) {
  EmployeeService service = EmployeeService.getInstance();
  boolean success = service.update((Employee) newVersion,  changes);
  if (!success) {
   Integer employeeId = ((Employee) newVersion).getEmployeeId();
   throw new DataSyncException(service.getEmployee(employeeId), changes);
  }
 }

 public void deleteItem(Object item) {
  EmployeeService service = EmployeeService.getInstance();
  boolean success = service.delete((Employee) item);
  if (!success) {
   Integer employeeId = ((Employee) item).getEmployeeId();
   throw new DataSyncException(service.getEmployee(employeeId), null);
  }
 }

}
<?xml version="1.0" encoding="UTF-8"?>
<service id="data-service"
    class="flex.data.DataService">

    <adapters>
        <adapter-definition id="actionscript" class="flex.data.adapters.ASObjectAdapter" default="true"/>
        <adapter-definition id="java-dao" class="flex.data.adapters.JavaAdapter"/>
    </adapters>

    <default-channels>
        <channel ref="my-rtmp"/>
    </default-channels>

    <destination id="employee">
        <adapter ref="java-dao" />
        <properties>
            <cache-items>false</cache-items>
            <use-transactions>false</use-transactions>
            <source>nl.ordina.flex.adfbc.EmployeeAssembler</source>
            <scope>application</scope>
            <metadata>
                <identity property="employeeId" type="java.math.BigDecimal" />
            </metadata>
            <network>
                <session-timeout>20</session-timeout>
                <paging enabled="false" pageSize="100" />
                <throttle-inbound policy="ERROR" max-frequency="500"/>
                <throttle-outbound policy="REPLACE" max-frequency="500"/>
            </network>
        </properties>
    </destination>

</service>
package
{
 import flash.display.InteractiveObject;

 [Managed]
 [RemoteClass(alias="nl.ordina.flex.adfbc.Employee")]

 public class Employee
 {
   public function Employee()
   {
   }
          public var employeeId:int;
          public var firstName:String;
          public var lastName:String;
      public var email:String;
          public var phoneNumber:String;
          public var hireDate:Date;
          public var jobId:String;
          public var salary:Number;
          public var commissionPct:Number;
          public var managerId:int;
          public var departmentId:int;
 }
}
<mx:Application xmlns:mx="http://www.adobe.com/2006/mxml"
   xmlns="*"
   width="1155" height="276"
  applicationComplete="ds.fill(employeeArray)" >

  <mx:ArrayCollection id="employeeArray"/>
  <mx:DataService id="ds" destination="employee"/>

  <Employee/>

  <mx:DataGrid dataProvider="{employeeArray}" editable="true"
     width="100%" height="100%"/>

</mx:Application>

 Now you can run LifeCycle from jdeveloper and please try the Data services features with java , hibernate or SQL adapter.
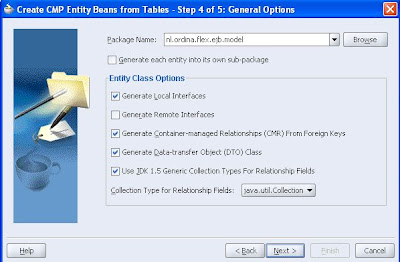
 In the model project we can create a new entity bean. I use the CMP entity bean from tables.

 Now we can create a Session Bean
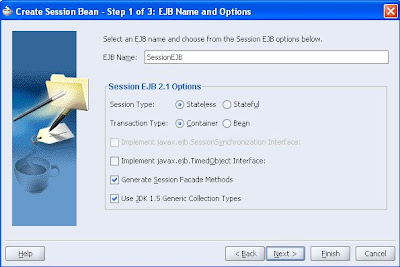 If we look at the properties of the session bean we see the retrieveAllEmployees method. We will use this to display all the employees in flex.
We are ready to add the blazeds libraries to the viewcontroller project. Because we want to use EJB, we have to download an extra library. Here is the link of the ejb library which is made by Ryan J. Norris. Add also this library to the viewcontroller project.
Because we use ejb we have to add the embedded oc4j client and j2ee library to viewcontroller project.
Now we can configure blazeds. We have to create two files (remoting-config.xml and services-config.xml ) in WEB-INF/flex/ folder
Here is the remoting-config.xml file. In this file we define a destination with the name of the session bean in the model project.
<?xml version="1.0" encoding="UTF-8"?>
<service id="remoting-service" class="flex.messaging.services.RemotingService">
    <adapters>
        <adapter-definition id="java-object"
class="flex.messaging.services.remoting.adapters.JavaAdapter"
                            default="true"/>
    </adapters>
    <default-channels>
        <channel ref="my-amf"/>
    </default-channels>
    <destination id="EmployeeEJB">
        <properties>
            <factory>ejb</factory>
            <source>SessionEJB</source>
        </properties>
    </destination>
</service>
<?xml version="1.0" encoding="UTF-8"?>
<services-config>
    <services>
        <service-include file-path="remoting-config.xml"/>
        <default-channels>
            <channel ref="my-amf"/>
        </default-channels>
    </services>
    <factories>
 <factory id="ejb" class="com.adobe.ac.ejb.EJBFactory" />
    </factories>
    <channels>
        <channel-definition id="my-amf"
                            class="mx.messaging.channels.AMFChannel">
            <endpoint url="http://{server.name}:{server.port}/{context.root}/messagebroker/amf"
                      class="flex.messaging.endpoints.AMFEndpoint"/>
            <properties>
                <polling-enabled>false</polling-enabled>
            </properties>
        </channel-definition>
    </channels>

    <logging>
        <target class="flex.messaging.log.ConsoleTarget" level="Error">
            <properties>
                <prefix>[Flex] </prefix>
                <includeDate>false</includeDate>
                <includeTime>false</includeTime>
                <includeLevel>false</includeLevel>
                <includeCategory>false</includeCategory>
            </properties>
        </target>
    </logging>
</services-config>
    <servlet>
        <servlet-name>MessageBrokerServlet</servlet-name>
        <servlet-class>flex.messaging.MessageBrokerServlet</servlet-class>
        <init-param>
            <param-name>services.configuration.file</param-name>
            <param-value>/WEB-INF/flex/services-config.xml</param-value>
       </init-param>
        <load-on-startup>1</load-on-startup>
    </servlet>

    <servlet-mapping>
        <servlet-name>MessageBrokerServlet</servlet-name>
        <url-pattern>/messagebroker/*</url-pattern>
    </servlet-mapping>

    <listener>
        <listener-class>flex.messaging.HttpFlexSession</listener-class>
    </listener>


<?xml version="1.0" encoding="utf-8"?>
<mx:Application xmlns:mx="http://www.adobe.com/2006/mxml"
 width="1155" height="206.21213">
 <mx:applicationComplete>
 srv.retrieveAllEmployees()
 </mx:applicationComplete>

  <mx:RemoteObject id="srv" showBusyCursor="true"
   destination="EmployeeEJB"/>
  <mx:DataGrid width="1104.6212"
   dataProvider="{srv.retrieveAllEmployees.lastResult}"
   height="140.98485"/>

</mx:Application>

 In this blog I will show you what you need to do to make this work. You need to know a litte bit about MDS and ADF security, for more info read my previous blog.
The ADF Query panel not only displays the attributes of the viewobject but also the viewobject criteria's. For this I created a new criteria called SalaryCriteria. To do this yourself we have to open the viewobject, go to the query part and there we see the defined criteria's. In this editor you can create a complex where clause. The bind variables you use in this criteria are displayed as search attributes in the ADF Query Panel.

 When you drag a named criteria on the jsf page you get a chioce to select a particular query panel. I now use the ADF Query Panel with Table. With Table means with a search result table.
 Here you see result when we drag the all queriable attributes named criteria from the datacontrol. Now if we want to save the search we have to use the ADF Security wizard and add security to the page definition of this search page. The last step is to configure MDS in this web application. We have to enable MDS on the viewcontroller project and pages and of course. configure adf-config.xml for MDS, you can use the adf-config of my previous blog, you only have to change the folders of the metadata path.
 When we press save in the Query Panel we get a dialog where we can save the searchIn the top right of the Query Panel you can select your own saved searches or the view criteria's
Here you see what is happening when you save a search. ADF creates a persdef folder and in this folder ADF makes a copy of the used viewobject and adds the new search criteria to it. ADF does the same thing as we did manually in the viewobject.
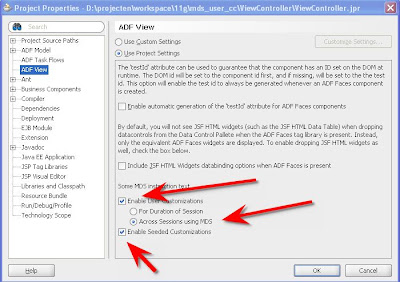 We have to enable Enable User customations then Across Sessions using MDS and at last Enable Seeded Customizations. Across sessions will store the changes in the mds repository, so the next time the user still sees the changes.
 The second thing are the customizations classes. You can use different classes at the same time. I use in this blog only one ( UserCC ) . You can also use SiteCC or SecurityRoleCC.
Now we only have to define which changes are stored in the mds repository
 In my case you can change the order of culumns in a table and the width of the column.
<?xml version="1.0" encoding="windows-1252" ?>
<adf-config xmlns="http://xmlns.oracle.com/adf/config"
            xmlns:sec="http://xmlns.oracle.com/adf/security/config">
  <sec:adf-security-child xmlns="http://xmlns.oracle.com/adf/security/config">
    <CredentialStoreContext credentialStoreClass="oracle.adf.share.security.providers.jps.CSFCredentialStore"
                            credentialStoreLocation="../../src/META-INF/jps-config.xml"/>
    <sec:JaasSecurityContext initialContextFactoryClass="oracle.adf.share.security.JAASInitialContextFactory"
                             jaasProviderClass="oracle.adf.share.security.providers.jps.JpsSecurityContext"
                             authorizationEnforce="true"
                             authenticationRequire="true"/>
  </sec:adf-security-child>
  <app-config type="MDS" name="default"
              xmlns="http://xmlns.oracle.com/adf/mds/config">
    <mds-config version="11.1.1.000" xmlns="http://xmlns.oracle.com/mds/config">
      <persistence-config>
        <metadata-namespaces>
          <namespace path="/" metadata-store-usage="one"/>
        </metadata-namespaces>
        <metadata-store-usages>
          <metadata-store-usage id="one">
            <metadata-store name="mymetadatastore"
                            class-name="oracle.mds.persistence.stores.file.FileMetadataStore">
              <property name="metadata-path"
                        value="D:/projecten/workspace/11g/mds_user_cc/ViewController/public_html;D:/projecten/workspace/11g/mds_user_cc/ViewController/adfmsrc;D:/projecten/workspace/11g/mds_user_cc/Model/src"/>
            </metadata-store>
          </metadata-store-usage>
        </metadata-store-usages>
      </persistence-config>
      <cust-config>
        <match>
          <customization-class name="oracle.adf.share.config.UserCC"/>
        </match>
      </cust-config>
    </mds-config>
  </app-config>
  <adf-faces-config xmlns="http://xmlns.oracle.com/adf/faces/config">
    <persistent-change-manager>
      <persistent-change-manager-class>
        oracle.adf.view.rich.change.MDSDocumentChangeManager
      </persistent-change-manager-class>
    </persistent-change-manager>
    <taglib-config>
      <taglib uri="http://xmlns.oracle.com/adf/faces/rich">
        <tag name="column">
          <attribute name="displayIndex">
            <persist-changes>true</persist-changes>
          </attribute>
          <attribute name="width">
            <persist-changes>true</persist-changes>
          </attribute>
        </tag>
      </taglib>
    </taglib-config>
  </adf-faces-config>
</adf-config>


