Pages

Wednesday, April 28, 2010

EJB injection in a JSF Managed Bean

EJB injection in a managed bean of a JSF application deployed on a Weblogic Server can be tricky, Lucas already made a good  blogpost about this subject and provided a workaround. In this blogpost I will show how you can inject a local and remote EJB Session Bean which are deployed with the Web Archive (WAR) in one Enterprise Archive ( EAR) and I injected a remote EJB deployed with a different EAR.
The First and most important step is It only works when you define the Managed Bean in the faces-config.xml and not as an ADF Managed Bean ( like in an unbounded or bounded Task Flow xml )
Here an example of a managed bean configuration
<?xml version="1.0" encoding="windows-1252"?>
<faces-config version="1.2" xmlns="http://java.sun.com/xml/ns/javaee">
  <application>
    <default-render-kit-id>oracle.adf.rich</default-render-kit-id>
  </application>
  <managed-bean id="__2">
    <managed-bean-name id="__1">Injection</managed-bean-name>
    <managed-bean-class id="__4">nl.whitehorses.ejb.beans.InjectionBean</managed-bean-class>
    <managed-bean-scope id="__3">request</managed-bean-scope>
  </managed-bean>

</faces-config>
Here an example of the Local and Remote bean which I used in the managed bean
EJB with Remote interface
@Stateless(name = "HrSessionEJB1", mappedName = "EjbInjection-Model-HrSessionEJB1")
@Remote
public class HrSessionEJB1Bean implements HrSessionEJB1 {
    @PersistenceContext(unitName="Model")
    private EntityManager em;
EJB with Local interface
@Stateless(name = "HrSessionEJB2", mappedName = "EjbInjection-Model-HrSessionEJB2")
@Local
public class HrSessionEJB2Bean implements HrSessionEJB2Local {
    @PersistenceContext(unitName="Model")
    private EntityManager em;
Before you deploy the JSF web application on a Weblogic Server you need to make an EJB deployment profile of your EJB model project and add this to the EAR assembly in the application menu of your Workspace. This is not necessary when you run it in the integrated Weblogic Server of JDeveloper.

Here is my example of a managed bean.
package nl.whitehorses.ejb.beans;


import javax.ejb.EJB;
import javax.faces.event.ActionEvent;
import nl.whitehorses.ejb.injection.model.HrSessionEJB1;
import nl.whitehorses.ejb.injection.model.HrSessionEJB2Local;

import nl.whitehorses.model.HRSessionEJB;

public class InjectionBean {
    public InjectionBean() {
    }

    @EJB
    private HrSessionEJB1 hrRemote;

    @EJB (name = "HrSessionEJB1", mappedName = "EjbInjection-Model-HrSessionEJB1")
    private HrSessionEJB1 hrRemote2;

    @EJB( beanName="../hrejb.jar#HrSessionEJB2") 
    private HrSessionEJB2Local hrLocal;

    private HRSessionEJB hrSessionEJB;


    public void inject(ActionEvent actionEvent) {
      // Add event code here...
      if ( hrSessionEJB != null)  {
        System.out.println("found remote bean outside ear");
      }
      if ( hrRemote != null)  {
        System.out.println("found remote bean");
      }
      if ( hrRemote != null)  {
        System.out.println("found remote bean2");
      }
      if ( hrLocal != null)  {
        System.out.println("found local bean");
      }        
    }
}
When you deploy the EJB deployment profile in the same EAR as the WAR then you can use the @EJB annotation on your local or remote interface variable. As extra you can add the name and mappedName attribute, these values are the same as the attributes of the Stateless annotation of your Session Bean.

An other not recomended way is to provide the beanName attribute and provide the EJB deployment jar location on the WLS server together with a hash and the name of the Bean. Don't know if this works on your integrated Weblogic server of JDeveloper.

And the last way to inject a Remote EJB is to define an ejb-ref element in the web.xml with the injection managed bean class and the variable inside this class and weblogic.xml for the JNDI name of the Remote EJB. This works perfectly when the Remote EJB is not deployed in the same EAR as the Web Application.
<ejb-ref>
        <ejb-ref-name>ejb/HRSessionEJB</ejb-ref-name>
        <ejb-ref-type>Session</ejb-ref-type>
        <remote>nl.whitehorses.model.HRSessionEJB</remote>
        <injection-target>
           <injection-target-class>nl.whitehorses.ejb.beans.InjectionBean</injection-target-class>
           <injection-target-name>hrSessionEJB</injection-target-name>
        </injection-target>
    </ejb-ref>  
</web-app>

And the weblogix.xml with the JNDI name
<?xml version = '1.0' encoding = 'windows-1252'?>
<weblogic-web-app xmlns:xsi="http://www.w3.org/2001/XMLSchema-instance"
                  xsi:schemaLocation="http://www.bea.com/ns/weblogic/weblogic-web-app http://www.bea.com/ns/weblogic/weblogic-web-app/1.0/weblogic-web-app.xsd"
                  xmlns="http://www.bea.com/ns/weblogic/weblogic-web-app">
  <ejb-reference-description>
    <ejb-ref-name>ejb/HRSessionEJB</ejb-ref-name>
    <jndi-name>ADF_EJB-SessionEJB#nl.whitehorses.model.HRSessionEJB</jndi-name>
  </ejb-reference-description>
</weblogic-web-app>
Hope this also works in an ADF Managed Bean soon, it should, but I tested it with JDeveloper 11g PS2 without any success.
Saturday, April 24, 2010

Super fast JPA with MySQL Cluster and with no JDBC or SQL

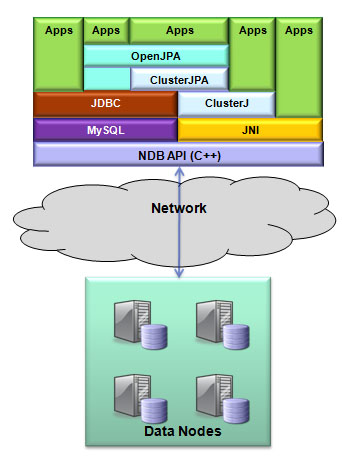
With Oracle / Sun MySQL Cluster 7.1 is it now possible to use JPA and without a JDBC driver and without any SQL conversion, this will give your java application or web application a great performance boot. With the 7.1 version you can use the ClusterJPA and ClusterJ libraries instead of the MySQL JDBC Driver. And the best thing, you still can use the JDBC driver or mysql utility. ( Best of both worlds )
With ClusterJPA is a query in this already fast memory cluster two times faster and an insert, update or delete at least three times faster. And the ClusterJPA library is cluster aware so no need for a Multi Datasource in Weblogic.
Ocklin's Blog and Andrew Morgan’s MySQL Cluster Database Blog already made some great articles about OpenJPA and MySQL Cluster 7.1 In my blog I go a little further by making a more complex example and deploy it in an EJB Session Bean on a Weblogic 10.3.2 ( WLS FMW 11g ) .server

I started with installing on  two machines Oracle Enterprise Linux version 5.5 ( Oracle edelivery ). Download in my case all the 32 bits Red Hat RPM's of the MySQL Cluster Community Edition. Install these packages on both servers and configure the cluster. it took me 30 minutes. I love this cluster , fast and easy.
ClusterJPA only supports for now, the Apache OpenJPA persistence.Oracle is working on other implementations like eclipselink / hibernate. You need to download the latest 1.2 release of OpenJPA ( I just 1.2.2 ) Version 2.0 is not working yet. Download the latest MySQL Connector/J jar and the ClusterJPA / ClusterJ jars from one of your Linux servers ( located in /usr/share/mysql/java/ ). And the last part is optional when your Weblogic server is also running on one of these linux servers. I am using JDeveloper 11g on my windows laptop so I also need to download the mysql cluster edition for Windows ( Windows edition is new ). I need the ndbclient.dll from the mysql lib folder and put this in one of my path folders.

open mysql  and create a clusterdb database: create database clusterdb;
create a test user on both mysql nodes: grant all on clusterdb.* to test@'%' identified by 'test';

I use JDeveloper 11g as my IDE so I first need to create a new java Application and add the following libraries to your project.


Next step is to create a persistence.xml which must be located in the META-INF folder. I add two persistence units one for the java application and one which uses the Weblogic JTA.
<persistence xmlns="http://java.sun.com/xml/ns/persistence" xmlns:xsi="http://www.w3.org/2001/XMLSchema-instance" version="1.0">
 <persistence-unit name="clusterdb" transaction-type="RESOURCE_LOCAL">
  <provider>org.apache.openjpa.persistence.PersistenceProviderImpl</provider>
  <class>nl.whitehorses.openjpa.mysql.cluster.entities.Employee</class>
  <class>nl.whitehorses.openjpa.mysql.cluster.entities.Department</class>
  <properties>
   <property name="openjpa.jdbc.SynchronizeMappings" value="buildSchema" />
   <property name="openjpa.ConnectionDriverName" value="com.mysql.jdbc.Driver" />
   <property name="openjpa.ConnectionURL" value="jdbc:mysql://10.10.10.50:3306/clusterdb" />
   <property name="openjpa.ConnectionUserName" value="test" />
   <property name="openjpa.ConnectionPassword" value="test" />
   <property name="openjpa.BrokerFactory" value="com.mysql.clusterj.openjpa.NdbOpenJPABrokerFactory" />
   <property name="openjpa.jdbc.DBDictionary" value="TableType=ndbcluster" />
   <property name="openjpa.ndb.connectString" value="10.10.10.50:1186" />
   <property name="openjpa.ndb.database" value="clusterdb" />
  </properties>
 </persistence-unit>
<persistence-unit name="clusterdbJTA" transaction-type="JTA"  >
  <provider>org.apache.openjpa.persistence.PersistenceProviderImpl</provider>
  <class>nl.whitehorses.openjpa.mysql.cluster.entities.Employee</class>
  <class>nl.whitehorses.openjpa.mysql.cluster.entities.Department</class>
  <properties>
   <property name="openjpa.jdbc.SynchronizeMappings" value="buildSchema" />
   <property name="openjpa.ConnectionDriverName" value="com.mysql.jdbc.Driver" />
   <property name="openjpa.ConnectionURL" value="jdbc:mysql://10.10.10.50:3306/clusterdb" />
   <property name="openjpa.ConnectionUserName" value="test" />
   <property name="openjpa.ConnectionPassword" value="test" />
   <property name="openjpa.BrokerFactory" value="com.mysql.clusterj.openjpa.NdbOpenJPABrokerFactory" />
   <property name="openjpa.jdbc.DBDictionary" value="TableType=ndbcluster" />
   <property name="openjpa.ndb.connectString" value="10.10.10.50:1186" />
   <property name="openjpa.ndb.database" value="clusterdb" />
  </properties>
 </persistence-unit>
</persistence>
The openjpa.ndb.connectString property need to have the management server url value.

Now you can create the example Entities: Department and Employee. You dont need to create these tables with mysql. ClusterJPA will do this for you.
the Department entity
package nl.whitehorses.openjpa.mysql.cluster.entities;

import java.io.Serializable;
import java.util.List;
import javax.persistence.*;

@NamedQueries({
   @NamedQuery(name = "Departments.findAll", query = "select o from department o")
,  @NamedQuery(name = "Departments.findByKey", query = "select o from department o where o.Id = :dept ")

})@Entity(name = "department")
public class Department implements Serializable {

    private int version;
    private int Id;
    private String Site;

    List<Employee> employees;


    public Department() {
    }


    @OneToMany(targetEntity = Employee.class, cascade = CascadeType.ALL,
               mappedBy = "department")
    public List<Employee> getEmployees() {
        return employees;
    }

    public void setEmployees(List<Employee> employees) {
        this.employees = employees;
    }


    @Id
    public int getId() {
        return Id;
    }

    public void setId(int id) {
        Id = id;
    }

    @Column(name = "location")
    public String getSite() {
        return Site;
    }

    public void setSite(String site) {
        Site = site;
    }

    @Version
    @Column(name = "version_field")
    // not required
    public int getVersion() {
        return version;
    }

    public void setVersion(int version) {
        this.version = version;
    }


    public String toString() {
        return "Department: " + getId() + " based in " + getSite();
    }
}
the Employee entity
package nl.whitehorses.openjpa.mysql.cluster.entities;

import java.io.Serializable;
import javax.persistence.*;

@Entity(name = "employee") //Name of the table
public class Employee implements Serializable {
    private int version;
    private int Id;
    private String First;
    private String Last;
    private String City;
    private String Started;
    private String Ended;
    protected  Department department;


    public Employee() {
    }

    @ManyToOne
    @JoinColumn(name="department", nullable=false)
    public Department getDepartment()
    {
        return department;
    }

    public void setDepartment(Department department)
    {
        this.department = department;
    }


    @Id
    public int getId() {
        return Id;
    }

    public void setId(int id) {
        Id = id;
    }

    public String getFirst() {
        return First;
    }

    public void setFirst(String first) {
        First = first;
    }

    public String getLast() {
        return Last;
    }

    public void setLast(String last) {
        Last = last;
    }

    @Column(name = "municipality")
    public String getCity() {
        return City;
    }

    public void setCity(String city) {
        City = city;
    }

    public String getStarted() {
        return Started;
    }

    public void setStarted(String date) {
        Started = date;
    }

    public String getEnded() {
        return Ended;
    }

    public void setEnded(String date) {
        Ended = date;
    }

    @Version
    @Column(name = "version_field")
    // not required
    public int getVersion() {
        return version;
    }

    public void setVersion(int version) {
        this.version = version;
    }


    public String toString() {
        return getFirst() + " " + getLast() + " (Dept " + getDepartment() +
            ") from " + getCity() + " started on " + getStarted() +
            " & left on " + getEnded();
    }
}
Now you can add a test class so you can test this. This will create the tables and add a department with an employee. Make sure you add the ndbclient library to your java path.
package nl.whitehorses.openjpa.mysql.test;

import java.util.List;

import javax.persistence.EntityManager;
import javax.persistence.EntityManagerFactory;
import javax.persistence.EntityTransaction;
import javax.persistence.Persistence;
import javax.persistence.Query;

import nl.whitehorses.openjpa.mysql.cluster.entities.Department;
import nl.whitehorses.openjpa.mysql.cluster.entities.Employee;

public class Main {

    public static void main(String[] args) throws java.io.IOException {

        EntityManagerFactory entityManagerFactory =
            Persistence.createEntityManagerFactory("clusterdb");
        EntityManager em = entityManagerFactory.createEntityManager();
        EntityTransaction userTransaction = em.getTransaction();

        userTransaction.begin();

        Department sales = em.find(Department.class, 10);
        if ( sales == null) {
            System.out.println("Create sales department");
            sales = new Department();
            sales.setId(10);
            sales.setSite("Amsterdam");
            sales.setEmployees(null);
            em.persist(sales);
        } else {
            System.out.println("Found sales department");
        }
        userTransaction.commit();

        userTransaction.begin();
        Employee edwin = em.find(Employee.class, 1);
        if ( edwin == null) {
            System.out.println("Create employee edwin");
            edwin = new Employee();
            edwin.setId(1);
            edwin.setDepartment(sales);
            edwin.setFirst("Edwin");
            edwin.setLast("Biemond");
            em.persist(edwin);
        } else {
            System.out.println("Found employee edwin");
        }
        userTransaction.commit();


        Query q = em.createQuery("select x from department x where x.id=10");
        for (Department dep : (List<Department>)q.getResultList()) {
            System.out.println(dep.toString());
            for (Employee emp : dep.getEmployees()) {
                System.out.println(emp.toString());
            }
         }

        em.close();
        entityManagerFactory.close();
    }
}

The next step is to make an EJB Session Bean with a remote interface where we do the same as the java test client.
package nl.whitehorses.openjpa.mysql.cluster.session;

import java.util.List;

import javax.ejb.Remote;
import javax.ejb.Stateless;

import javax.persistence.EntityManager;
import javax.persistence.PersistenceContext;

import nl.whitehorses.openjpa.mysql.cluster.entities.Department;

@Stateless(name = "HrSessionEJB", mappedName = "OpenJPACluster-model-HrSessionEJB")
@Remote
public class HrSessionEJBBean implements HrSessionEJB {
    public HrSessionEJBBean() {
    }
    @PersistenceContext(unitName="clusterdbJTA")

    private EntityManager em;


    public Object mergeEntity(Object entity) {
        return em.merge(entity);
    }

    public Object persistEntity(Object entity) {
        em.persist(entity);
        return entity;
    }

    public List<Department> getDepartmentsFindAll() {
        return em.createNamedQuery("Departments.findAll").getResultList();
    }

    public Department getDepartmentFindByKey(int dept) {
        return (Department)em.createNamedQuery("Departments.findByKey").setParameter("dept", dept).getSingleResult();
    }

}
Make a EJB deployment profile and an application deployment profile (EAR) where you also include the OpenJPA and MySQL jars.

With Weblogic 10.3 and higher, Oracle replaced the default JPA provider with Eclipselink. So when you deploy this to a Weblogic 10.3 server, this will not work with Apache OpenJPA. So you need to add an weblogic deployment descriptor ( weblogic-application.xml). With this you can control the class loading.
<?xml version = '1.0' encoding = 'windows-1252'?>
<weblogic-application xmlns:xsi="http://www.w3.org/2001/XMLSchema-instance"
                      xsi:schemaLocation="http://www.bea.com/ns/weblogic/weblogic-application http://www.bea.com/ns/weblogic/weblogic-application/1.0/weblogic-application.xsd"
                      xmlns="http://www.bea.com/ns/weblogic/weblogic-application">
  <prefer-application-packages>
    <package-name>com.mysql.*</package-name>
    <package-name>org.apache.*</package-name>
  </prefer-application-packages>
</weblogic-application>
Before you can test it you need to add the ndbclient.dll to a weblogic path. ( wlserver_10.3\server\native\win\32 )
and the part is the EJB Session bean client.
package nl.whitehorses.openjpa.mysql.cluster;

import java.util.Hashtable;
import java.util.List;

import javax.naming.Context;
import javax.naming.InitialContext;

import javax.naming.NamingException;

import nl.whitehorses.openjpa.mysql.cluster.entities.Department;
import nl.whitehorses.openjpa.mysql.cluster.session.HrSessionEJB;

public class HrSessionEJBClient {

    private static Context getInitialContext() throws NamingException {
        Hashtable env = new Hashtable();
        // WebLogic Server 10.x connection details
        env.put( Context.INITIAL_CONTEXT_FACTORY, "weblogic.jndi.WLInitialContextFactory" );
        env.put(Context.PROVIDER_URL, "t3://localhost:7101");
        return new InitialContext( env );
    }

    public static void main(String [] args) {
        try {
            final Context context =  getInitialContext();

            HrSessionEJB hRSessionEJB = (HrSessionEJB)
                context.lookup("OpenJPACluster-model-HrSessionEJB#nl.whitehorses.openjpa.mysql.cluster.session.HrSessionEJB");
            for (Department departments : (List<Department>)hRSessionEJB.getDepartmentsFindAll()) {
                System.out.println( "department = " + departments.getId());
                System.out.println( "location = " + departments.getSite());
                System.out.println( "employeesList = " + departments.getEmployees() );
            }

        } catch (Exception ex) {
            ex.printStackTrace();
        }
    }

}

Thats all, here you can download my JDeveloper 11g Workspace.

Saturday, April 17, 2010

High Availability Load Balancer for Weblogic Cluster

Oracle Weblogic Application Server has a lot of features to make your Web Applications or Web Services Scalable and High Available. To achieve Scalability you can add managed servers to a WLS cluster and High Availability can be achieved by Server and Service migration. The only thing Weblogic does not provide for you is a one shared IP address for the outside HTTP world. You don't want the user or application connect to one specific managed server of the cluster. For this Oracle made a mod plugin for Apache which can listen on one address and redirect the http request to one of the managed server in a cluster. Ok this is fine but this can be your new single point of failure. So you need some software which can monitor for example the apache process, when it fails this software needs to switch the ip address to the other server so that apache server can do the work. Off course this is also possible in hardware but this in this blog I will show you how this can be done with opensource Linux software.When you have Windows Server then Microsoft NLB can also do this for you.

Required Software
I got this working with Oracle Enterprise Linux 5.5 ( get it from edelivery ) and I installed with all the OEL options  ( Development , Cluster , Web etc ). When you do this you will have all the required libraries and tools to compile the required software. This also provides the Apache Web Servers.
HAProxy is a free very fast and reliable solution offering high availability, load balancing, and proxying for TCP and HTTP-based applications. It is particularly suited for web sites crawling under very high loads while needing persistence or Layer7 processing.
Keepalived this linux program can monitor HAProxy and can switch the shared ip address so that the requests are handled by the second server.
This is a picture of my Weblogic configuration.
Before you begin you need to install Weblogic software ( on both servers ) and configure a Weblogic Domain with a Admin server and a cluster with two managed servers. And off course the Weblogic nodemanagers.

First step is to configure apache on both machines.
You should be root to do this.
Copy the weblogic apache mod to the apache module folder.
cp /WLSHOME/wlserver_10.3/server/plugin/linux/i686/*.so /etc/httpd/modules

Change the httpd.conf
vi /etc/httpd/conf/httpd.conf
Add the module in the module section.
LoadModule weblogic_module modules/mod_wl_22.so

provide the ip addresses and port number of the managed servers in the cluster
<IfModule mod_weblogic.c>
  WebLogicCluster 10.10.10.150:7001,10.10.10.151:7001
</IfModule>


this redirect everything else use /weblogic instead of /

<Location / >
  SetHandler weblogic-handler
</Location>

Start apache on both servers.
cd /usr/sbin
./apachectl start


test it on both servers, check if you can invoke a Web Service or open a Web application on the Apache port number.

The next step is to install and configure HAProxy
Download the latest HAProxy source from http://haproxy.1wt.eu/#down
You should be root to do this.

unzip the source
gunzip  haproxy-1.4.4.tar.gz
tar xvf  haproxy-1.4.4.tar
cd haproxy-1.4.4


Compile HAProxy
make TARGET=linux26 CPU=generic


Copy the haproxy executable to both OEL servers ( /usr/sbin )
cp haproxy /usr/sbin/

Check haproxy by retrieving the version
./haproxy -v

Create the haproxy user and group, you can do this in OEL ( on both servers )

Make the haproxy config file. ( on both servers )
vi /etc/haproxy.cnf
##### begin #####
global
        log     127.0.0.1   local0
        log     127.0.0.1   local1 notice
        maxconn 4096
        user      haproxy
        group   haproxy

defaults
    log              global
    mode          http
    option         httplog
    option         dontlognull
    option         redispatch
    retries         3
    maxconn      2000
    contimeout   5000
    clitimeout     50000
    srvtimeout    50000

listen wlsproxy 10.10.10.40:80
       mode http
       balance roundrobin
       stats enable
       stats auth weblogic:weblogic1
       cookie  JSESSIONID prefix
       option  httpclose
       option  forwardfor
       server  wls1 10.10.10.50:81 cookie wls1 check
       server  wls2 10.10.10.51:81 cookie wsl2 check
##### end #####

10.10.10.40:80 is the shared VIP ip address and 10.10.10.50:81 is one of the Apache server.
stats enable and stats auth weblogic:weblogic1 enables the HAProxy status application with weblogic as username and weblogic1 as password.


Install and configure Keepalived
Download the latest source from http://www.keepalived.org/download.html
You should be root to do this.

Unzip the source
gunzip keepalived-1.1.19.tar.gz
tar xvf keepalived-1.1.19.tar
cd keepalived-1.1.19


Compile and install Keepalived
./configure
make
make install


Because Keepalived uses a shared ip address you need to add a kernel parameter ( on both servers )
vi /etc/sysctl.conf
Add this line to sysctl.conf
net.ipv4.ip_nonlocal_bind=1


Reload the kernel parameters
sysctl -p

Copy these files to both OEL servers
cp /usr/local/sbin/keepalived /usr/sbin
cp /usr/local/etc/rc.d/init.d/keepalived /etc/init.d/
cp /usr/local/etc/sysconfig/keepalived /etc/sysconfig/


Add the keepalived configuration files and do this on both servers
mkdir /etc/keepalived
vi /etc/keepalived/keepalived.conf

##### begin ######
vrrp_script chk_haproxy {          # Requires keepalived-1.1.13
        script "killall -0 haproxy"     # cheaper than pidof
        interval 2                            # check every 2 seconds
        weight 2                             # add 2 points of prio if OK
    }

    vrrp_instance VI_1 {
        interface eth0
        state MASTER
        virtual_router_id 51
        priority 101                    # 101 on master, 100 on backup
        virtual_ipaddress {
            10.10.10.40
        }
        track_script {
            chk_haproxy
        }
    }
##### end #####


You have to decide which server is your primary http server, this one need to have priority 101 and the other priority 100.


Starting and testing load balancing and failover

Start on both servers haproxy
cd /usr/sbin
./haproxy -f /etc/haproxy.cnf

Start on both servers keepalived
cd /etc/init.d
./keepalived start


Now you can check on both servers if the shared ip address is only mapped on the primary server.
ip addr sh eth0

on the primary server
[root@wls1 init.d]# ip addr sh eth0
2: eth0: mtu 1500 qdisc pfifo_fast qlen 1000
    link/ether 08:00:27:3f:68:d6 brd ff:ff:ff:ff:ff:ff
    inet 10.10.10.50/24 brd 10.10.10.255 scope global eth0
    inet 10.10.10.40/32 scope global eth0
    inet6 fe80::a00:27ff:fe3f:68d6/64 scope link
       valid_lft forever preferred_lft forever


on the slave
 [root@wls2 init.d]# ip addr sh eth0
2: eth0: mtu 1500 qdisc pfifo_fast qlen 1000
    link/ether 08:00:27:d1:f2:c0 brd ff:ff:ff:ff:ff:ff
    inet 10.10.10.51/24 brd 10.10.10.255 scope global eth0
    inet6 fe80::a00:27ff:fed1:f2c0/64 scope link
       valid_lft forever preferred_lft forever

On the primary server you can kill the haproxy process and this will failover the shared ip address to the slave. When you start haproxy on the master then the ip address will be moved back to the master.

The last thing you can check is the haproxy status application. Go to http://10.10.10.40/haproxy?stats and log in as weblogic with password weblogic1.
Here a picture of the status application.

Tuesday, April 13, 2010

Resetting Weblogic datasources with ANT

When you are working with Weblogic JDBC Datasources for example in a Web Application, EJB or in an AQ or Database resource adapter then there is a possibility that the database sessions are in an invalid state when you change something like a package or object type in the database. This can be solved by restarting all the managed servers, reset all the Datasources in the Weblogic console or use this ANT or WLST script. This script is an ANT file where I use the WLST ANT task to fire some wlst and phyton commandos.
This ANT target works fast and can be easily integrated in your deployed script.

the reset.xml ANT build file.
<?xml version="1.0" encoding="iso-8859-1"?>
<project name="resetAllDatasources" default="resetJDBC">

  <target name="resetJDBC">
   <property name="admin.User" value="weblogic"/>
   <property name="admin.Password" value="weblogic1"/>
   <property name="admin.Url" value="localhost"/>
   <property name="admin.Port" value="7101"/>
   <property name="admin.ServerTarget" value="DefaultServer"/>

   <property name="datasources" value="hrDS,scottDS"/>

    <wlResetDatasource adminUser="${admin.User}" 
            adminPassword="${admin.Password}" 
            adminUrl="${admin.Url}" 
            adminPort="${admin.Port}" 
            serverTarget="${admin.ServerTarget}" 
            datasourceNames="${datasources}"/>

  </target>

 <macrodef name="wlResetDatasource">
  <attribute name="adminUser"/>
  <attribute name="adminPassword"/>
  <attribute name="adminUrl"/>
  <attribute name="adminPort"/>
  <attribute name="serverTarget"/>
  <attribute name="datasourceNames"/>
  <sequential>
    <wlst failonerror="true" debug="true" arguments="@{adminUser} @{adminPassword} @{adminUrl} @{adminPort} @{serverTarget} @{datasourceNames}">
      <script>
          adminUser=sys.argv[0]
          adminPassword=sys.argv[1]
          adminUrl="t3://"+sys.argv[2]+":"+sys.argv[3]
          serverTarget=sys.argv[4]
          datasourceNames=String(sys.argv[5]).split(",")
          connect(adminUser,adminPassword,adminUrl)
          print 'all datasource: '+sys.argv[5]
          domainRuntime()
          for datasourceName in datasourceNames:
           print 'resetting datasource: '+datasourceName
           cd('/')
           cd('ServerRuntimes/'+serverTarget+'/JDBCServiceRuntime/'+serverTarget+'/JDBCDataSourceRuntimeMBeans/'+datasourceName)
           objs = jarray.array([], java.lang.Object)
           strs = jarray.array([], java.lang.String)
           invoke('reset', objs, strs)
      </script>
    </wlst>
  </sequential>
 </macrodef>

</project>
And the windows bat file to startup the ANT target. I only need a ANT home and the weblogic.jar
set ORACLE_HOME=C:\oracle\MiddlewareJdev11gR1PS1
set ANT_HOME=%ORACLE_HOME%\jdeveloper\ant
set PATH=%ANT_HOME%\bin;%PATH%
set JAVA_HOME=%ORACLE_HOME%\jdk160_14_R27.6.5-32
set ANT_OPTS=%ANT_OPTS% -XX:MaxPermSize=128m

set CLASSPATH=%CLASSPATH%;%ORACLE_HOME%\wlserver_10.3\server\lib\weblogic.jar

ant -f reset.xml
I also made a WLST script which automatically finds the managed servers in the connected domains and resets the user created datasources ( I skipped the Soa datasource )
domainRuntime()

drs = ObjectName("com.bea:Name=DomainRuntimeService,Type=weblogic.management.mbeanservers.domainruntime.DomainRuntimeServiceMBean"); 
domainconfig =  mbs.getAttribute(drs, "DomainConfiguration");
servers = mbs.getAttribute(domainconfig, "Servers"); 
for server in servers:
  serverName = mbs.getAttribute(server,'Name')
  print 'server: '+serverName
  if serverName == "AdminServer":
    print 'server skipped'
  else:
    dsBean = ObjectName('com.bea:ServerRuntime='+serverName+',Name='+serverName+',Location='+serverName+',Type=JDBCServiceRuntime')
    if dsBean is None:
      print 'not found'
    else:
      datasourceObjects = mbs.getAttribute(dsBean, 'JDBCDataSourceRuntimeMBeans')  
      for datasourceObject in datasourceObjects:
        if datasourceObject is None:
          print 'datasource not found'
        else:
          Name = mbs.getAttribute(datasourceObject,'Name')
          x = Name.find("SRA",0,3 )
          if ( Name.find("SOA",0,3 ) == -1 and Name.find("mds",0,3 ) == -1 and Name.find("EDN",0,3 ) == -1 and Name.find("BAM",0,3 ) == -1 and Name.find("Ora",0,3 ) == -1):  
            mbs.invoke(datasourceObject, 'reset',None,None)  
            print 'reset: '+Name

Thursday, April 8, 2010

ADF Task Flow interaction with WebCenter Composer

When You use JDeveloper 11g and ADF you probably made some independent Task Flows. To use these Task Flows you must add them as regions in your JSPX page or in an UIShell template page. The second step is  to provide the right input parameters or use contextual Events so the Task Flows will display the right data. For events you need to publish events from the Task Flows and in the JSPX page you need to subscribe to these events and invoke a ADF Method Action in a other Task Flow.
With WebCenter Composer you can do this at runtime, and change this for example in production without to program any code. In this blog I will show you how you can achieve this.
I made two TF and the first will have an input parameter and this value will be displayed in a view. This TF will also publish a simple event with a string payload and a complex event with a Map payload. The Second TF has two ADF Method Actions which can be used for the simple and complex event.
In the customizable WebCenter page you can add these Task Flows from the catalog, provide the input parameter for the First TF and intercepts the events and invoke the Method Actions of the Second TF.
Here is a screenshot of the final Webcenter page.


First step, Making the ADF Task Flow Fragments with input parameter and contextual events
Create Fusion Web Application and add the first ADF Task Flow. This must be a bounded TF with Page Fragments.

Add an input parameter to this TF.

Add a view and create the page fragment. In the view you will display the input parameter.
For the contextual Events you can use this Java Class and you need to generate a Data Control on this java class so you can use this in ADF.
package nl.whitehorses.webcenter.taskflows.view;

import java.util.HashMap;
import java.util.Map;

public class Events {
    public Events() {
        super();
    }

    public String fireEvents(String parameter) {
        System.out.println("fire event with parameter: " + parameter);
        return parameter;
    }

    public Map<String, Object> fireComplexEvent() {
        System.out.println("fire complex event ");
        Map<String, Object> eventData = new HashMap<String, Object>();
        eventData.put("text1", "hello");
        eventData.put("text2", "hello2");
        return eventData;
    }


    public String captureEvents(String parameter) {
        System.out.println("capture event with parameter: " + parameter);
        return parameter;
    }

    public String captureComplexEvents(Object parameter) {
        System.out.println("capture complex event");
        Map<String, Object> eventData = (Map<String, Object>)parameter;
        return (String)eventData.get("text1") + " / " +
            (String)eventData.get("text2");
    }

}
Generate a Data Control.
Open the Data Controls window so you can drag the methods on the page.
First drag the parameter of the fireEvents method on the page as an inputtext component, after this drag the fireEvents method on the page (a Button ). Do the same with the fireComplexEvent method ( Only a button, no parameters. ) JDeveloper will also add the Method Actions of the Data Control to the page definition.

Select the first button and go to the property window, to add a new Event on this button.

Do the same for the other button. JDeveloper will add an event to the Method actions in the page definitions.


Create the second bounded Task Flow with page fragment, add a view and create the page fragment. In this fragment you need to drag the return values of the captureEvents and captureComplexEvents methods. No need to provide the input parameters. The event handler will do this for you.


This is the layout of the Second TF.

Last step in this project to make an ADF Library Deployment.

And deploy the ADF library to a jar.

Second Step, The WebCenter Project
For this step you need to have the WebCenter plugin ( Add this from the JDeveloper Update ).
Create a WebCenter project


Create an JSPX page where you will add the customizable page, panel and link component.

The customizable webcenter components are located in the Oracle Composer section.


The page looks like this.

The last step before you can run this WebCenter application is to add the Task Flows to the Composer Catalog so you can use this at Runtime.

Add an File Location in your Resource Pallette to your ADF library folder.
Select the first TF and use the right button to generate a catalog reference.
Open the default-catalog.xml in the mds folder located at the application home folder.

Add the catalog reference to this file and do the same for the second TF.

Add the ADF library to the WebCenter project.

Third Step, configure the WebCenter page.
Run the WebCenter application and press the edit button. This will open the design view.
Select the Task Flows from the catalog and add them to the page.
It will look like this and press the small edit button of the first TF.
Add an value to the input parameter
Close the dialog and press the edit button of the Second TF. Here you select the events of the First TF and select the Method actions of the Second TF. Go to the Events Tab and select the simpleEvent and the captureEvents Action. Enable this and use ${payLoad} as parameter value.
Do the same for the complex event and leave the Edit mode. You will see this as result.

That's all.

Here you can download the two applications.