Pages

Tuesday, December 29, 2009

Using Oracle Service Registry in Soa Suite 11g

Oracle released a new version of Oracle Service Registry and this 11.1.1.2.0 version is compatible with Soa Suite 11g. In this blog I will show you, how you can use the OSR UDDI Services in Soa Suite 11G. Basically this are steps I did in this blog. Start with installing OSR , Make an UDDI connection in JDeveloper, Add a Business Entity in the OSR, Publish a Soa Web Service to the UDDI registry ( We will do this in JDeveloper ) , Use this Web Service UDDI reference in an other composite and configure the Soa Suite so it can lookup this service in the UDDI registry.

We start by downloading OSR and Oracle Weblogic 11G ( 10.3.2 or 10.3.1 ) .
Install Oracle Weblogic and unpack the OSR zip. Open command and set the java home and path.

set JAVA_HOME=c:\oracle\wls1032\jdk160_14_R27.6.5-32
set PATH=%JAVA_HOME%\bin;%PATH%
java -jar oracle-service-registry-11.1.1.jar

I choose for a standalone registry

We need to install OSR in a folder located in the Weblogic 10.3.2 middleware home.

OSR need to have a repository

I decided to use a datasource for connecting to the OSR repository

I select the domain option, this will create a new Weblogic domain template.

We are finished with installing OSR and now we can create a new Weblogic domain. Start the configuration wizard. We need to select the Oracle Service Registry Option.

When you install OSR on the same server as your Soa Suite server then you can better change the port number of the adminserver else you can get port conflicts and or config.xml corruption.

Start the OSR admin server ( startWeblogic.cmd in your domain home ) and from the domain bin folder we can start the OSR server( startManagedWeblogic osr_server1 )

Start JDeveloper 11g R1 PS1 and add a new UDDI Registry Connection. We need to provide the UDDIv2 inquiry url ( http://server:7101/registry/uddi/inquiry)

In the resource palette we can see the created UDDI Server.

To fill this registry we need to create our own Business entity. Go the registry control console ( http://laptopedwin.wh.lan:7101/registry/uddi/web )


We can go back to JDeveloper resource palette and open the Soa application server connection. Open the right composite application and select the Web service we want to publish to the OSR. Use the right mouse button and select publish WSDL to UDDI.

Provide the username and password and select your own Business Entity.

When we refresh the OSR UDDI connection we can see the Service under the business entity.

To get more UDDI information over this service we can select the service and use the right mouse button to generate a report.

We are ready to use this UDDI service in a composite application. Add the Web Service adapter to the composite and we will lookup the WSDL in the resource palette. Go to the OSR Registry connection and select the service under the Business Entity

We need to choose if we want to lookup this web service for every soa instance in the UDDI server or only once during deployment.
This is how the ws binding looks like in the composite.xml, No hard coded endpoints.

<reference name="HelloService" ui:wsdlLocation="BPELProcess1.wsdl">
<interface.wsdl interface="http://xmlns.oracle.com/HelloWorld/Helloworld/BPELProcess1#wsdl.interface(BPELProcess1)"/>
<binding.ws port="http://xmlns.oracle.com/HelloWorld/Helloworld/BPELProcess1#wsdl.endpoint(bpelprocess1_client_ep/BPELProcess1_pt)"
location="orauddi:/uddi:d798e4c0-f4ab-11de-8e46-d0e4b9a18e45">
<property name="oracle.soa.uddi.serviceKey" type="xs:string" many="false">uddi:d798e4c0-f4ab-11de-8e46-d0e4b9a18e45</property>
</binding.ws>
</reference>

Last step is to provide the UDDI v2 inquiry url, No need to specify the user and password. After this you need to restart the Soa Server.

Finally test your composite services with the UDDI Service references.

Friday, December 25, 2009

Flex embedded youtube player 1.2

I made a new version of the Flex embedded YouTube player ( For all features see the 1.1 version ). This time I use javascript with ExternalInterface instead of a php proxy script and this version will work forever because it all runs on the client side. Since april 2009 the proxy way won't work anymore. This version is based on the javascript & actionscript code of Matthew Richmond. Click here for his demo and source code.

First we need to change video.xml, url is now only the youtube id

<node id="0" category="overzicht">
<node id="0" category="2008">
<node id="0" category="Europees">
<node id="2012" category="Bauska 2008" url="c9BqEm7zxU4"/>
<node id="2011" category="Bauska 2008 2" url="BwfPfDAMnF0"/>
</node>
</node>
<node id="0" category="2007">
<node id="0" category="Europees">
<node id="421" category="Autocross Championship - Murça 1" url="8TZgXfqpd5I"/>
<node id="420" category="Autocross Championship - Murça 2" url="6Ncyu7-7UMA"/>
<node id="419" category="Autocross Murça 2007: Div.3 Campeonato" url="NLF2BGQmFrY"/>
<node id="418" category="Autocross race in Hungary" url="21wjz-tGcC4"/>
</node>
</node>
</node>

And we need to add some javascript to the html page. Here is my Adobe Flex project. Happy tubing.

Tuesday, December 22, 2009

EJB Session Bean Security in Weblogic

With Weblogic it is relative easy to protect your deployed EJB's by adding roles. These roles are mapped to WLS groups or users. In this blog I will show you, how you can protect for example the EJB Session beans.
I will start with securing an EJB3 Session Bean and later on in this article I will do the same only then in 2.1 way ( ejb-jar ).

First we create the Remote interface ( JDeveloper can create the EJB Session bean and remote or local interface for you )

package nl.whitehorses.ejb.security.services;

import java.util.List;
import javax.ejb.Remote;

import nl.whitehorses.ejb.security.entities.Departments;

@Remote
public interface HrModelSessionEJB {
Departments mergeDepartments(Departments departments);

List<Departments> getDepartmentsFindAll();
}

Create the EJB Session Bean. First we can optional add the @Resource annotation ( SessionContext ctx ) so we can retrieve the principal ( ctx.getCallerPrincipal) or check if the principal has the right role ( ctx.isCallerInRole )
To protect the Session bean methods we can add the @RolesAllowed or @PermitAll annotation ( @RolesAllowed({"adminsEJB"}) )

package nl.whitehorses.ejb.security.services;

import java.security.Principal;

import java.util.List;

import javax.annotation.Resource;

import javax.annotation.security.RolesAllowed;

import javax.ejb.Remote;
import javax.ejb.SessionContext;
import javax.ejb.Stateless;

import javax.persistence.EntityManager;
import javax.persistence.PersistenceContext;

import nl.whitehorses.ejb.security.entities.Departments;


@Stateless(name = "HrModelSessionEJB", mappedName = "EJB_Security-HrModel-HrModelSessionEJB")
@Remote
public class HrModelSessionEJBBean implements HrModelSessionEJB {
@PersistenceContext(unitName="HrModel")
private EntityManager em;

public HrModelSessionEJBBean() {
}

@Resource SessionContext ctx;

@RolesAllowed({"adminsEJB"})
public Departments mergeDepartments(Departments departments) {
return em.merge(departments);
}

@RolesAllowed({"adminsEJB","usersEJB"})
public List<Departments> getDepartmentsFindAll() {
Principal cp = ctx.getCallerPrincipal();
System.out.println("getname:" + cp.getName());
if ( ctx.isCallerInRole("adminsEJB")) {
System.out.println("user has admins role");
}
return em.createNamedQuery("Departments.findAll").getResultList();
}
}

The last thing we need to do is to add the weblogic ejb deployment descriptor ( weblogic-ejb-jar ) , This maps the EJB roles to users or groups in Weblogic Security Realm ( myrealm ). Do manually or use JDeveloper 11g R1 PS1, this version has a nice visual editor for the weblogic descriptors files.
The role-name must match with the roles names used in RolesAllowed annotation and the principal-name must match with a user or role in Weblogic Security Realm.

<?xml version = '1.0' encoding = 'windows-1252'?>
<weblogic-ejb-jar xmlns:xsi="http://www.w3.org/2001/XMLSchema-instance"
xsi:schemaLocation="http://www.bea.com/ns/weblogic/weblogic-ejb-jar http://www.bea.com/ns/weblogic/weblogic-ejb-jar/1.0/weblogic-ejb-jar.xsd"
xmlns="http://www.bea.com/ns/weblogic/weblogic-ejb-jar">
<weblogic-enterprise-bean>
<ejb-name>HrModelSessionEJB</ejb-name>
<stateless-session-descriptor/>
<enable-call-by-reference>true</enable-call-by-reference>
</weblogic-enterprise-bean>
<security-role-assignment>
<role-name>usersEJB</role-name>
<principal-name>scott</principal-name>
</security-role-assignment>
<security-role-assignment>
<role-name>adminsEJB</role-name>
<principal-name>edwin</principal-name>
</security-role-assignment>
</weblogic-ejb-jar>

Deploy your Session Bean to the Weblogicserver. In the Weblogic console we can check the permissions by going to the EJB deployment.
Check the EJB roles
Which WLS users or groups are connected to the EJB role


check the permissions of the Session methods.

Now we only have to make a test client and change the java.naming.security.principal property.

package nl.whitehorses.ejb.security.test;

import java.util.List;

import java.util.Properties;

import javax.naming.Context;
import javax.naming.InitialContext;

import nl.whitehorses.ejb.security.entities.Departments;
import nl.whitehorses.ejb.security.services.HrModelSessionEJB;

public class HrClient {
public HrClient() {
try {
Properties parm = new Properties();
parm.setProperty("java.naming.factory.initial","weblogic.jndi.WLInitialContextFactory");
parm.setProperty("java.naming.provider.url","t3://localhost:7101");
parm.setProperty("java.naming.security.principal","edwin");
parm.setProperty("java.naming.security.credentials","weblogic1");
final Context context = new InitialContext(parm);

HrModelSessionEJB hr = (HrModelSessionEJB)context.lookup("EJB_Security-HrModel-HrModelSessionEJB#nl.whitehorses.ejb.security.services.HrModelSessionEJB");

for (Departments departments : (List<Departments>)hr.getDepartmentsFindAll()) {
System.out.println( "departmentId = " + departments.getDepartmentId() );
System.out.println( "departmentName = " + departments.getDepartmentName() );
System.out.println( "locationId = " + departments.getLocationId() );
}
} catch (Exception ex) {
ex.printStackTrace();
}
}

public static void main(String[] args) {
HrClient hrClient = new HrClient();
}
}


The EJB 2.1 way is a bit different, now we need the use the ebj-jar.xml and this requires an remote home interface. So first we need to create this.

package nl.whitehorses.ejb.security.services;

import java.rmi.RemoteException;

import javax.ejb.CreateException;
import javax.ejb.EJBHome;

public interface HrModelSessionEJBHome extends EJBHome {
HrModelSessionEJB create() throws RemoteException, CreateException;
}

The remote interface is also different then its 3.0 version.

package nl.whitehorses.ejb.security.services;

import java.rmi.RemoteException;
import java.util.List;
import javax.ejb.EJBObject;

import nl.whitehorses.ejb.security.entities.Departments;

public interface HrModelSessionEJB extends EJBObject {
Departments mergeDepartments(Departments departments) throws RemoteException;

List<Departments> getDepartmentsFindAll() throws RemoteException;
}

The EJB Session Bean

package nl.whitehorses.ejb.security.services;

import java.security.Principal;

import java.util.List;
import javax.annotation.Resource;

import javax.ejb.EJBHome;
import javax.ejb.EJBObject;
import javax.ejb.Handle;
import javax.ejb.Init;
import javax.ejb.Remote;
import javax.ejb.RemoteHome;
import javax.ejb.Remove;
import javax.ejb.SessionContext;
import javax.ejb.Stateless;

import javax.persistence.EntityManager;
import javax.persistence.PersistenceContext;


import nl.whitehorses.ejb.security.entities.Departments;

@Stateless(name = "HrModelSessionEJB", mappedName = "EJB_Security-HrModel-HrModelSessionEJB")
@Remote({HrModelSessionEJB.class})
@RemoteHome(HrModelSessionEJBHome.class)
public class HrModelSessionEJBBean implements HrModelSessionEJB {
@PersistenceContext(unitName="HrModel")
private EntityManager em;

public HrModelSessionEJBBean() {
}

@Resource SessionContext ctx;


public Departments mergeDepartments(Departments departments) {
return em.merge(departments);
}

/** <code>select o from Departments o</code> */
public List<Departments> getDepartmentsFindAll() {
Principal cp = ctx.getCallerPrincipal();
System.out.println("getname:" + cp.getName());
if ( ctx.isCallerInRole("adminsEJB")) {
System.out.println("user has admins role");
}
return em.createNamedQuery("Departments.findAll").getResultList();
}

@Init
public void create(){};

@Remove
public void remove(){};


public EJBHome getEJBHome() {
return null;
}

public Object getPrimaryKey() {
return null;
}

public Handle getHandle() {
return null;
}

public boolean isIdentical(EJBObject ejbObject) {
return false;
}
}

We can use the same weblogic-ejb-jar.xml, now we only need to create ebj-jar.xml descriptor. This descriptor does the same as the RolesAllowed annotation

<?xml version = '1.0' encoding = 'windows-1252'?>
<ejb-jar xmlns:xsi="http://www.w3.org/2001/XMLSchema-instance"
xsi:schemaLocation="http://java.sun.com/xml/ns/javaee/ejb-jar_3_0.xsd"
version="3.0" xmlns="http://java.sun.com/xml/ns/javaee">
<enterprise-beans>
<session>
<ejb-name>HrModelSessionEJB</ejb-name>
<home>nl.whitehorses.ejb.security.services.HrModelSessionEJBHome</home>
<remote>nl.whitehorses.ejb.security.services.HrModelSessionEJB</remote>
<ejb-class>nl.whitehorses.ejb.security.services.HrModelSessionEJBBean</ejb-class>
<session-type>Stateless</session-type>
<transaction-type>Container</transaction-type>
<security-role-ref>
<role-name>usersEJB</role-name>
</security-role-ref>
<security-role-ref>
<role-name>adminsEJB</role-name>
</security-role-ref>
</session>
</enterprise-beans>
<assembly-descriptor>
<security-role>
<role-name>usersEJB</role-name>
</security-role>
<security-role>
<role-name>adminsEJB</role-name>
</security-role>
<method-permission>
<role-name>usersEJB</role-name>
<role-name>adminsEJB</role-name>
<method>
<ejb-name>HrModelSessionEJB</ejb-name>
<method-name>getDepartmentsFindAll</method-name>
</method>
</method-permission>
<method-permission>
<role-name>adminsEJB</role-name>
<method>
<ejb-name>HrModelSessionEJB</ejb-name>
<method-name>mergeDepartments</method-name>
</method>
</method-permission>
</assembly-descriptor>
</ejb-jar>

And the test client.

package nl.whitehorses.ejb.security.test;

import java.util.List;

import java.util.Properties;

import javax.naming.Context;
import javax.naming.InitialContext;

import nl.whitehorses.ejb.security.entities.Departments;
import nl.whitehorses.ejb.security.services.HrModelSessionEJB;
import nl.whitehorses.ejb.security.services.HrModelSessionEJBHome;

public class HrClient {
public HrClient() {
try {
Properties parm = new Properties();
parm.setProperty("java.naming.factory.initial","weblogic.jndi.WLInitialContextFactory");
parm.setProperty("java.naming.provider.url","t3://localhost:7101");
parm.setProperty("java.naming.security.principal","edwin");
parm.setProperty("java.naming.security.credentials","weblogic1");
final Context context = new InitialContext(parm);

HrModelSessionEJBHome hRSessionEJB = (HrModelSessionEJBHome)context.lookup("EJB_Security-HrModel-HrModelSessionEJB#nl.whitehorses.ejb.security.services.HrModelSessionEJBHome");
HrModelSessionEJB hr = hRSessionEJB.create();

for (Departments departments : (List<Departments>)hr.getDepartmentsFindAll()) {
System.out.println( "departmentId = " + departments.getDepartmentId() );
System.out.println( "departmentName = " + departments.getDepartmentName() );
System.out.println( "locationId = " + departments.getLocationId() );
}


} catch (Exception ex) {
ex.printStackTrace();
}
}

public static void main(String[] args) {
HrClient hrClient = new HrClient();
}

}

Here is the example workspace

Monday, December 14, 2009

SCA Spring in Weblogic 10.3.2 & Soa Suite 11g Part 2

In my previous post I made a SCA Spring example and deployed this on Weblogic 10.3.2 Now it is time to use the same spring context and java sources in a Soa Suite 11g composite ( without any changes) . Keep in mind SCA Spring in WLS and the Spring Component in Soa Suite is still in preview and will be supported in Patch Set2 of Soa Suite 11g.
In this example I use the java Logger and BPEL component of Clemens OTN article.

First I copied the java sources from my Weblogic SCA Spring project to the Soa project and created for demo purposes two Spring Bean configurations.
The first has a bean with a service and a reference and the second one has only a bean with a service. ( Off course I can combine these two together in one spring bean configuration, but this is more fun)

The first spring bean configuration will just passthrough the java call. We need to remove the WS and EJB binding in the service and reference. ( Soa Suite don't need this )

<?xml version="1.0" encoding="windows-1252" ?>
<beans xmlns="http://www.springframework.org/schema/beans"
xmlns:util="http://www.springframework.org/schema/util"
xmlns:jee="http://www.springframework.org/schema/jee"
xmlns:lang="http://www.springframework.org/schema/lang"
xmlns:aop="http://www.springframework.org/schema/aop"
xmlns:tx="http://www.springframework.org/schema/tx"
xmlns:sca="http://xmlns.oracle.com/weblogic/weblogic-sca">
<!--Spring 2.5 Bean defintions go here-->
<sca:service target="loggerPassThrough" name="LogServiceWS"
type="nl.whitehorses.wls.sca.spring.ILoggerComponent">
</sca:service>

<bean class="nl.whitehorses.wls.sca.spring.LoggerPassThrough" name="loggerPassThrough">
<property name="reference" ref="loggerEJBReference" />
</bean>

<sca:reference name="loggerEJBReference"
type="nl.whitehorses.wls.sca.spring.ILoggerComponent">
</sca:reference>

</beans>

The second spring bean configuration is the java logger. Here we also have to remove the WS binding in the service

<?xml version="1.0" encoding="windows-1252" ?>
<beans xmlns="http://www.springframework.org/schema/beans"
xmlns:util="http://www.springframework.org/schema/util"
xmlns:jee="http://www.springframework.org/schema/jee"
xmlns:lang="http://www.springframework.org/schema/lang"
xmlns:aop="http://www.springframework.org/schema/aop"
xmlns:tx="http://www.springframework.org/schema/tx"
xmlns:sca="http://xmlns.oracle.com/weblogic/weblogic-sca">
<!--Spring 2.5 Bean defintions go here-->
<sca:service target="logger" name="LogServiceEJB"
type="nl.whitehorses.wls.sca.spring.ILoggerComponent">
</sca:service>

<bean class="nl.whitehorses.wls.sca.spring.LoggerComponentImpl" name="logger">
<property name="output" ref="loggerOutput" />
</bean>

<bean id="loggerOutput" class="nl.whitehorses.wls.sca.spring.LoggerOutput"></bean>

</beans>

Now the composite application looks like this. We need to add some wires between the BPEL and Spring Components.


Open the BPEL component and add an invoke to call the partnerlink and create the input and output variables.

Deploy the composite and test it in the Soa Suite. With this as result.
Conclusion: With the new SoaSuite Spring component it is relative easy to do a java call outs and you can exchange your SCA spring application from Weblogic to Soa Suite without any changes.

Here is my Soa Suite example workspace

Sunday, December 13, 2009

SCA Spring in Weblogic 10.3.2 & Soa Suite 11g

With Weblogic 10.3.2 ( part of Patch Set 1 of Fusion Middleware R1 ) Oracle released a preview of SCA Spring. For more info about this announcement see the blog of Raghav.
This is great news because everything what works in SCA Spring can be used without any problem in Soa Suite 11g. With Patch Set 2 SCA Spring will be supported in WLS or Soa Suite. For a Soa Suite Spring example see this blog of Clemens

To test this I made a small example based on the blog of Clemens. In this test I will call a logging webservice and this service will pass the call to a passthrough bean which has a reference to an logging EJB service which calls a logging bean and this bean has an other bean injected which does the output.

First deploy the weblogic-sca war as a library to the WLS server, you can find this war in wlserver_10.3/common/deployable-libraries/ folder and is called weblogic-sca-1.0.war

Create in JDeveloper a new web project ( no need for ADF ) . We don't need the spring jar or add some config in the web.xml ( this can be empty , don't need to add spring listener )

Add a library reference in your webapp to the weblogic-sca library, Do this in the weblogic.xml or weblogic-application.xml file
<?xml version = '1.0' encoding = 'windows-1252'?>
<weblogic-web-app xmlns:xsi="http://www.w3.org/2001/XMLSchema-instance"
                 xsi:schemaLocation="http://www.bea.com/ns/weblogic/weblogic-web-app http://www.bea.com/ns/weblogic/weblogic-web-app/1.0/weblogic-web-app.xsd"
                 xmlns="http://www.bea.com/ns/weblogic/weblogic-web-app">
   <library-ref>
       <library-name>weblogic-sca</library-name>
   </library-ref>
</weblogic-web-app>

Create a spring from jdeveloper and call this file spring-context.xml and put this in META-INF/jsca folder ( in the src folder )
When you got experience with Apache Tuscany then this spring configuration is not so difficult.
<?xml version="1.0" encoding="windows-1252" ?>
<beans xmlns="http://www.springframework.org/schema/beans"
      xmlns:xsi="http://www.w3.org/2001/XMLSchema-instance"
      xmlns:sca="http://xmlns.oracle.com/weblogic/weblogic-sca"
      xmlns:wlsb="http://xmlns.oracle.com/weblogic/weblogic-sca-binding"
      xmlns:wsp="http://schemas.xmlsoap.org/ws/2004/09/policy"
      xsi:schemaLocation="http://www.springframework.org/schema/beans http://www.springframework.org/schema/beans/spring-beans-2.0.xsd http://xmlns.oracle.com/weblogic/weblogic-sca http://xmlns.oracle.com/weblogic/weblogic-sca/1.0/weblogic-sca.xsd http://xmlns.oracle.com/weblogic/weblogic-sca-binding http://xmlns.oracle.com/weblogic/weblogic-sca-binding/1.0/weblogic-sca-binding.xsd">
 <!--Spring 2.5 Bean defintions go here-->
 <sca:service target="loggerPassThrough" name="LogServiceWS"
              type="nl.whitehorses.wls.sca.spring.ILoggerComponent">
   <wlsb:binding.ws xmlns="http://xmlns.oracle.com/sca/1.0"
               name="LoggerService_WS" uri="/LoggerService_Uri"
               port="LoggerService_PORT"/>
 </sca:service>

 <sca:reference name="loggerEJBReference"
 type="nl.whitehorses.wls.sca.spring.ILoggerComponent">
   <wlsb:binding.ejb uri="LoggerService_EJB30_JNDI" />
 </sca:reference>

 <bean class="nl.whitehorses.wls.sca.spring.LoggerPassThrough" name="loggerPassThrough">
    <property name="reference" ref="loggerEJBReference" />
 </bean>

 <sca:service target="logger" name="LogServiceEJB"
              type="nl.whitehorses.wls.sca.spring.ILoggerComponent">
   <wlsb:binding.ejb uri="LoggerService_EJB30_JNDI" remote="true"
                     name="LoggerService_EJB"/>
 </sca:service>

 <bean class="nl.whitehorses.wls.sca.spring.LoggerComponentImpl" name="logger">
    <property name="output" ref="loggerOutput" />
 </bean>

 <bean id="loggerOutput" class="nl.whitehorses.wls.sca.spring.LoggerOutput"></bean>

</beans>

Now we need to create a logger interface, this will be use by the WS & EJB services and references.
package nl.whitehorses.wls.sca.spring;

public interface ILoggerComponent
{
   
    /**
     * Log a message, including the originating component, its instance id and
     * a message.
     * @param pComponentName the name of the component that sends this log msg
     * @param pInstanceId the instanceId of the component instance
     * @param pMessage the message to be logged
     */
    public void log (String pComponentName,
                     String pInstanceId, String pMessage);
}

Create a passthrough class this will pass on the logger call to the ejb service.
package nl.whitehorses.wls.sca.spring;

public class LoggerPassThrough implements ILoggerComponent {
    public LoggerPassThrough() {
        super();
    }

    @Override
    public void log(String pComponentName, String pInstanceId,
                    String pMessage)  {
    
       reference.log(pComponentName, pInstanceId, pMessage);
    }

    private ILoggerComponent reference;

    public void setReference(ILoggerComponent reference) {
        this.reference = reference;
    }

    public ILoggerComponent getReference() {
        return reference;
    }

}

Create the logger implementation class.
package nl.whitehorses.wls.sca.spring;

public class LoggerComponentImpl implements ILoggerComponent {
    public LoggerComponentImpl() {
        super();
    }

    @Override
    public void log(String pComponentName, String pInstanceId,
                    String pMessage)  {
       output.logToConsole(pComponentName, pInstanceId, pMessage);
    }

    private LoggerOutput output;

    public void setOutput(LoggerOutput output) {
        this.output = output;
    }

    public LoggerOutput getOutput() {
        return output;
    }
}

The last class prints the console output
package nl.whitehorses.wls.sca.spring;

public class LoggerOutput {
    public LoggerOutput() {
        super();
    }
    
    public void logToConsole(String pComponentName, String pInstanceId,  String pMessage)
    {
        StringBuffer logBuffer = new StringBuffer ();
        logBuffer.append("[").append(pComponentName).append("] [Instance: ").
            append(pInstanceId).append("] ").append(pMessage);
        
        System.out.println(logBuffer.toString());
    }
}


Deploy the web application the weblogic server and use soapui to test the service. The wsdl url is in my case http://laptopedwin.wh.lan:7001/WlsSpring-ScaSpring-context-root/LoggerService_Uri?WSDL or make a EJB test client and use this ILoggerComponent logger = (ILoggerComponent)context.lookup("LoggerService_EJB30_JNDI");

Here you can download my code on github https://github.com/biemond/jdev11g_examples/tree/master/WlsSpring

Saturday, December 5, 2009

ADF Data push with Active Data Service

With Patch Set 1 of JDeveloper 11G we can push data to the JSF page. This is called Active Data Service and this works with the following JSF component
  • activeCommandToolbarButton
  • activeImage
  • activeOutputText
  • table
  • tree
  • All DVT components
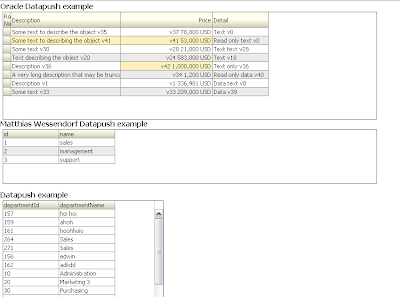
One requirement for this feature is you need to have a Datasource who supports data push. For example the BAM server of the Soa Suite support this. For other cases you need to use the Active Data Proxy framework. In this blog I made a demo with 3 different working examples , The first is an example of Oracle this in the fusion demo and can be downloaded here , the second is the one of Matthias Wessendorf and the last is the one of the Oracle ADS documentation example which works with a EJB datacontol.

In the next weeks I will make an ADS example with EJB and JMS, The ADS Page components will then listen on a topic for EJB data change events and refreshes the page with push .

But first let me show what you need to do.
Configure the adf-config.xml , located in the .adf\META-INF folder ( workspace level). With this ADF file you can configure the push parameters, study these parameters because they can influence the application performance.


<?xml version="1.0" encoding="windows-1252" ?>
<adf-config xmlns="http://xmlns.oracle.com/adf/config"
xmlns:sec="http://xmlns.oracle.com/adf/security/config"
xmlns:ads="http://xmlns.oracle.com/adf/activedata/config">
<sec:adf-security-child xmlns="http://xmlns.oracle.com/adf/security/config">
<CredentialStoreContext credentialStoreClass="oracle.adf.share.security.providers.jps.CSFCredentialStore"
credentialStoreLocation="../../src/META-INF/jps-config.xml"/>
</sec:adf-security-child>
<ads:adf-activedata-config xmlns="http://xmlns.oracle.com/adf/activedata/config">
<!--
transport allows three settings:
* streaming (default)
* polling
* long-polling
-->
<transport>long-polling</transport>
<latency-threshold>10000</latency-threshold>
<keep-alive-interval>10000</keep-alive-interval>
<polling-interval>3000</polling-interval>
<max-reconnect-attempt-time>1800000</max-reconnect-attempt-time>
<reconnect-wait-time>10000</reconnect-wait-time>
</ads:adf-activedata-config>
</adf-config>

Then create in the .adf\META-INF folder a new folder called services and put a new file in called adf-config.properties and add the following content.
http\://xmlns.oracle.com/adf/activedata/config=oracle.adfinternal.view.faces.activedata.ActiveDataConfiguration$ActiveDataConfigCallback

Go to your JSF page and drag and drop for example departments from your datacontrol to your page. Choose a readonly table ( when you want to use inputtext instead of outputtext JSF components then keep in mind you need to reset the uicomponent else it won't get the new value ) and don't use Filtering on the table.
This is how your JSF can look like.

<af:table value="#{bindings.departmentsFindAll.collectionModel}"
var="row"
rows="#{bindings.departmentsFindAll.rangeSize}"
emptyText="#{bindings.departmentsFindAll.viewable ? 'No data to display.' : 'Access Denied.'}"
fetchSize="#{bindings.departmentsFindAll.rangeSize}"
rowBandingInterval="0"
selectedRowKeys="#{bindings.departmentsFindAll.collectionModel.selectedRow}"
selectionListener="#{bindings.departmentsFindAll.collectionModel.makeCurrent}"
rowSelection="single" id="t3">
<af:column sortProperty="departmentId" sortable="true"
headerText="#{bindings.departmentsFindAll.hints.departmentId.label}"
id="c8">
<af:outputText value="#{row.departmentId}" id="ot9">
<af:convertNumber groupingUsed="false"
pattern="#{bindings.departmentsFindAll.hints.departmentId.format}"/>
</af:outputText>
</af:column>
<af:column sortProperty="departmentName" sortable="true"
headerText="#{bindings.departmentsFindAll.hints.departmentName.label}"
id="c9">
<af:outputText value="#{row.departmentName}" id="ot8"/>
</af:column>
</af:table>

Here the pagedef of the page ,we need to have a handle to the departmentsFindAll tree in our Active Data Proxy framework.

<?xml version="1.0" encoding="UTF-8" ?>
<pageDefinition xmlns="http://xmlns.oracle.com/adfm/uimodel"
version="11.1.1.55.36" id="ADStablePageDef"
Package="nl.whitehorses.app.view.pageDefs">
<parameters/>
<executables>
<iterator Binds="root" RangeSize="25" DataControl="CountrySessionEJBLocal"
id="CountrySessionEJBLocalIterator"/>
<accessorIterator MasterBinding="CountrySessionEJBLocalIterator"
Binds="departmentsFindAll" RangeSize="25"
DataControl="CountrySessionEJBLocal"
BeanClass="nl.whitehorses.model2.Departments"
id="departmentsFindAllIterator"/>
</executables>
<bindings>

<tree IterBinding="departmentsFindAllIterator" id="departmentsFindAll">
<nodeDefinition DefName="nl.whitehorses.model2.Departments"
Name="departmentsFindAll0">
<AttrNames>
<Item Value="departmentId"/>
<Item Value="departmentName"/>
</AttrNames>
</nodeDefinition>
</tree>
</bindings>
</pageDefinition>

Now we can make our own DepartmentModel where we add Active Data Service to it. We need the departmentsFindAll tree attribute from the pagedef.

package nl.whitehorses.app.ads;

import oracle.adf.model.BindingContext;
import oracle.adf.model.binding.DCBindingContainer;
import oracle.adf.view.rich.model.ActiveCollectionModelDecorator;

import oracle.adf.view.rich.model.ActiveDataModel;

import oracle.adfinternal.view.faces.model.binding.FacesCtrlHierBinding;


import org.apache.myfaces.trinidad.model.CollectionModel;

public class DepartmentModel extends ActiveCollectionModelDecorator {

private MyActiveDataModel _activeDataModel = new MyActiveDataModel();
private CollectionModel _model = null;


public CollectionModel getCollectionModel() {
if (_model == null) {
DCBindingContainer dcBindings = (DCBindingContainer)BindingContext.getCurrent().getCurrentBindingsEntry();
FacesCtrlHierBinding treeData = (FacesCtrlHierBinding)dcBindings.getControlBinding("departmentsFindAll");
_model = treeData.getCollectionModel();
}
return _model;
}

public ActiveDataModel getActiveDataModel() {
return _activeDataModel;
}

public MyActiveDataModel getMyActiveDataModel() {
return _activeDataModel;
}

}

Make your own active ActiveDataModel in which we start a thread where we fire change events.


package nl.whitehorses.app.ads;

import java.util.Collection;

import java.util.concurrent.atomic.AtomicInteger;
import oracle.adf.view.rich.activedata.BaseActiveDataModel;
import oracle.adf.view.rich.event.ActiveDataUpdateEvent;

public class MyActiveDataModel extends BaseActiveDataModel
{
protected void startActiveData(Collection<Object> rowKeys, int startChangeCount)
{
_listenerCount.incrementAndGet();
if (_listenerCount.get() == 1)
{
System.out.println("start up");

Runnable dataChanger = new Runnable()
{
public void run()
{
System.out.println("MyThread starting.");
try
{
Thread.sleep(2000);
System.out.println("thread running");
Change chg = new Change();
chg.triggerDataChange(MyActiveDataModel.this);
}
catch (Exception exc)
{
System.out.println("MyThread exceptioned out.");
}
System.out.println("MyThread terminating.");
}
};
Thread newThrd = new Thread(dataChanger);
newThrd.start();
}
}

protected void stopActiveData(Collection<Object> rowKeys)
{
_listenerCount.decrementAndGet();
if (_listenerCount.get() == 0)
{
System.out.println("tear down");
}
}

public int getCurrentChangeCount()
{
return _currEventId.get();
}

public void bumpChangeCount()
{
_currEventId.incrementAndGet();
}

public void dataChanged(ActiveDataUpdateEvent event)
{
fireActiveDataUpdate(event);
}

private final AtomicInteger _listenerCount = new AtomicInteger(0);
private final AtomicInteger _currEventId = new AtomicInteger();
}


For demo purposes we send some change events. For this we need to know the Key of the department iterator and the attribute which changed. See the ADS help page for other events like insert ,delete etc..


package nl.whitehorses.app.ads;

import oracle.adf.view.rich.event.ActiveDataEntry;

import oracle.adf.view.rich.event.ActiveDataUpdateEvent;

import oracle.adfinternal.view.faces.activedata.ActiveDataEventUtil;
import oracle.adfinternal.view.faces.activedata.JboActiveDataEventUtil;


public class Change {
public Change() {

}

public void triggerDataChange(MyActiveDataModel model) throws Exception {


for ( int i = 0 ; i < 10 ; i++) {
try {
Thread.sleep(4000);
} catch (InterruptedException ie) {
ie.printStackTrace();
}


model.bumpChangeCount();

ActiveDataUpdateEvent event =
ActiveDataEventUtil.buildActiveDataUpdateEvent(ActiveDataEntry.ChangeType.UPDATE,
model.getCurrentChangeCount(),
JboActiveDataEventUtil.convertKeyPath(new Object[] { new Long(10) , new Integer(0) }),
null,
new String[] { "departmentName" },
new Object[] { "Administration" });

model.dataChanged(event);

try {
Thread.sleep(2000);
} catch (InterruptedException ie) {
ie.printStackTrace();
}

model.bumpChangeCount();
event =
ActiveDataEventUtil.buildActiveDataUpdateEvent(ActiveDataEntry.ChangeType.UPDATE,
model.getCurrentChangeCount(),
JboActiveDataEventUtil.convertKeyPath(new Object[] { new Long(30), new Integer(0) }),
null,
new String[] { "departmentName" },
new Object[] { "Purchasing" });

model.dataChanged(event);

}
}
}

We need to add the DepartmentModel class as backing bean in the adfc-config or faces-config xml.

<managed-bean>
<managed-bean-name>DepartmentModel</managed-bean-name>
<managed-bean-class>nl.whitehorses.app.ads.DepartmentModel</managed-bean-class>
<managed-bean-scope>session</managed-bean-scope>
</managed-bean>


And at last change the value attribute of the af:table to our managed bean
af:table value="#{DepartmentModel}" var="row"

Here you can download my demo workspace