Pages

Friday, November 28, 2008

Using XQuery in JDeveloper 11g and Workshop

With JDeveloper 11g you can use XQuery in your java code and test it with the XQuery runner of JDeveloper. But the only thing missing is a XQuery Designer. When Oracle bought Bea they also bought Workshop for Weblogic. This Workshop application is eclipse plugin which has a very nice XQuery designer. So let's combine these Oracle tools and make some awesome transformations.
First we create a new application / project in JDeveloper 11g with the following libraries.

Create a new xquery file in the project.

Start Workshop for Weblogic where we will create a new project and add a new XQuery Transformation.

Define the input of the XQuery. This can be a xml schema or something else. In my case I will use a xml schema. Workshop has now created a new input variable called data_message1.

My output is also a xml schema

Workshop provides a Expression functions window with all the XQuery functions you can use. Just drag a function to the target expression.

Here you have a overview of the XQuery mappings. Data is a anyType element which I map to the output schema

With the Workshop application you can also test the XQuery file by providing a input xml.

Now we can go back to JDeveloper where we will use this workshop XQuery and test this XQuery file. This is the original XQuery file from Workshop.

(:: pragma bea:global-element-parameter parameter="$data_message1" element="ns2:data-message" location="../xsd/mhs/main_mhs.xsd" ::)
(:: pragma bea:global-element-return element="ns1:data" location="../xsd/mhs/main_delfor.xsd" ::)

declare namespace ns2 = "http://tennet.org/mhs/queue";
declare namespace ns1 = "http://tennet.org/mhs";
declare namespace ns0 = "http://tennet.org/mhs/delfor";
declare namespace xf = "http://tempuri.org/MHS/xquery/main_delfor/";

declare function xf:main_delfor($data_message1 as element(ns2:data-message))
as element(ns1:data) {
<ns1:data RUNID = "{ xs:integer(data($data_message1/ns2:runid)) }"
SENDER = "{ data($data_message1/ns2:sender) }"
RECEIVER = "{ data($data_message1/ns2:recipient) }"
TIMESTAMP = "{ data($data_message1/ns2:timestamp) }">
<ns0:DELFOR>{ $data_message1/ns2:contentlist/ns2:content[1]/ns2:data/@* , $data_message1/ns2:contentlist/ns2:content[1]/ns2:data/node() }</ns0:DELFOR>
</ns1:data>
};

declare variable $data_message1 as element(ns2:data-message) external;

xf:main_delfor($data_message1)

We have to change this XQuery file so it works in JDeveloper. We have to import the input schema else XQuery won't recognize this element(ns2:data-message) definition. To test the XQuery with the XQuery runner I need to change the external $data_message1 variable. This how the JDeveloper version looks like
import schema default element namespace "http://tennet.org/mhs/queue" at "main_mhs.xsd";

declare namespace ns2 = "http://tennet.org/mhs/queue";
declare namespace ns1 = "http://tennet.org/mhs";
declare namespace ns0 = "http://tennet.org/mhs/delfor";
declare namespace xf = "http://tempuri.org/MHS/xquery/main_delfor/";

declare function xf:main_delfor($data_message1 as element(ns2:data-message))
as element(ns1:data) {

{ $data_message1/ns2:contentlist/ns2:content[1]/ns2:data/@* , $data_message1/ns2:contentlist/ns2:content[1]/ns2:data/node() }

};

declare variable $data_message2  := doc('delfor2.xml');
declare variable $data_message1  as element(ns2:data-message)  := $data_message2/data-message;

xf:main_delfor($data_message1)

In JDeveloper we can select the XQuery file and press run to see the output.

Off course we can run the xquery file in java too. We only have to use this class and make $data_message2 a external variable in the XQuery file
package nl.ordina.xquery;

import java.io.FileNotFoundException;
import java.io.FileReader;
import java.io.IOException;
import java.io.InputStream;
import java.io.Reader;

import javax.xml.namespace.QName;

import oracle.xml.parser.v2.DOMParser;
import oracle.xml.parser.v2.XMLDocument;
import oracle.xml.parser.v2.XMLParseException;
import oracle.xml.xqxp.datamodel.XMLItem;
import oracle.xml.xqxp.datamodel.XMLSequence;
import oracle.xquery.PreparedXQuery;
import oracle.xquery.XQueryContext;
import oracle.xquery.exec.Utils;
import org.xml.sax.SAXException;


public class TestXQuery {

public TestXQuery() {
try {

XQueryContext ctx = new XQueryContext();
Reader strm = new FileReader("main_delfor2.xq");
PreparedXQuery xquery = ctx.prepareXQuery(strm);

DOMParser prs = new DOMParser();
InputStream is = Utils.getStream("delfor2.xml");
prs.parse(is);
XMLDocument doc = prs.getDocument();

xquery.setNode( new QName("data_message2"), doc);

XMLSequence seq = xquery.executeQuery();
while (seq.next()) {
XMLItem item = seq.getCurrentItem();
item.getNode().print(System.out);
}
} catch (FileNotFoundException e) {
e.printStackTrace();
} catch (IOException e) {
e.printStackTrace();
} catch (XMLParseException e) {
e.printStackTrace();
} catch (SAXException e) {
e.printStackTrace();
}
}

public static void main(String[] args) {
TestXQuery testXQuery = new TestXQuery();
}
}


and this is the xquery I used for the java example
import schema default element namespace "http://tennet.org/mhs/queue" at "main_mhs.xsd";

declare namespace ns2 = "http://tennet.org/mhs/queue";
declare namespace ns1 = "http://tennet.org/mhs";
declare namespace ns0 = "http://tennet.org/mhs/delfor";
declare namespace xf = "http://tempuri.org/MHS/xquery/main_delfor/";

declare function xf:main_delfor($data_message1 as element(ns2:data-message))
as element(ns1:data) {

{ $data_message1/ns2:contentlist/ns2:content[1]/ns2:data/@* , $data_message1/ns2:contentlist/ns2:content[1]/ns2:data/node() }

};

declare variable $data_message2  external;
declare variable $data_message1  as element(ns2:data-message)  := $data_message2/data-message;

xf:main_delfor($data_message1)


Here you can download the Jdeveloper project I used in this blog.

Saturday, November 22, 2008

JDeveloper 11g PDF previewer

I made a new version of PDF previewer in JDeveloper 11g and add some nice new features to it. Like showing a printable page and go to a particular page.
And I also add some technical features to it like a jsf template and stretchable panels so it resizes itself

Here is an example of the printable page.

Download the 11g project here

Thursday, November 20, 2008

Using AQ in WebLogic 10.3

For a project we want to use a Message Driven Bean in WebLogic 10.3 which listens to an Oracle AQ queue. You can use a JMS bridge which uses jndi and OID to retrieve the connection and queue. This didn't work for me because the OID username and password must be same as the Database user of the queue. But there is another way to make this happen. Robert Patrick made a great howto. I decide to do same what Robert did I do it from JDeveloper 11G.
In this blog we will create a startup class for WebLogic which can connect to the AQ queues and topics.
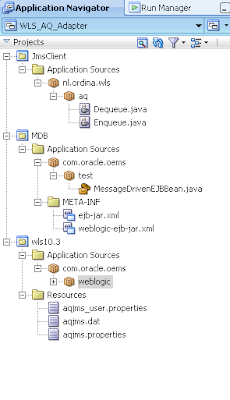
First I made a new jdeveloper 11G application with 3 projects.
The first is wls10.3. This project generates a startup class jar ( I imported the wls10 and jms1.1 code from Robert) In this project there is also a password file generator for the database user / password. WLS uses this password file to connect to the Oracle database .
The MDB project is my Message Driven Bean which will enqueue the AQ messages.
The last project is JmsClient which can dequeue or enqueue new messages to AQ through WLS. Not directly to the database.


For these projects I need the AQ and Weblogic 10.3 remote-client library.


Now we can create a new jar ( deploy project wls10.3 to jar ) called WLS103AQJMSStartupClass.jar


Let's create in the scott/tiger schema a jms queue table called TEST_TABLE and a queue TEST

begin

sys.dbms_aqadm.create_queue_table(

queue_table => 'TEST_TABLE',

queue_payload_type => 'SYS.AQ$_JMS_MESSAGE',

sort_list => 'PRIORITY',

compatible => '10.0.0',

primary_instance => 0,

secondary_instance => 0,

storage_clause => 'tablespace USERS pctfree 10 initrans 1 maxtrans 255 storage ( initial 64K minextents 1 maxextents unlimited )');

end;

/

begin

sys.dbms_aqadm.create_queue(

queue_name => 'TEST',

queue_table => 'TEST_TABLE',

queue_type => sys.dbms_aqadm.normal_queue,

max_retries => 5,

retry_delay => 0,

retention_time => 0);

end;

/


Make sure to start the queue


Next step is to generate the password files which holds the scott/tiger username password.
We do this by running the AQJMSPasswordUtility class. Delete the aqjms.dat and aqjms_user.properties files.


com.oracle.oems.weblogic.AQJMSPasswordUtility -username scott -password tiger


this will generate the password files agian


I use in this blog the Weblogic server of jdeveloper 11g. In this middleware home I create a new folder jms_lib ( D:\oracle\Middleware\jms_lib ) . In this folder I copied the following files WLS103AQJMSStartupClass.jar, aqapi.jar , aqjms.dat, aqjms_user.properties and aqjms.properties files.


Change the aqjms.properties file so it matches with your database and queue.


# Oracle database connection-related properties#


Server=XPCND7010XMP


Port=1521


DBInstance=orcl


These are important settings ( I will use AQJMS_QueueConnectionFactory as my jndi connection factory lookup, I have a queue and I don't use XA )


XAQueueConnectionFactoryJNDIName=AQJMS_XAQueueConnectionFactory


QueueConnectionFactoryJNDIName=AQJMS_QueueConnectionFactory


XATopicConnectionFactoryJNDIName=AQJMS_XATopicConnectionFactory


TopicConnectionFactoryJNDIName=AQJMS_TopicConnectionFactory


Change QueueName1 to TEST ( the name of the Queue in the scott schema)


QueueName1=TEST


#QueueName2=JMSDEMO_QUEUE2


#TopicName1=JMSDEMO_TOPIC1


Give the queue name a jndi name so we can use this name in the JNDI lookup of the queue


QueueJNDIName1=ORAQ_TEST


#QueueJNDIName2=ORAQ_JMSDEMO_QUEUE2


#TopicJNDIName1=ORAQ_JMSDEMO_TOPIC1


We are ready with changing this file. Now we can configure Weblogic so it uses the startup class.


first open the setDomainEnv.cmd file located in D:\oracle\Middleware\jdeveloper\system\system11.1.1.0.31.51.56\DefaultDomain\bin


Add -Doracle.jms.useEmulatedXA=false -Doracle.jms.useNativeXA=true to the JAVA_PROPERTIES variable


and Add D:\oracle\Middleware\jms_lib\WLS103AQJMSStartupClass.jar;D:\oracle\Middleware\jms_lib\aqapi.jar to the PRE_CLASSPATH variable


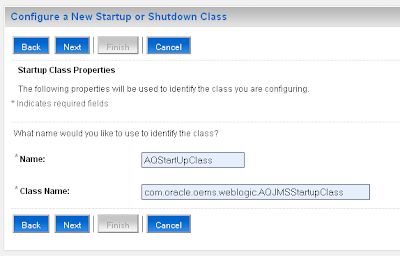
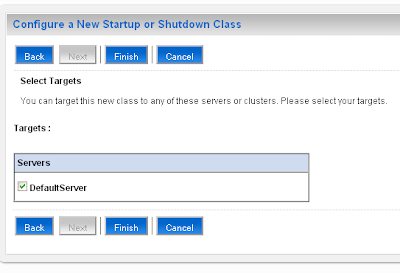
Start the WebLogic Server where we will create a new Startup Class


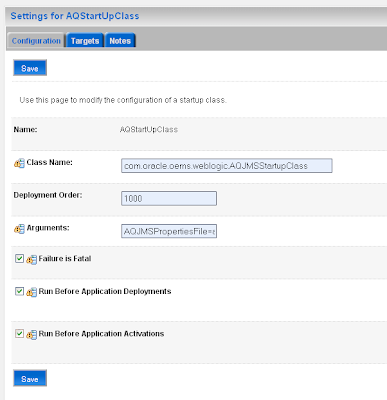
Use as "AQJMSPropertiesFile=aqjms.properties, AQJMSPasswordFile=aqjms_user.properties, AQJMSSecretFile=aqjms.dat, AQJMSConfigDirectory=D:/oracle/Middleware/jms_lib" as arguments.

Or you can change the config.xml and add the startupclass to this xml

<startup-class>
<name>AQStartUpClass</name>
<target>DefaultServer</target>
<deployment-order>1000</deployment-order>
<class-name>com.oracle.oems.weblogic.AQJMSStartupClass</class-name>
<arguments>AQJMSPropertiesFile=aqjms.properties,AQJMSPasswordFile=aqjms_user.properties,AQJMSSecretFile=aqjms.dat,AQJMSConfigDirectory=D:/oracle/Middleware/jms_lib</arguments>
<failure-is-fatal>true</failure-is-fatal>
<load-before-app-deployments>true</load-before-app-deployments>
<load-before-app-activation>true</load-before-app-activation>
</startup-class>

Restart Weblogic and deploy the Message Driven Bean to WLS or use the dequeue / enqueue class to connect to weblogic / aq.
Here is some code from the dequeue java class which can connect to weblogic.

String queueName = "ORAQ_TEST";
String queueConnectionFactoryName = "AQJMS_QueueConnectionFactory";

Context ctx;

try {
Properties parm = new Properties();
parm.setProperty("java.naming.factory.initial","weblogic.jndi.WLInitialContextFactory");
parm.setProperty("java.naming.provider.url","t3://localhost:7101");
parm.setProperty("java.naming.security.principal","weblogic");
parm.setProperty("java.naming.security.credentials","weblogic");

ctx = new InitialContext(parm);

QueueConnectionFactory connectionFactory =
(QueueConnectionFactory)ctx.lookup(queueConnectionFactoryName);

connection = connectionFactory.createQueueConnection();
connection.start();
session = connection.createQueueSession(false, Session.AUTO_ACKNOWLEDGE);
queue = (Queue)ctx.lookup(queueName);
receiver = session.createReceiver(queue);

try {
javax.jms.TextMessage textMessage = (javax.jms.TextMessage)receiver.receive();
System.out.println("Receiving message [" + textMessage.getJMSMessageID() + "] enqueued at " + new Timestamp(textMessage.getJMSTimestamp()).toString());
String xmlText = textMessage.getText();
System.out.println(xmlText);
} catch (JMSException jmse) {
jmse.printStackTrace();
}

receiver.close();
session.close();
connection.close();


} catch (JMSException je) {
throw new RuntimeException("Fout opgetreden bij het starten ",je);
} catch (Throwable t) {
throw new RuntimeException("Fout opgetreden bij het starten ",t);


Download the 11g example project here

Tuesday, November 18, 2008

Dynamic Tree menu and Task Flow Regions

I had to request to make a JSF Tree Menu so when a user clicks on a menu item in this tree the right region/ page is loaded. With the help of the 11G Task Flows regions this is very easy to implement. Basically we are building an one page application. One page apps gives us the best performance ( Oracle Fusion Apps is build this way). When performance is important you can better use regions then loading whole pages.
Here is an example of the result. Employee and Departments are menu items, the rest are menu nodes. For this demo I had to build two bounded task flows Employees and Departments. I will be using these task flow url's in the adf menu tree and pass this value to the dynamic region bean.
This is the menu table I used for this example.
I made two viewobjects based on this menu table, the first vo has the main menu records ( highest leve) and the second vo has the sub menu or menu items records. Main menu has a viewlink to the second vo and the second vo has a viewlink to itself. Here you can see my application module

Now we can drag the main menu vo to the page where we will select ADF Tree option
Configure the Tree Binding where we need to select the following attributes. Label, Type and TaskflowUrl


When you drag one of the bounded task flows to the jsf page you will get the option to create a dynamic region. This will also create a backing bean what looks like this.
I add the setTaskFlowId method to this bean and changed the scope of this backing bean to application.

package nl.ordina.view.backing;

import oracle.adf.controller.TaskFlowId;
public class TreeMenu {
private String taskFlowId = "/WEB-INF/employee-task-flow-definition.xml#employee-task-flow-definition";

public TreeMenu() {
}
public void setTaskFlowId(String taskFlow) {
this.taskFlowId = taskFlow;
}
public TaskFlowId getDynamicTaskFlowId() {
return TaskFlowId.parse(taskFlowId);
}
}

The JSF Tree page code looks like this. When the menu is a item then I will render a image and when you click on a label the taskflowurl value is passed on to the dynamic region bean and the page will show this task flow

<af:tree value="#{bindings.MainMenuView.treeModel}" var="node"
selectionListener="#{bindings.MainMenuView.treeModel.makeCurrent}"
rowSelection="single">
<f:facet name="nodeStamp">
<af:group>
<af:image source="/images/item.gif"
rendered="#{node.Type eq 'item' }" id="im"/>
<af:commandLink text="#{node.Label}">
<af:setActionListener from="#{node.TaskflowUrl}" to="#{TreeMenu.taskFlowId}"/>
</af:commandLink>
</af:group>
</f:facet>
</af:tree>

Here is the example workspace and the menu table script

Monday, November 17, 2008

Tour de Flex, a great Flex example library

Greg Wilson, Christophe Coenraets and James Ward have made an Adobe Air application called Tour de Flex. This app includes now 217 runnable flex samples, each with source code, links to documentation, and other details. Check this out go this url and download the 50mb air application. Now you always have your flex examples library with you.

Here a overview of the mapping examples ( google & yahoo maps) with the source code

The Tour de Flex topics

A ebay example.

This air application is a must have for every flex developer. Great Job ria cowboys.

Friday, November 14, 2008

Installing ADF 11G runtime on WebLogic 10.3

Before ADF 11g you had an ADF installer or JDeveloper which you can use to install the ADF libraires on the Application Server. With JDeveloper 11G and WebLogic 10.3 Oracle has changed this deployment procedure. This blog will show you how you can install the ADF 11G libraries on the WebLogic 10.3 Server.

First we install WebLogic on the server and make sure it works. Now we have to download JDeveloper 11G and put this jdeveloper installer on the server where you installed WebLogic.

Start the JDeveloper 11g installer where we will select the middleware home of the WebLogic installation.

Select the ADF runtime option. JDeveloper Studio is optional.


And finish the installation. Next we can start the configuration wizard on the WebLogic where we change the domain and add the ADF libraries to it.

I want to extend the already existing domain.

Select the webLogic domain in my case wlserver_10.3/samples/domain/wl_server

Now we can enable the ADF option to the domain configuration

and press extend and we are ready.

start the WebLogic server and go to the console application where we will see the ADF library in the deployments overview.

Friday, November 7, 2008

Split-Join in Oracle Service Bus

One of the cool features of the OSB is Split-Join feature with this you can split up you service request message and process these parts parallel. This part can be processed in an other service. The results or errors of these parts will be later joined together and send back in the response of the proxy service. In this blog I will use a Web Service which has as input Orders and we will split these orders to one order. Because I don't know how many orders I can receive we need to use a Dynamic Split-Join.

This is the xsd I used

I created a WSDL with operation which has a request and a response based on the xsd above

Create a new Split-Join ( You have to do this from the workshop application) where we select the operation of the just created wsdl
The Split-Join automatically creates two variables.

We have to initialize the response variable by adding an assign action where I add the result element to the response variable. Put this Assign action right after Receive
Now we can add a For Each Flow Control which will handle every Order, Put this after the Assign Action.

Select the For Each component where we can define the parallel mode of the order processing and we have to define the counter variable name which start in my case with 1 and ends with the count of the order elements.
Add a new variable order which is based on the order element. We will copy later one order to this variable.
Add a copy action to the Scope window of the For Each component where we use the counter variable to get the right order and pass this value to the order variable. (
$request.parameters/def:Orders/def:Order[$counter] )
Let's change the status of a order by adding a new copy action. Normally you will call an external service which processes the order and returns the result.
Now we collect the result of an order and this to the right place in the responce variable.
A Split-Join can only be called from a business service so let's create one automatically.


This business can be called by a proxy service. Create a proxy service based on the same WSDL as the split-join.
Add some routing to this proxy so the split-join business service is called from this proxy service
Publish this project to the ESB where we can test the proxy service. OSB automatically generates a example orders xml where we will add an extra order.
And voila here is the response where the status element value of the orders are changed to processed.

Wednesday, November 5, 2008

Build your own WebLogic 10.3 cluster

For one of my customer I had to build a JMS cluster to provide High Availablility for one of the customer applications. The choice to do this with WebLogic is very easy. WebLogic is excellent with JMS and clustering so let's make a cluster first and then add a JMS ConnectionFactory and a Distributed Queue to this cluster.
Download and install WebLogic 10.3 on the servers of the cluster and don't forget the install the nodemanager. You don't have to install Workshop for WebLogic
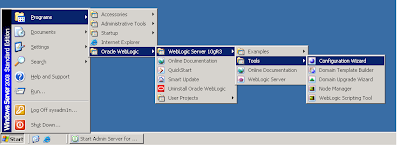
Start the "Configuration Wizard" to create a new WebLogic domain.
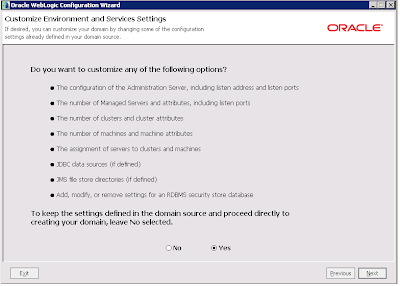
Choose Yes, so we can add our own cluster, node managers and managed servers.
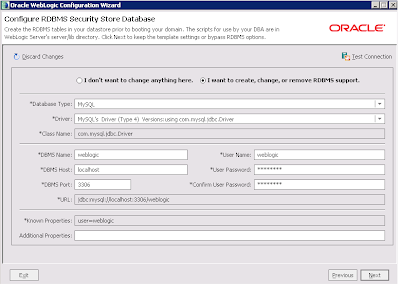
WebLogic will use a database as domain repository. In my case I will use MySQL as database. Off course you can use an Oracle database too. In the bea_home\wlserver_10.3\server\lib folder there are some scripts to create the weblogic repository. For Oracle is this the "rdbms_security_store_oracle.sql" file. Too bad there isn't a script for the MySQL database so I changed one of the scripts so it matches MySQL ddl.
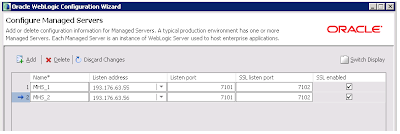
Add two or more managed servers to this domain.
Create a new cluster and add the two managed servers to this cluster.
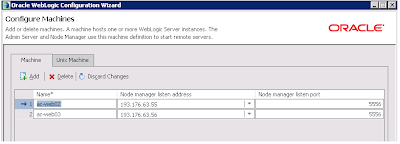
Add the node managers to this domain.
Add the AdminServer and Managed Server 1 to the first machine and Managed Server 2 to the second.
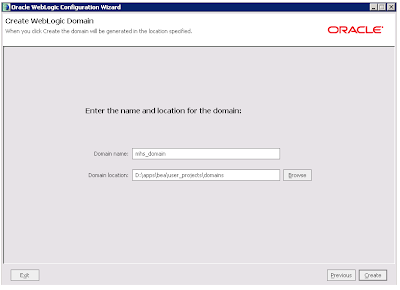
The last step is to give this domain a name and storing this domain in the user_projects folder
Start the Admin Server and after this you can start the Admin Server Console.

Go the control tab of the Servers where we can start the first managed server. Make Sure the node manager is running on this server.
To start the second managed server we have to do a little more. We need to pack the domain configuration on the first machine and unpack this on the second machine. After this we can start this second managed server.
go to this folder D:\Apps\bea\wlserver_10.3\common\bin>

pack -managed=true -domain=D:\Apps\bea\user_projects\domains\mhs_domain -template=d:\apps\mhs_domain_template.jar -template_name="mhs domain"

On the second machine we can unpack this domain
unpack -domain=D:\Apps\bea\user_projects\domains\mhs_domain -template=mhs_domain_template.jar

Now we can go back the console and start the second managed server. ( Be sure that the node manager is started on this machine)

If you want JMS clustering then you need to make a JMS server on all managed nodes.


Create a Connection Factory which has the Cluster as subdeployment. The last step is to create a distributed Queue or Topic.

That's all.