Pages

Saturday, September 26, 2009

Deploy Soa Suite 11g composite applications with Ant scripts

With Soa Suite 11g you can deploy your composite applications from JDeveloper or with ANT. In this blog I will do this with the SOA 11g ANT scripts. These ant scripts can only deploy one project so I made an ANT script around the SOA ANT scripts which can deploy one or more composites applications to different SOA environments. So now you can use it to automate your deployment or use it in your build tool.
In my ant script I will deploy shared artifacts to the MDS, compile, build and package the composite applications and deploy this to the SOA Server. After this I use an ANT script to start the unit tests and generate a JUnit result XML and at last I can optional disable the composite.
This JUnit XML can be used in your continuous build system. You can easily extend this build script so you use it to manage the composite applications.
For more info over ANT deployment see the official deployment documentation .
The official ANT scripts are located in the jdeveloper\bin folder. Here is a summary of the scripts and what they can do
  • ant-sca-test.xml, This script can start the test suites of the composite and generates a juinit report and not Attaches, extracts, generates, and validates configuration plans for a SOA composite application, The official documentation description is not correct.
  • ant-sca-compile.xml, Compiles a SOA composite application ,this script is also called in the package scrip, so we don't need to call this directly.
  • ant-sca-package.xml, Packages a SOA composite application into a composite SAR file and also validates and build the composite application.
  • ant-sca-deploy.xml, Deploys a SOA composite application.
  • ant-sca-mgmt.xml, Manages a SOA composite application, including starting, stopping, activating, retiring, assigning a default revision version, and listing deployed SOA composite applications.

Here is the main build.properties where you have to define the jdeveloper and your application home, which composite applications you want to deploy and what is the environment dev or acc.


Every application can have one or more SOA projects so the main ant script will load the application properties file which contains all the project with its revision number.
Here is a example of SoaEjbReference.properties file
projects=Helloworld
Helloworld.revision=1.0
Helloworld.enabled=true
Helloworld.partition=default

Because in my example I have two soa environments so I need to create two configuration plans. With this plan ( which look the wls plan ) can change the url of endpoints so it matches with the environment.
Select the composite application xml and generate a configuration plan.
Add the dev or acc extension to the file name.
Here you see how the plan looks like.


And here is the main ANT build script which can do it all and calls the Oracle ANT scripts.

For development testing environment I need to have dev.jndi.properties
java.naming.factory.initial=weblogic.jndi.WLInitialContextFactory
java.naming.provider.url=t3://localhost:8001/soa-infra
java.naming.security.principal=weblogic
java.naming.security.credentials=weblogic1
dedicated.connection=true
dedicated.rmicontext=true


And finally the CMD script to run this ANT script. To make this work we need the ant-contrib library and put this in the classpath of ANT or put it in the ANT lib folder.
set ORACLE_HOME=C:\oracle\MiddlewareJdev11gR1PS3
set ANT_HOME=%ORACLE_HOME%\jdeveloper\ant
set PATH=%ANT_HOME%\bin;%PATH%
set JAVA_HOME=%ORACLE_HOME%\jdk1.6.0_23

set CURRENT_FOLDER=%CD%

ant -f build.xml deployAll


See my github project for the source code https://github.com/biemond/soa_tools
Latest changes.

  • PS3 / PS4 support
  • Activation of the composite
  • partition support
  • Build number generator
  • Build logging
  • SAR and MDS z ipsfiles are bundled under build number.
  • Demo mode, in which you can test the ANT configuration without deploying
The new file structure with a logs and build folder.
 The logging of a run.

Tuesday, September 22, 2009

Job scheduling in Weblogic

This blog is about how you can run a batchjob on a specific time in the Weblogic application server and as extra, I made an ADF page in which you can stop or start the jobs. This job schedular can start for example some Soa processes at a specific time.
The scheduling is done with the help of the CommonJ API which is standard in Weblogic. This example works perfectly in a managed node but if you want to do the same in a Weblogic Cluster then you should not read this blog and go the James Bayer's blog . And for more information about Timer API see the official Weblogic documentation.

Very important, this job scheduling only works within in a web application.
First we start by adding the TimerManager to the web.xml

<resource-ref>
<res-ref-name>tm/TimerManager</res-ref-name>
<res-type>commonj.timers.TimerManager</res-type>
<res-auth>Container</res-auth>
<res-sharing-scope>Unshareable</res-sharing-scope>
</resource-ref>
</web-app>

Now we done this we can add a servlet which start this TimerManager and its jobs. Important that the servlet is automatically started when the webapp is started.

<servlet>
<display-name>timer</display-name>
<servlet-name>timer</servlet-name>
<servlet-class>nl.whitehorses.wls.schedular.TimerServlet</servlet-class>
<load-on-startup>100</load-on-startup>
</servlet>
<servlet-mapping>
<servlet-name>timer</servlet-name>
<url-pattern>/timer</url-pattern>
</servlet-mapping>

Then the servlet code which start the TimeManager and the two example batches. In this example the job is started again when it is finished after 30 seconds. If you want to do this at a specific time then use scheduleAtFixedRate

package nl.whitehorses.wls.schedular;

import java.io.IOException;
import java.io.PrintWriter;
import javax.servlet.http.HttpServlet;
import javax.servlet.http.HttpServletRequest;
import javax.servlet.http.HttpServletResponse;
import javax.servlet.ServletConfig;
import javax.servlet.ServletException;
import javax.naming.InitialContext;
import javax.naming.NamingException;
import commonj.timers.*;

/**
* TimerServlet demonstrates a simple use of commonj timers
*/
public class TimerServlet extends HttpServlet {


public void init(ServletConfig config) throws ServletException {

super.init(config);
System.out.println("timer servlet is initialized ");
try {
InitialContext ic = new InitialContext();
TimerManager tm = (TimerManager)ic.lookup("java:comp/env/tm/TimerManager");

Timer batchRun1Timer = null;
Boolean batchRun1TimerIsRunning = false;
Timer batchRun2Timer = null;
Boolean batchRun2TimerIsRunning = false;

// Execute timer every 30 seconds starting immediately
batchRun1Timer = tm.schedule(new Batch1(), 0, 30 * 1000);
batchRun1TimerIsRunning = true;

batchRun2Timer = tm.schedule(new Batch2(), 0, 30 * 1000);
batchRun2TimerIsRunning = true;

config.getServletContext().setAttribute("batch1",batchRun1Timer);
config.getServletContext().setAttribute("batch2",batchRun2Timer);
config.getServletContext().setAttribute("batch1Running",batchRun1TimerIsRunning);
config.getServletContext().setAttribute("batch2Running",batchRun2TimerIsRunning);

} catch (NamingException ne) {
ne.printStackTrace();
}
}

public void service(HttpServletRequest req, HttpServletResponse res) throws IOException {
res.setContentType("text/html");
PrintWriter out = res.getWriter();
out.println("Timer servlet is working!");
}
}

Here is an example of a batch job. The timerExpired method is fired every time when the job time has passed. Here you can put in your own code and when the job is canceled then the TimerCancel method is fired.

package nl.whitehorses.wls.schedular;

import commonj.timers.*;
import java.io.Serializable;

public class Batch1 implements Serializable, TimerListener, CancelTimerListener {

public void timerExpired(Timer timer) {
System.out.println("Batch1 timer expired called on " + timer);
}
public void timerCancel(Timer timer) {
System.out.println("Batch1 timer cancelled called on " + timer);

}
}

And finally the JSF page with its backing bean to control the jobs.


<?xml version='1.0' encoding='windows-1252'?>
<jsp:root xmlns:jsp="http://java.sun.com/JSP/Page" version="2.1"
xmlns:f="http://java.sun.com/jsf/core"
xmlns:af="http://xmlns.oracle.com/adf/faces/rich">
<jsp:directive.page contentType="text/html;charset=windows-1252"/>
<f:view>
<af:document id="d1">
<af:form id="f1">
<af:panelHeader text="Timers" id="ph1">
<af:panelFormLayout id="pfl1">
<af:panelGroupLayout id="pgl6" layout="horizontal">
<af:panelGroupLayout id="pgl8" layout="vertical">
<af:poll id="poll1">
<af:panelGroupLayout id="pgl5" layout="vertical">
<af:outputLabel value="#{TimerBean.tmStatus}" id="ol4"
partialTriggers="poll1"/>
<af:outputLabel value="#{TimerBean.batch1Status}" id="o22"
partialTriggers="poll1"/>
<af:outputLabel value="#{TimerBean.batch2Status}" id="o23"
partialTriggers="poll1"/>
</af:panelGroupLayout>
</af:poll>
</af:panelGroupLayout>
<af:panelGroupLayout id="pgl7" layout="vertical">
<af:commandButton text="Time Manager On / Off" id="cb1"
actionListener="#{TimerBean.timerManager}"/>
<af:commandButton text="Batch 1 On / Off" id="cb2"
actionListener="#{TimerBean.Batch1}"/>
<af:commandButton text="Batch 2 On / Off" id="cb3"
actionListener="#{TimerBean.Batch2}"/>
</af:panelGroupLayout>
</af:panelFormLayout>
</af:panelHeader>
</af:form>
</af:document>
</f:view>
</jsp:root>


package nl.whitehorses.wls.backing;

import commonj.timers.Timer;
import commonj.timers.TimerManager;

import javax.faces.event.ActionEvent;
import javax.naming.InitialContext;
import javax.naming.NamingException;

import nl.whitehorses.wls.schedular.Batch1;
import nl.whitehorses.wls.schedular.Batch2;

import javax.faces.context.FacesContext;
import javax.servlet.ServletContext;

public class TimerBean {


private InitialContext ic = null;
private TimerManager tm = null;

private Timer batchRun1Timer = null;
public Boolean batchRun1TimerIsRunning = false;
private Timer batchRun2Timer = null;
public Boolean batchRun2TimerIsRunning = false;


public TimerBean() {
try {
ic = new InitialContext();
tm = (TimerManager)ic.lookup("java:comp/env/tm/TimerManager");

FacesContext ctx = FacesContext.getCurrentInstance();
ServletContext servletContext = (ServletContext) ctx.getExternalContext().getContext();

batchRun1Timer = (Timer)servletContext.getAttribute("batch1");
batchRun2Timer = (Timer)servletContext.getAttribute("batch2");
batchRun1TimerIsRunning = (Boolean)servletContext.getAttribute("batch1Running");
batchRun2TimerIsRunning = (Boolean)servletContext.getAttribute("batch2Running");
System.out.println("init end");

} catch (NamingException e) {
e.printStackTrace();
}
}

public void timerManager(ActionEvent actionEvent) {
// Add event code here...
if ( tm.isSuspended() ) {
tm.resume();
} else {
tm.suspend();
}
}

public void Batch1(ActionEvent actionEvent) {
// Add event code here...
if ( batchRun1TimerIsRunning ) {
batchRun1Timer.cancel();
batchRun1TimerIsRunning = false;
} else {
batchRun1Timer = tm.schedule(new Batch1(), 0, 10 * 1000);
batchRun1TimerIsRunning = true;
}

}

public void Batch2(ActionEvent actionEvent) {
// Add event code here...
if ( batchRun2TimerIsRunning ) {
batchRun2Timer.cancel();
batchRun2TimerIsRunning = false;
} else {
batchRun2Timer = tm.schedule(new Batch2(), 0, 10 * 1000);
batchRun2TimerIsRunning = true;
}
}

public String getTmStatus () {
if ( tm.isSuspended() ) {
return "TimerManager is stopped";
} else {
return "TimerManager is running";
}
}

public String getBatch1Status () {
Long time = batchRun1Timer.getScheduledExecutionTime();
java.util.Date date = new java.util.Date(time);
if ( batchRun1TimerIsRunning ) {
return "Batch1 scheduled time "+date.toString();
} {
return "Batch1 stopped";
}
}

public String getBatch2Status () {
Long time = batchRun2Timer.getScheduledExecutionTime();
java.util.Date date = new java.util.Date(time);
if ( batchRun2TimerIsRunning ) {
return "Batch2 scheduled time "+date.toString();
} {
return "Batch2 stopped";
}
}


public Timer getBatchRun1Timer(){
return batchRun1Timer;
}

public void setBatchRun1Timer(Timer batchRun1Timer ){
this.batchRun1Timer = batchRun1Timer;
}

public Timer getBatchRun2Timer(){
return batchRun2Timer;
}

public void setBatchRun2timer(Timer batchRun2Timer ){
this.batchRun2Timer = batchRun2Timer;
}
}


Here is the example workspace.

Wednesday, September 16, 2009

WSM in Fusion Middleware 11G

Probably you already knew the Web Service Manager of Soa Suite 10.1.3, The 10.1.3 version was mainly used in combination with Soa Suite because this was the only way to secure the BPEL and ESB Services. In FMW 11g Oracle changed WSM so it is fully integrated in all the Fusion Middleware components. Now you can use WSM in ADF, in the Services and References of Soa Suite and in the jax-ws services or proxy clients.
In FMW 11G you can also define your own ws-security policies ( just use a wizard in the EM website) or use the standard policies, So it can always comply to your security requirements.

In this blog entry I will show you how to setup FMW on Weblogic and define security on a BPEL service, call this service with an ADF Web Service Datacontol and a java web service proxy client.

Special thanks to Vishal Jain of Oracle who helped to solve the issues and explained how WSM works with keystores.

First we need to generate a keystore with a self signed certificate. Somehow certificates with generated with OpenSSL fails in FMW.
keytool -genkey -keyalg RSA -keystore C:\test_keystore.jks -storepass password -alias client_key -keypass password -dname "CN=Client, OU=WEB AGE, C=US" -keysize 1024 -validity 1460

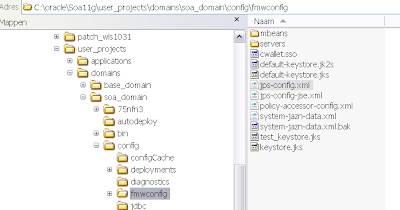
Now here comes the trick , copy this keystore to fmwconfig folder ( domain_name/config ) of the soa suite domain

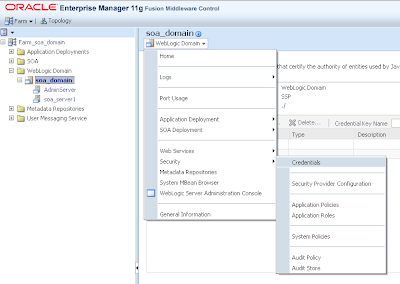
Go the Enterprise Manager Website where we can configure the just created keystore. We have to select the weblogic domain and go to the security menu / credentials.


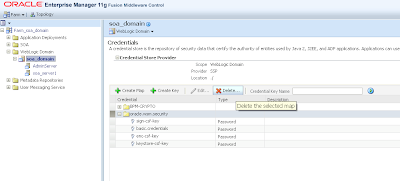
Here we can change maps or passwords which will be stored in the cwallet.sso file. If you see the oracle.wsm.security map then you can delete this map. This map contains the keystore password.


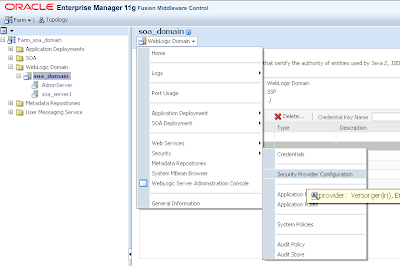
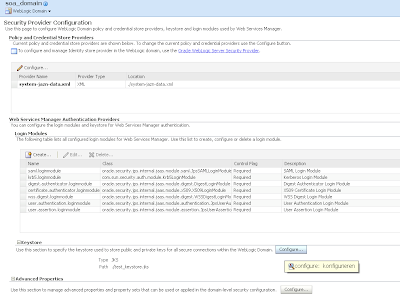
Go the Security Provider Configuration menu item in the security menu where we will add the keystore to FMW
Press the Configure button in the keystore part of the screen.

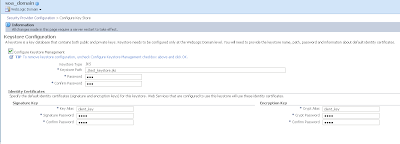
Here we can add the keystore details. Use ./ as keystore path. This will fill the oracle.wsm.security map in the credentials menu.

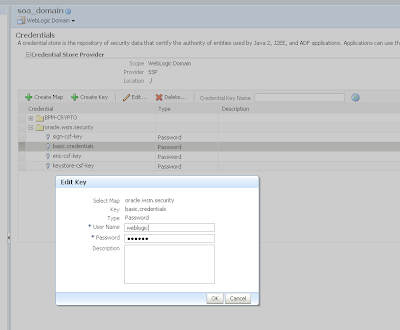
Go back to the Credentials where we will add an extra entry in the wsm map. Create a new key basic.credentials with as username weblogic and with password weblogic1


Restart the Weblogic server.

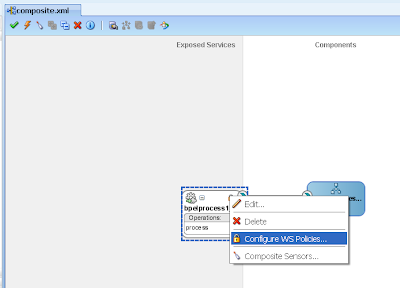
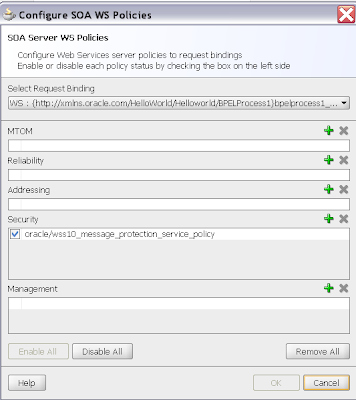
Next part is to add a wsm policy to a BPEL Service.

Select the server policy you like to use and deploy this to the soa suite server.


Now we can make a jax-ws proxy client so we can test the policy. In this client we will use the matching client policy. If this fails check your libraries.


package nl.whitehorses.wsclient;

import java.util.Map;

import javax.xml.ws.BindingProvider;
import javax.xml.ws.WebServiceRef;

import oracle.webservices.ClientConstants;

import weblogic.wsee.jws.jaxws.owsm.SecurityPolicyFeature;

public class BPELProcess1_ptClient
{
@WebServiceRef
private static Bpelprocess1_client_ep bpelprocess1_client_ep;

public static void main(String [] args)
{
bpelprocess1_client_ep = new Bpelprocess1_client_ep();

SecurityPolicyFeature[] securityFeature = new SecurityPolicyFeature[] {
new SecurityPolicyFeature("oracle/wss10_message_protection_client_policy") };

BPELProcess1 port = bpelprocess1_client_ep.getBPELProcess1_pt(securityFeature);


Map reqContext = ((BindingProvider) port).getRequestContext();
reqContext.put(ClientConstants.WSSEC_KEYSTORE_TYPE, "JKS");
reqContext.put(ClientConstants.WSSEC_KEYSTORE_LOCATION, "C:\\test_keystore.jks");
reqContext.put(ClientConstants.WSSEC_KEYSTORE_PASSWORD, "password");
reqContext.put(ClientConstants.WSSEC_SIG_KEY_ALIAS, "client_key");
reqContext.put(ClientConstants.WSSEC_SIG_KEY_PASSWORD, "password");
reqContext.put(ClientConstants.WSSEC_ENC_KEY_ALIAS, "client_key");
reqContext.put(ClientConstants.WSSEC_ENC_KEY_PASSWORD, "password");
reqContext.put(ClientConstants.WSSEC_RECIPIENT_KEY_ALIAS, "client_key");
System.out.println("output = " + port.process("aaaa"));

}
}


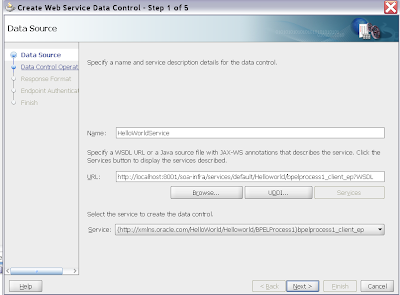
If all went well then we can do same with a ADF Web Service Datacontrol.

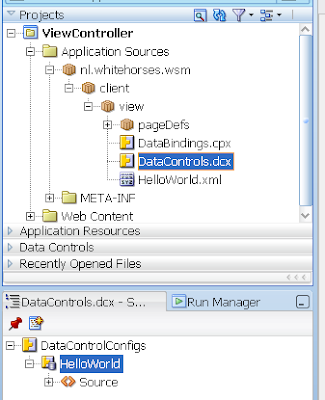
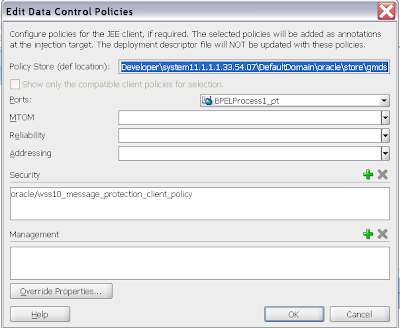
To add the client policy select the DataControls.dcx and go to the structure window.

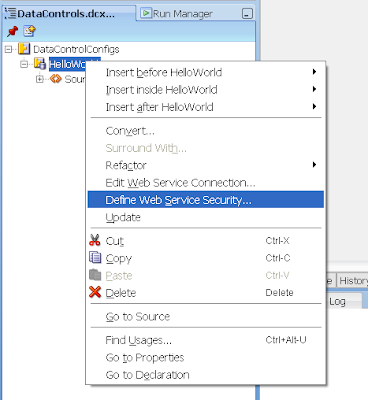
Here we can define web service security

Select the right client policy and in this case we need to override properties, press the button and fill in the recipient with your key alias. Else you will get a orakey error.

And at last deploy this webapplication with a ear profile to the Soa Suite server and test your webapp.

Monday, September 14, 2009

SSO with WebLogic 10.3.1 and SAML2

In a previous blog entry I already explained how to setup Single Sign On (SSO) with SAML1.1. In this blogpost I do the same but then with SAML version 2 or SAML2 in Weblogic 10.3.1 server.
First we start with the SAML2 Identity Provider, in SAML1.1 this is called the source site. Because we can't do anything in the federation tab of the serve, we need to create a Credential Mapping Provider ( go to myrealm security, Providers , Credential Mappings. )
and choose the SAML2 credential mapping.

Fill the provider specific details and use the demoidentity keystore ( this is default)

Now we can go the Federation Services tab of the server configuration and create a SAML2 profile for this server, We need to save this to a file and import this later in the other SAML2 Service Providers.
The published site url is very important , choose url of this server , use http or https and add saml2 to this url. SAML needs this url to communicate with the other SAML services.

Second part of the SAML2 profile

Save this profile to a xml


Go the Identity provider tab and fill in these fields
Go to the second Weblogic server, this is called the Service provider or in SAML1.1 the destination. Here we need to create a new SAML2 Authentication provider ( Go to the myrealm Security realm , Providers and then Authentication )

Now we done this we can go the Federation Services Tab of this weblogic server and fill in this SAML2 profile. The published url is very important and it must match with the server url and have to end with saml2

Second part of this SAML profile

Save this metadata to a xml. This needs to be imported in the Credential Mapping Provider of the Identity Provider ( the first weblogic server).


Next step is to go the SAML2 Service Provider tab.
Go back to the SAML2 authentication provider where we will import the identity provider metadata xml.

Select the identity metadata xml.

You have to enable this and most important, fill in all the url's of your applications who needs SAML authentication.


Now we do the same for metadata xml of the service provider, We need to import this in the Credential Mapper provider of the Identity Provider
Select the Service Provider metadata xml

enable this Service Provider.

That's all

In this example I use http but it shoud also work with https and when it fails, please check your url's , don't mix localhost or pc name. Same for the domain name.

For more debug information in your server.log and set these java parameters in your setDomainEnv
set EXTRA_JAVA_PROPERTIES=-Dweblogic.debug.DebugSecuritySAMLAtn=true -Dweblogic.debug.DebugSecuritySAMLLib=true -Dweblogic.debug.DebugSecuritySAML2Service=true -Dweblogic.debug.DebugSecuritySAML2CredMap=true -Dweblogic.debug.DebugSecuritySAML2Atn=true %EXTRA_JAVA_PROPERTIES%