Pages

Tuesday, January 20, 2009

ADF Skinning in JDeveloper 11G

With JDeveloper 11G you can change every ADF Rich faces component with CSS. This is called Skinning. In this blog I made an example workspace and I will show you what to do if you want to apply Skinning in your web application.
Here is an image of the main page where I have a custom PanelTabbed which contains some inputtext items, PanelGroup with custom corporate branding selectors and two PanelBoxes with some buttons

First we can add a new css file to the project.


Create a new file called trinidad-skins.xml in the WEB-INF folder. Make sure it extends from blafplus-rich

<?xml version="1.0" encoding="windows-1252" ?>
<skins xmlns="http://myfaces.apache.org/trinidad/skin">
<skin>
<id>myskin.desktop</id>
<family>myskin</family>
<extends>blafplus-rich.desktop</extends>
<style-sheet-name>css/layout.css</style-sheet-name>
</skin>
</skins>

We need to change the trinidad-config.xml file so it will use the new skin

<?xml version="1.0" encoding="windows-1252"?>
<trinidad-config xmlns="http://myfaces.apache.org/trinidad/config">
<skin-family>myskin</skin-family>
</trinidad-config>

If you want to test your css the you should change the CHECK_FILE_MODIFICATION context parameter to true. ( This is located in the web.xml ).
Now you can change the css file and press F5 to refresh the page to see the result without restarting the web application.

We need to use CSS level 3 and enable ADF faces Extension. ADF will automatically converts this to a level 2 css file. Open the JDeveloper preferences window to change this.

There are some great reference resources for Skinning, the first resource is located in the JDeveloper help.


The second reference is the demo page of Oracle where you can test the Skinning features of every JSF component

JDeveloper provides some css tools to help you, but these tool does not work so well. Oracle must take a look at Adobe Flex, that's is working perfectly ( maybe next version). Here is an image of the css structure window.
JDeveloper also has a property window. It will show you all the css properties and not the properties which can be used by component selector.
The only what works is to open the css file and do it yourself. JDeveloper helps you with the possible options.

Here is my example workspace which you can use and test it yourself.

Friday, January 16, 2009

Passing ADF events between Task Flow regions

Passing events and handle these events in an ADF Task Flow region or page is in JDeveloper 11G very simple and you don't need to program java to achieve this. Lucas already made an article about this where he use java to achieve this.
To explain the ADF way, I made a page which is located in the default unbounded Task Flow adfc-config.xml. This ADF JSF page contains two bounded Task Flows. The Task Flow contains one page fragment with has its own HR department iterator.
In this blog I will show you the different ADF Event options.

Let's start with an easy one. When I press on the next button of the Left department region then I want that the right region also goes to the next department.
First we need to define the event. Start by opening the Left page fragment page ( this page will fire the event) and go the bindings tab. This will give you an overview of the ADF bindings. The Structure window will also give you an overview. Here we will select the Next action

Use the right button so we can add the events element to this action binding.

Add an event element to the events element.


Give the event a meaningfull name

That's all for defining event on a binding. You can add an event on every adf binding type( For example, a methodaction, an action or an attributevalue)
This is how it looks in the pagedef.

<action IterBinding="DepartmentsViewTFLeftIterator" id="Next"
RequiresUpdateModel="true" Action="next">
<events xmlns="http://xmlns.oracle.com/adfm/contextualEvent">
<event name="LeftNext"/>
</events>
</action>

The next step is to do something with this event. For this we need to open jsf the page which contains the departments Task Flow regions. This pagedef is the event mediator. It listen for events and can start the action or method in a pagedef.
Go the bindings tab of the jsf page and open the structure window.

Select the pagedef root node and press Edit Event Map


This opens the event wizard where we can add a new eventmap entry
We need to select the producer of the event. Go the pagedef of the department region and select the LeftNext event.

The next step is to select the action or method action in the other department region pagedf. You can only select action or methodactions. That's all. The next button in the left department also fire the next action of the right department region.

This is how the pagedef of the main jsf page looks like

<?xml version="1.0" encoding="UTF-8" ?>
<pageDefinition xmlns="http://xmlns.oracle.com/adfm/uimodel"
version="11.1.1.51.88" id="mainPageDef"
Package="nl.whitehorses.view.pageDefs">
<parameters/>
<executables>
<taskFlow id="taskflowdefinitionleft1"
taskFlowId="/WEB-INF/task-flow-definition-left.xml#task-flow-definition-left"
xmlns="http://xmlns.oracle.com/adf/controller/binding"/>
<taskFlow id="taskflowdefinitionright1"
taskFlowId="/WEB-INF/task-flow-definition-right.xml#task-flow-definition-right"
xmlns="http://xmlns.oracle.com/adf/controller/binding"/>
</executables>
<bindings/>
<eventMap xmlns="http://xmlns.oracle.com/adfm/contextualEvent">
<event name="LeftNext">
<producer region="taskflowdefinitionleft1.leftPageDef.Next">
<consumer region="taskflowdefinitionright1"
handler="rightPageDef.Next"/>
</producer>
</event>
</eventMap>
</pageDefinition>


We can make it more complex by adding parameters to an event. For this I will add an event to SetCurrentRowWithKeyValue operation in the left department and fire the SetCurrentRowWithKeyValue of the right region. So I can lookup the department in the left and right department region. The only difference with this and the Next action is that we need to pass the rowKey variable. We have to do the same actions as with the Next action event.
Add the rowKey variable and its value.
In my case I add a setActionlistener to the button which fires the setCurrentRow operation. This setActionlistener copies the rowkey to the request bean or you can use the special PayLoad variable.
The Payload variable has some handy attributes. For Example is you add an event on an attributevalue like departmentId then ${payload.newValue} contains the new value of the attribute.
If the called operation returns an value then this value is stored in the payload variable.

To fire more operations on an event we can add more consumers to an event. Here is an example of this.

<event name="Change">
<producer region="*">
<consumer region="taskflowdefinitionright1"
handler="rightPageDef.valueMethod">
<parameters>
<parameter name="attribute" value="${payLoad.newValue}"/>
</parameters>
</consumer>
<consumer region="taskflowdefinitionleft1"
handler="leftPageDef.valueMethod">
<parameters>
<parameter name="attribute" value="${payLoad.newValue}"/>
</parameters>
</consumer>
</producer>
</event>

In the example I used an * in the producer region. This means that it listen for an event with the name Change and it does not matter which pagedef fires this event.

Here is my example workspace.

Tuesday, January 13, 2009

Create PL/SQL Webservice in JDeveloper 11g and eclipselink

In Late 2007 I already made a blog about creating a webservice in JDeveloper 11g TP based on a plsql package. Too bad the plsql web service creation option didn't make it in the final release of 11g. Maybe in the next release of 11g the plsql webservice will make a comeback. But creating a plsql webservice in the first jdeveloper 11g release is still possible. We will use eclipselink and some smart jdeveloper wizards to create this web service. This way of creating a web service gives you a lot of options how this plsql web service is created.

This is the pl/sql package I will use in this example. The package contains a current time funtion and a procedure which returns all the dept records of the scott scherma. Add this package to the scott schema

create or replace package scott_ws is

TYPE cursor_type IS REF CURSOR;

function get_current_time(date_format varchar2) return varchar2;

procedure get_all_department(dept_recordset OUT scott_ws.cursor_type);

end scott_ws;

create or replace package body scott_ws is

function get_current_time(date_format varchar2) return varchar2 is
v_time varchar2(20);
begin
if date_format is null then
return 'empty format';
end if;
select to_char(sysdate, date_format) into v_time from dual;
return v_time;

exception
when others then
return 'error';
end;

procedure get_all_department(dept_recordset OUT scott_ws.cursor_type) is
begin
OPEN dept_recordset FOR SELECT * FROM dept;
end get_all_department;


end scott_ws;

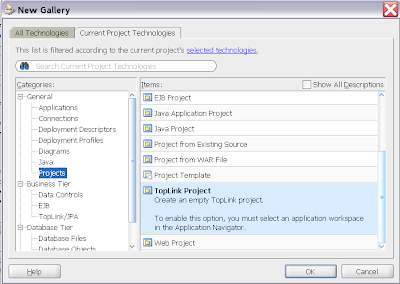
Now we can create a new TopLink project


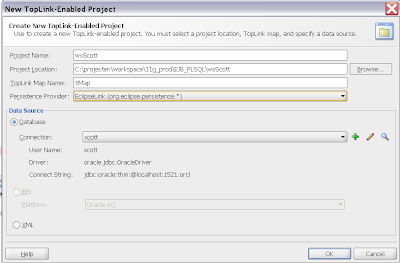
We will use the eclipselink provider and use or create the scott database connection
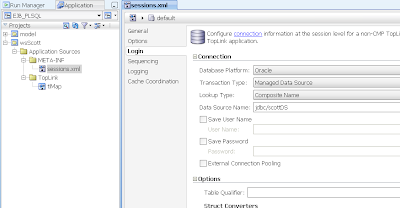
JDeveloper creates a new project with a Toplink project file and a session xml. Open this xml where we use the default profile and select the Login link.
If you want to use a datasource then select managed datasource option and provide the datasource name ( this datasource has to be created in WebLogic )

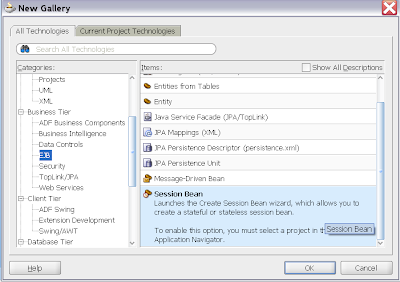
Next we can create a session bean which wil contain the code which make a connection to the database using the default profile of the session xml and the eclipselink code for our plsql procedure / function

Give this bean a name and use the default values.

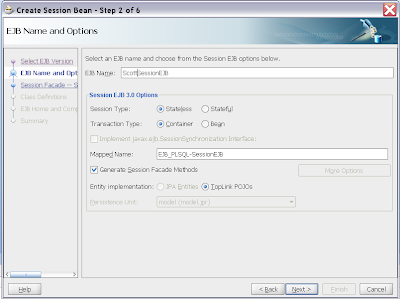
Implement a remote and local interface on the session bean

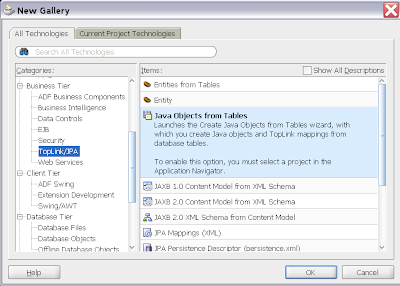
The next option is only necessary when we want to map the dept record to a dept java class. So the web services can use this class to transform these departments to xml.
Select the java objects from tables option in the TopLink/JPA category

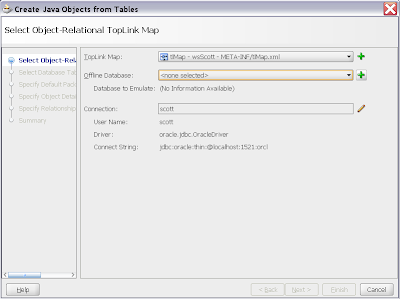
Use the scott connection again

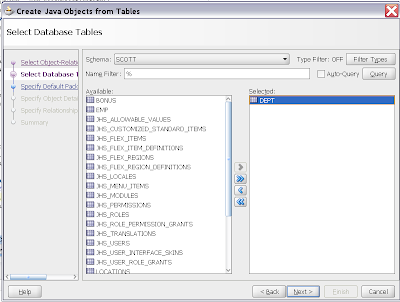
Select the dept table


The dept class looks like this.

package wsscott.definitions;

import java.io.Serializable;

import java.math.BigDecimal;

/**
* ### Generated by Oracle JDeveloper 11g 11.1.1.0.31.51.88 - Mon Jan 12 23:08:08 CET 2009. ###
*/

public class Dept implements Serializable {

private BigDecimal deptno;
private String dname;
private String loc;

public Dept() {
}

public Dept(BigDecimal deptno, String dname, String loc) {
this.dname = dname;
this.deptno = deptno;
this.loc = loc;
}

public BigDecimal getDeptno() {
return this.deptno;
}

public String getDname() {
return this.dname;
}

public String getLoc() {
return this.loc;
}

public void setDeptno(BigDecimal deptno) {
this.deptno = deptno;
}

public void setDname(String dname) {
this.dname = dname;
}

public void setLoc(String loc) {
this.loc = loc;
}

}


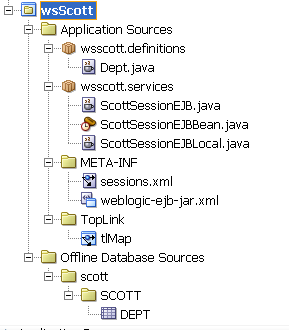
Here an overview of the toplink project.

Open your sessionbean class and add the following code to this bean

This code is necessary to create a connection to the database. In the sessions.xml file and in the default profile is our scott database connection or datasource defined

public class ScottSessionEJBBean implements ScottSessionEJB,
ScottSessionEJBLocal {

private SessionFactory sessionFactory;

// constructor
public ScottSessionEJBBean() {
this.sessionFactory = new SessionFactory("META-INF/sessions.xml", "default");
}
}

Here the code for the get_current function. See the eclipselink wiki for more plsql examples. Because we are calling an function we need to use StoredFunctionCall

public String plsqlCurrentTime(String format) {
StoredFunctionCall functionCall = new StoredFunctionCall();

// function name in package
functionCall.setProcedureName("scott_ws.get_current_time");
// input parameter name
functionCall.addNamedArgument("date_format");
// function result datatype
functionCall.setResult("FUNCTION_RESULT", String.class);


ValueReadQuery query = new ValueReadQuery();
query.setCall(functionCall);
query.addArgument("date_format"); // input

// create an argument list and add a value for the date_format
List args = new ArrayList();
args.add("YYYY-MM-DD");

// get an database session
Session session = sessionFactory.getSharedSession();

// execute function and return the result
return (String)session.executeQuery(query, args);
}

The java code for the procedure is a bit more complex then the function. This methods return a list of dept classes.

public List plsqlDeptFindAll() {

// create a database session
Session session = sessionFactory.getSharedSession();

StoredProcedureCall spcall = new StoredProcedureCall();
spcall.setProcedureName("scott_ws.get_all_department");
// this procedure has only one output parameter
spcall.useNamedCursorOutputAsResultSet("dept_recordset");

// make a new list of departments classes
List department = new ArrayList();
// execute the procedure.
List list = session.executeSelectingCall(spcall);

// make an iterator of the ref cursor result
ListIterator litr = ((List)list).listIterator();
while(litr.hasNext()) {

// when a the iterator has a next value then create
// a new dept class and fill its attributes
Dept dept = new Dept();
DatabaseRecord record = litr.next();
dept.setDeptno( (BigDecimal)record.get("DEPTNO") );
dept.setDname( (String)record.get("DNAME") );
dept.setLoc( (String)record.get("LOC") );
department.add(dept);
}
return department;
}

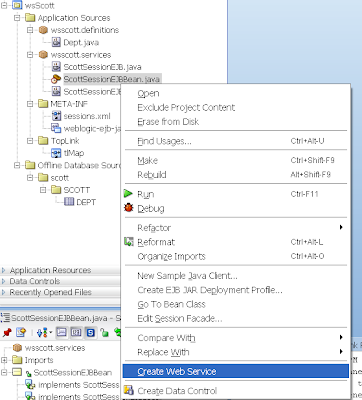
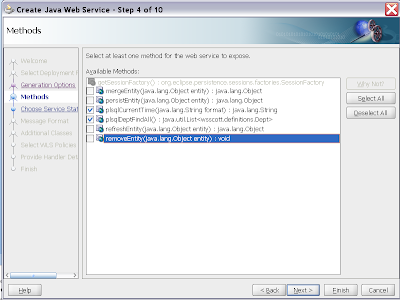
Add these two plsql methods to the remote and local ejb interface. After this we can select the EJB session bean and create a new web service

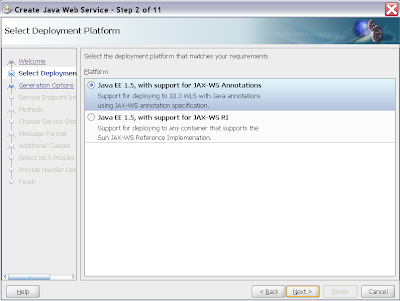
Choose a web service deployment profile

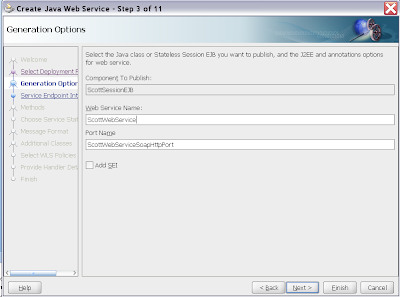
Give this web service a name
Just select our two plsql methods


The wizard will also create a new web service deployment. Use this deployment profile to deploy your ejb web service to WebLogic
When the deployment is successfull then we can take a look in the weblogic console. Go to deployments tab and open you enterprise application.

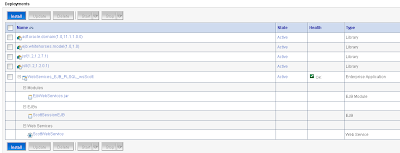
Select your Web Service to see the wsdl.

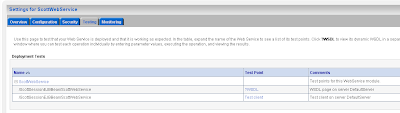
That's all, just generate a web service proxy to test this web service.
Here is the 11g project code.

Saturday, January 10, 2009

Calling an insert edit Task Flow

Inspired by a great article of Frank and Steve about how to cancel an edit Task Flow where Frank is using adfm savepoints to achieve this. In this example I rebuild my dynamic regions example and added the a create / insert Task Flow. This TF start a new transaction ( So I don't need to use an adfm savepoint) and this transaction which will be rollbacked by an abort. The create edit TF of Steve and Frank is using the same viewobject iterator in the main page and the create edit TF. The TF I build can be used everywhere just pass the departmentId to this TF. If you use the shared datacontrol option then the main page detects the update and refreshes the deparments in the tree and fragment, It also works in Isolated mode but then you can not see the department changes. In this example I call this TF from a tree (unbounded TF) and from a page fragment (Bounded).
Here the create edit department Task Flow is called from a page fragment.
The create / edit Task Form.
It start with a router which eveluates the department primary key input parameter. If it has the value 0 then the createinsert operation on the department iterator is called else the setCurrentRowWithKeyValue operation is called.
Here is picture of the router parameters ( this is the default activity) where we evaluates the input.


In the unbounded TF there are two control flow cases between the create edit TF and the view.


Here is the TF of the department page fragment. Here I don't have a return flow case because this is fragment. The fragment can not be replaced by a TF. We can only open the create edit TF in a dialog mode and the user can close the TF and return to the page with the fragment.
To achieve this we need to select the TF call in the page fragment Task Flow and select the run as dialog option.

The second step is to change the button which calls the action. Go to the page fragment page and select the button where we select the useWindow option. Now the TF is opened in a popup.


To pass the department primary key value to the create edit TF we need to use an input parameter
In the behaviour option of the Task Flow we change the transaction option to new-transaction so we call just do a rollback or commit when we leave the TF.

Here is the example workspace

Wednesday, January 7, 2009

Using remote / local ejb in JDeveloper 11g and WLS

If you want to use EJB as model in your 11G ADF JSF application then you can follow this guide on otn. Using the local interface to an ejb session bean is not so difficult. Just select the ejb session bean and create an datacontrol on this. Then You will get the option to use the Local or Remote interface.

After this you can select and use the ejb methods from the viewcontroller datacontrol window. When you use this local ejb, JDeveloper will add a reference to this ejb in the web.xml. It will use ejb-local-ref element

<ejb-local-ref>
<ejb-ref-name>ejb/local/HRSessionEJB2</ejb-ref-name>
<ejb-ref-type>Session</ejb-ref-type>
<local>nl.whitehorses.model2.HRSessionEJB2Local</local>
<ejb-link>HRSessionEJB2</ejb-link>
</ejb-local-ref>

When you start your application then JDeveloper automatically add this ejb module in the weblogic deployment and the web application will use the ejb-link element to resolve the ejb.

Now let's make it a bit more difficult by using remote interface EJB. We have now two options. You can add this remote ejb to the application workspace then JDeveloper will deploy this ejb too with the web application deployment. The only thing what is different with a local interface ejb is the reference element in the web.xml. It will now use the ejb-ref element.

<ejb-ref>
<ejb-ref-name>ejb/HRSessionEJB</ejb-ref-name>
<ejb-ref-type>Session</ejb-ref-type>
<remote>nl.whitehorses.model.HRSessionEJB</remote>
<ejb-link>HRSessionEJB</ejb-link>
</ejb-ref>

I think when you choose to use remote ejb then it is wise to deploy this on a different wls then the wls where you web application is running. For this we need to create a new workspace where we will create the remote ejb's. Deploy this ejb to a WLS server other then the WLS of the web application .
When we want to use this ejb with ADF in the web application then we need to create a new datacontrol on this ejb session bean. Now we use the remote interface option. If we want see this datacontrol in the data control window of the web application then we need to make an ADF library deployment.

Deploy this to a jar and add this jar to the viewcontroller project.
There are two ways to do a jndi lookup from the web application to the remote EJB. The first way is to open datacontrols.dcx in the remote ejb wproject and fill the correct jndi properties fields.

<Source>
<ejb-definition ejb-version="3.0" ejb-name="HRSessionEJB"
ejb-type="Session"
ejb-business-interface="nl.whitehorses.model.HRSessionEJB"
ejb-interface-type="remote"
jndi-name="ADF_EJB-SessionEJB#nl.whitehorses.model.HRSessionEJB"
provider-url="t3://127.0.0.1:7001"
initial-context-factory="weblogic.jndi.WLInitialContextFactory"
xmlns="http://xmlns.oracle.com/adfm/adapter/ejb"/>
</Source>
</AdapterDataControl>
</DataControlConfigs>

The other way is to make a reference element in the web.xml and weblogic.xml in the viewcontroller project. here is the remote ejb reference in the web.xml

<ejb-ref>
<ejb-ref-name>ejb/HRSessionEJB</ejb-ref-name>
<ejb-ref-type>Session</ejb-ref-type>
<remote>nl.whitehorses.model.HRSessionEJB</remote>
</ejb-ref>

and here the weblogic.xml located in the web-inf folder

<?xml version = '1.0' encoding = 'windows-1252'?>
<weblogic-web-app xmlns:xsi="http://www.w3.org/2001/XMLSchema-instance" xsi:schemaLocation="http://www.bea.com/ns/weblogic/weblogic-web-app.xsd" xmlns="http://www.bea.com/ns/weblogic/weblogic-web-app">
<ejb-reference-description>
<ejb-ref-name>ejb/HRSessionEJB</ejb-ref-name>
<jndi-name>ADF_EJB-SessionEJB#nl.whitehorses.model.HRSessionEJB</jndi-name>
</ejb-reference-description>
</weblogic-web-app>

Now we only have to make an library for the WebLogic server and add this library to weblogic-application.xml of the viewcontroller project. This library contains the remote ejb classes else we can get a class loading problem and our application can't find the ejb classes. To do this we first have to make a folder where we will add an APP-INF and a META-INF folder and we use an empty dummy jar.

Under the APP-INF folder I created a new folder lib and add the ejb jar to this folder.

In the meta-inf folder we need to create two files MANIFEST.MF and application.xml these files will we used to determine the WLS library name.
We can go the weblogic server console and go to deployment menu where we press the install button and follow the wizards.


When this is successfull we can change the weblogic-application.xml.

<?xml version = '1.0' encoding = 'windows-1252'?>
<weblogic-application xmlns:xsi="http://www.w3.org/2001/XMLSchema-instance" xsi:schemaLocation="http://www.bea.com/ns/weblogic/weblogic-application.xsd" xmlns="http://www.bea.com/ns/weblogic/weblogic-application">
<listener>
<listener-class>oracle.adf.share.weblogic.listeners.ADFApplicationLifecycleListener</listener-class>
</listener>
<library-ref>
<library-name>adf.oracle.domain</library-name>
</library-ref>
<library-ref>
<library-name>ejb.whitehorses.model</library-name>
</library-ref>
</weblogic-application>

If you deployed the remote ejb to the same WebLogic server as the web application then everything should work now when you deploy the application.
When you have deployed the remote ejb on a different WLS then we need to create an foreign jndi provider first. Go to the wls console of the web application and create a foreign jndi provider and foreign jndi link. So the web appplication can find the remote ejb on the other Weblogic server.


It can be that you still got errors where you use the remote ejb on a different WLS server. Then you could try to generate ejb client.jar. Use this to add the Welblogic stub classes to the deployment jar of the remote ejb and add jar as a library to the adf wls.

set JAVA_HOME=C:\oracle\MiddlewareJdev11g\jdk160_05
set PATH=C:\oracle\MiddlewareJdev11g\jdk160_05\bin
set CLASSPATH=C:\oracle\MiddlewareJdev11g/wlserver_10.3/server/lib/weblogic.jar

java weblogic.appc C:\projecten\workspace\11g_prod\ADF_EJB_REMOTE\model\deploy\EjbWebServices.jar


here are my example projects.