Pages

Thursday, November 19, 2009

Find and Expand all nodes of an ADF Tree

I want to find and expand all nodes of an ADF Tree and I saw an Oracle Forum post of Kenyatta which gave me a nice solution.
First some usefull methods.

private void expandTreeChildrenNode( RichTree rt
, FacesCtrlHierNodeBinding node
, List<Key> parentRowKey) {
ArrayList children = node.getChildren();
List<Key> rowKey;

if ( children != null ) {
for (int i = 0; i < children.size(); i++) {
rowKey = new ArrayList<Key>();
rowKey.addAll(parentRowKey);
rowKey.add(((FacesCtrlHierNodeBinding)children.get(i)).getRowKey());
rt.getDisclosedRowKeys().add(rowKey);
if (((FacesCtrlHierNodeBinding)(children.get(i))).getChildren() == null)
continue;
expandTreeChildrenNode(rt
,(FacesCtrlHierNodeBinding)(node.getChildren().get(i))
, rowKey);
}
}
}

// find a jsf component
private UIComponent getUIComponent(String name) {
FacesContext facesCtx = FacesContext.getCurrentInstance();
return facesCtx.getViewRoot().findComponent(name) ;
}

private UIComponent getUIComponent(UIComponent component,String name ){
List<UIComponent> items = component.getChildren();
for ( UIComponent item : items ) {
UIComponent found = getUIComponent(item,name);
if ( found != null ) {
return found;
}
if ( item.getId().equalsIgnoreCase(name) ) {
return item;
};
}
return null;
}

Now find the ADF tree in a region and expand the main and child nodes of this tree

// get the dymamic region of the main page
RichRegion region = (RichRegion)getUIComponent("dynam1");

if ( region != null) {
// find tree 2 and expand this tree
RichTree rt = (RichTree)getUIComponent(region,"t2");
if ( rt != null ) {
int rowCount = rt.getRowCount();
List<Key> rowKey;
for (int j = 0; j < rowCount; j++) {
// expand the main nodes
FacesCtrlHierNodeBinding node = (FacesCtrlHierNodeBinding)rt.getRowData(j);
rowKey = new ArrayList<Key>();
rowKey.add(node.getRowKey());
rt.getDisclosedRowKeys().add(rowKey);
rt.setRowKey(rowKey);
// expand the child nodes of the main nodes
expandTreeChildrenNode(rt , node, rowKey);
}
}
}

Find an UIComponent in an ADF Task Flow Region

When you want to find an UIComponent (like a Tree) inside an ADF Region you can not use findComponent on the ViewRoot because this will only search for the component in the JSF page and not in the JSF page fragments ( Task Flows). And off course you can use a backing bean to make a binding but I want to find the component by first searching for the right Region in the JSF page and then searching the component inside the Region.

First I need to have some common methods.
// find a jsf component inside the JSF page
private UIComponent getUIComponent(String name) {
  FacesContext facesCtx = FacesContext.getCurrentInstance();
  return facesCtx.getViewRoot().findComponent(name) ;
}

// find a UIComponent inside a UIComponent 
private UIComponent getUIComponent(UIComponent component, String name) {
        if (component != null)
            System.out.println(component.getId());
        
        List<UIComponent> items = component.getChildren();
        Iterator<UIComponent> facets = component.getFacetsAndChildren();

        if  ( items.size() > 0 ) {
          System.out.println("got childern");
          for (UIComponent item : items) {
              UIComponent found = getUIComponent(item, name);
              if (found != null) {
                  return found;
              }
              if (item.getId().equalsIgnoreCase(name)) {
                  return item;
              }
          }
        } else if ( facets.hasNext()) {
            System.out.println("got facets");
            while ( facets.hasNext() ){
              UIComponent facet = facets.next();  
              UIComponent found = getUIComponent(facet, name);
              if (found != null) {
                  return found;
              }
              if (facet.getId().equalsIgnoreCase(name)) {
                  return facet;
              }
            }
        }
        return null;
    }
Now we can find the right Region and then search inside the Region for the ADF Tree
// get the dymamic region of the main page
RichRegion region = (RichRegion)getUIComponent("dynam1");
if ( region != null) {
  // find tree 2 
  RichTree rt = (RichTree)getUIComponent(region,"t2");
  if ( rt != null ) {
    // do your thing
  }   
}
Or you can use the findComponent method after you found the region
// get the dymamic region of the main page
RichRegion region = (RichRegion)getUIComponent("dynam1");
if ( region != null) {
  // find tree 2 
  RichTree rt = (RichTree)region.findComponent("t2");
  if ( rt != null ) {
   // do your thing
  }   
}

Tuesday, November 17, 2009

Soa Suite 11g MDS deploy and removal ANT scripts

With the release of Soa Suite 11g R1 Patch Set 1 Oracle improved the standard ant scripts for MDS deployment and removal. Before PS1 we had an ant example of Clemens.
Basically this is how my ANT scripts works. First add your own metadata folders under the apps folder ( do this in jdeveloper\integration\seed\apps ).

My ANT script will do the following steps for every metadata folder under apps
  • optionally remove the metadata folder from the remote Soa Suite Database MDS repository
  • Make a zip file of the metadata files ( Local MDS file repository) .
  • Make a new Soa Bundle zip with this metadata zip
  • Deploy this soa bundle to the Soa Suite Server, The server will add this to the Database MDS
When you want to use the MDS files in your own project read this blog


To make this work copy the antcontrib jar to the jdeveloper\ant\lib folder ( because of the foreach and the propertycopy fucntion )
Here is my build.properties

The build.xml

and at last the deployMDS.bat file
set ORACLE_HOME=C:\oracle\MiddlewareJdev11gR1PS2
set ANT_HOME=%ORACLE_HOME%\jdeveloper\ant
set PATH=%ANT_HOME%\bin;%PATH%
set JAVA_HOME=%ORACLE_HOME%\jdk160_18

set CURRENT_FOLDER=%CD%

ant -f build.xml deployMDS
See my github for the source code https://github.com/biemond/soa_tools

Monday, November 16, 2009

Calling a Soa Suite Direct Binding Service from Java & OSB

I was trying to connect Oracle Soa Suite 11G R1 PS1 with the OSB when I saw this new Direct Binding Service in the Soa Suite 11G. This direct binding make it possible to start this RMI service from OSB or Java. In a previous blog I already called a Soa Service from Java using the ADF binding but this direct binding makes it also possible to call this also from OSB using the SB transport . In this Blog I will call this RMI synchronous service from Java, I can not use this binding in OSB 10.3.1, probably in the next version of the OSB I can.

First we add the Direct Binding Service to exposed Services side of the composite and use the WSDL of one of the other exposed services and add a Wire to the Component.
In the source view of the composite xml you can see that this service uses the direct binding.
<service name="RMIService" ui:wsdlLocation="BPELProcess1.wsdl">
<interface.wsdl interface="http://xmlns.oracle.com/HelloWorld/Helloworld/BPELProcess1#wsdl.interface(BPELProcess1)"/>
<binding.direct/>
</service>

To see the WSDL of this service go to http://localhost:8001/soa-infra/ and select your RMI service.

The source of project is on github check https://github.com/biemond/soa11g_examples/tree/master/SOA_Directbinding where I use adf binding , directbinding and starting these from java and also start / stop composite , check activated instances , start unit tests.

Saturday, November 14, 2009

ADF Contextual Events in 11G R1 PS1

In a previous blog I already talked about ADF events and how you can use it in the Task Flow interaction communication. With the new JDeveloper 11g Patch Set 1, Oracle really improved this event mechanism and the JDeveloper IDE support for these events.
In this blog entry I will show you the new features and give you examples of a tree and table selection Event and inputtext change Event.
First we start by adding events to the ADF application. The first way we can do it, is by selecting an af:inputtext, af:tree or af:table component . Here an example of how you can add an event to an inputtext. Contextual Events is now part of the component property window.
The second big difference is that you can change the payload of the event. You can return now what you want, for example an binding or a backing bean method. In the previous release the payload was fixed ( return of the MethodAction or the new value of an attribute). If you don't specify a payload then this is the default.
And you can restrict the events by adding a condition to the event. In this case it only fires when the value is hello
The events are registered in the pagedef of the page or fragment. This is how it can looks like.
In this case the attributeValue got a restricted event and in the bottom the default payload is changed for this event.
The pagedef editor got a Contextual Events tab, where we can add producers or subscription to an event.

Lets subscribe to this attribute event. First we need to add an MethodAction to a page or fragment. We can call this method and pass on the attribute payload. I made a java class with this method and generate a DataControl on this class.
Open the page definition and go the Subscribers tab where we add a new one subscription. We need to select the event and the publisher ( or use any ) and the handler, this is the ADF MethodAction which has 3 parameters. And we need to provide the required values for these parameters.


That's all for the Inputtext. The value is now passed on to a other page fragment.

ADF Table selection Event
We can do the same with the ADF Table component, just select the table and go to the Contextual Events part of the property window. You can now select a class and in my case is that the Department class.
To do something usefull with this Table selection event I add a method to the Java datacontrol and add this as a MethodAction to a pagedef of a page or fragment

public String tableEvent( Object payload) {
if ( payload != null) {
System.out.println("handle tableEvent");
DCBindingContainerCurrencyChangeEvent event = (DCBindingContainerCurrencyChangeEvent)payload;
DCDataRow row = (DCDataRow)event.getRow();
if ( row.getDataProvider() instanceof Department ) {
// do department stuff like displaying the department task flow
Department dept = (Context.Department)row.getDataProvider();
return "handle tableEvent for Department "+dept.getName();
}
} else {
return "empty payload tableEvent";
}
return null;
}

Now we can add a subscription to this event and we call the above method as handler of this event.


ADF Tree Selection Event
This is almost the same as an ADF Table but now we can define more events because a tree can have different levels , In my case I made a department / employee example so I can have a department and employee event and do different things with this. For example show a department or employee Task Flow.
Here you see two events in the property window of the ADF tree. One for the department selection and one for the employees

This is how it looks like in the page defintion with an event on every level of the tree.

Here is my example workspace with Task Flows who produces these different event and the index page who pass the events on to the output Task Flow.

Thursday, November 12, 2009

New features of the EJB Datatcontrol, Query panel and Range size

With Patch Set 1 of JDeveloper 11G R1 Oracle improved the ADF EJB Datacontrol with two important features. We can now use this EJB Datacontrol in a Querypanel, this makes searching with EJB's a lot easier and the second big improvement is the range size option, so you don't get all the rows in one time, this can improve the performance of your ADF application and will generate less network traffic.
With JDeveloper you can generate an EJB datacontol on an EJB session bean and this Datacontol can be used in ADF. In this blog entry I will show you what the new features are and how you can do it yourself.

First we start with an entity, this is a normal entity on the country table in the HR schema ( I use the eclipselink persistence implementation, which supported very well in JDeveloper )


Next step is to create a Session Bean where we add some Facade Methods.

Here you can see that JDeveloper adds a queryByRange Facade method which we be used by ADF for the range size option.

Here you can see the Session Bean code with the queryByRange method

Generate a Datacontrol on this Session Bean,


If we now go the viewcontroller project we can use this Country EJB datacontrol ( add the EJB model project to the viewcontroller project dependency or add the EJB ADF library to the project) . In the Data Controls window you can see the Named Criteria folder in the countriesFindAll method. Drag the All Queriable Attributes on the JSF page and select the Query Panel option.
With this as result, a customizable search panel and when you configure MDS you can even save the user queries in the MDS repository.

The last feature of the EJB Datacontrol is the Range Set option. Default the ADF iterator get the data in set of 25 records ( this is a pagedef option on the iterator ). When the ADF table on the JSF view is full with rows then it won't get the rest of the rows unles you use the scrollbar or use the Next Set Operation. The Next and Previous Set are new options for the EJB Datacontrol.

Use the scrollbar or the next / previous Set button to get all the rows.


Here some eclipselink logging to let you see that is really works.

[EL Fine]: 2009-11-12 14:03:47.375--ServerSession(22965561)--SELECT COUNT(COUNTRY_ID) FROM COUNTRIES

[EL Fine]: 2009-11-12 14:03:47.39 --SELECT * FROM (SELECT /*+ FIRST_ROWS */ a.*, ROWNUM rnum FROM (SELECT COUNTRY_ID AS COUNTRY_ID1
, COUNTRY_NAME AS COUNTRY_NAME2, REGION_ID AS REGION_ID3 FROM COUNTRIES) a WHERE ROWNUM <= ?) WHERE rnum > ?
bind => [5, 0]
[EL Fine]: 2009-11-12 14:03:49.953 --SELECT * FROM (SELECT /*+ FIRST_ROWS */ a.*, ROWNUM rnum FROM (SELECT COUNTRY_ID AS COUNTRY_ID1
, COUNTRY_NAME AS COUNTRY_NAME2, REGION_ID AS REGION_ID3 FROM COUNTRIES) a WHERE ROWNUM <= ?) WHERE rnum > ?
bind => [10, 5]
[EL Fine]: 2009-11-12 14:04:39.281 --SELECT * FROM (SELECT /*+ FIRST_ROWS */ a.*, ROWNUM rnum FROM (SELECT COUNTRY_ID AS COUNTRY_ID1
, COUNTRY_NAME AS COUNTRY_NAME2, REGION_ID AS REGION_ID3 FROM COUNTRIES) a WHERE ROWNUM <= ?) WHERE rnum > ?
bind => [15, 10]

Friday, November 6, 2009

Installing Soa Suite 10.1.3.5.1 on Weblogic

Yesterday Oracle released Soa Suite 10.1.3.5.1, the version which you can install on Weblogic 10.3.1 ( FMW11g version ). This is a full version so you don't early versions or extra patches to makes this work.

We need to download Weblogic 10.3.1 and Soa Suite 10.1.3.5.1

first step is to install Weblogic 10.3.1, I use C:\oracle\Soa10gWls as my wls middleware home folder

Now we can go to the Soa suite part, first we need to create a bpel, esb and wsm repository.

Extract the soa suite install zip and go to the rca folder located in ias_windows_x86_101351\Disk1\install\soa_schemas\irca

We need to set a database home for the jdbc driver.
set ORACLE_HOME=C:\oracle\product\11.1.0\db_1
We can use the jdk of the new weblogic install
set JAVA_HOME=C:\oracle\Soa10gWls\jdk160_11

Now we can start irca.bat

After a succesfull install of the repository we can start the soa suite installer in this folder ias_windows_x86_101351\Disk1

Very important the destination path must be in a folder of the just created wls middleware home so I use C:\oracle\Soa10gWls\soa10g


As weblogic home location use C:\oracle\Soa10gWls\wlserver_10.3

We are ready with the install

Now we to start script for wsm go to the C:\oracle\Soa10gWls\soa10g\config\ folder and start
configureSOA.bat

Last step is to create a Soa domain just like Soa Suite 11g and select the Soa Suite 10.1.3.5.1 option


Provide the orabpel and oraesb schema passwords.


Start the admin server and go to http://localhost:7001/console where we can take a look at the server. The soa suite server is called soa10g_server1


When we want to start the soa server we need to go the soa domain bin folder
C:\oracle\Soa10gWls\user_projects\domains\soa1013_domain\bin
and use "startManagedWebLogic.cmd soa10g_server1" to start the server.

This are the default installation url's of the Soa Suite applications
http://localhost:9700/esb
http://localhost:9700/BPELConsole
http://localhost:9700/ccore

And we need to use soaadmin as username to log in and use weblogic1 as password.


The issues that I had and luckily also solved.

Asynchronous routing fails with this error oracle.tip.esb.server.common.exceptions.BusinessEventRetriableException: Failed to enqueue deferred event "oracle.tip.esb.server.dispatch.QueueHandlerException: Publisher not exist for system "{0}"

Thanks to Juan Pablo

change the ESB_PARAMETER table on ORAESB schema the following parameters:

PROP_NAME_CONTROL_TCF_JNDI OracleASjms/ControlTCF
PROP_NAME_MONITOR_TCF_JNDI OracleASjms/MonitorTCF
PROP_NAME_ERROR_TCF_JNDI OracleASjms/ErrorTCF
PROP_NAME_ERROR_RETRY_TCF_JNDI OracleASjms/ErrorRetryTCF
PROP_NAME_DEFERRED_TCF_JNDI OracleASjms/DeferredTCF
PROP_NAME_ERROR_XATCF_JNDI OracleASjms/ErrorTCF
PROP_NAME_DEFERRED_XATCF_JNDI OracleASjms/DeferredTCF

to

PROP_NAME_CONTROL_TCF_JNDI ESB_CONTROL
PROP_NAME_MONITOR_TCF_JNDI ESB_MONITOR
PROP_NAME_ERROR_TCF_JNDI ESB_ERROR
PROP_NAME_ERROR_RETRY_TCF_JNDI ESB_ERROR_RETRY
PROP_NAME_DEFERRED_TCF_JNDI ESB_JAVA_DEFERRED
PROP_NAME_ERROR_XATCF_JNDI ESB_ERROR
PROP_NAME_DEFERRED_XATCF_JNDI ESB_JAVA_DEFERRED

and in the ESB console change the Property of Topic Location of every system to ESB_JAVA_DEFERRED

and see the comments for more fixes

Wednesday, November 4, 2009

Invoking Soa Suite 11g Service from java

In Soa Suite 11g we can not call the composite service directly from java. We need to copy the service in the composite, change its binding to adf and wire this service to the component. All the credits goes to Jay's Blog and Clemens, Great work.

The first step is to open the composite xml and find your service.

Copy this service and give it a unique name and now we need to add the binding.adf binding to this service instead of the binding.ws

Go back to the design mode and open the new adf binding service and select the same wsdl as your other service ( this will correct the serviceName ) and at last we need to wire the new service to the component

Now we only need to call this service from java
The source of project is on github check https://github.com/biemond/soa11g_examples/tree/master/SOA_Directbinding where I use adf binding , directbinding and starting these from java and also start / stop composite , check activated instances , start unit tests.

Tuesday, November 3, 2009

Working with Apache Tuscany, The Java SCA based platform part 1

In this blogpost and future blogposts I will try to give you a jumpstart with Apache Tuscany Java SCA. If you follow my blog you may already know that I also work and make blogsposts over an other Service Component Architecture (SCA)-based SOA platform ( Oracle Soa Suite 11g). Soa Suite 11g has a different SCA approach and has much better designer support. But it is nice to take a look at Tuscany and see how this java SCA implementation works.

I will explain how you can make some composite applications. In this blogpost we start easy with building a composite application with
  • Simple java Component
  • Jax-ws component
  • Component with references to other components ( wires )
  • Service on a component
  • Using a second composite


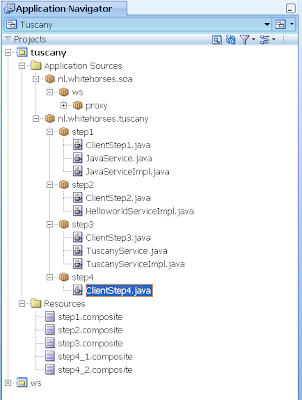
Here a overview of my test project.


First we need to download Apache Tuscany Java SCA

We start with a simple java component with its interface.

package nl.whitehorses.tuscany.step1;

public interface JavaService {
public String getData();
}

package nl.whitehorses.tuscany.step1;

public class JavaServiceImpl implements JavaService {

public String getData() {
return "Hello from java component";
}
}

We can add this component in the step1 composite file and provide the java implementation class.

<?xml version="1.0" encoding="UTF-8"?>
<composite xmlns="http://www.osoa.org/xmlns/sca/1.0"
targetNamespace="http://whitehorses"
name="step1">

<component name="JavaCp">
<implementation.java class="nl.whitehorses.tuscany.step1.JavaServiceImpl" />
</component>

</composite>

Last part of step 1 is to run this composite application, now we have to load and test the composite application.

package nl.whitehorses.tuscany.step1;

import org.apache.tuscany.sca.host.embedded.SCADomain;

public class ClientStep1 {

public final static void main(String[] args) throws Exception {

SCADomain scaDomain = SCADomain.newInstance("step1.composite");
JavaService javaService = scaDomain.getService(JavaService.class, "JavaCp");

System.out.println("java: " + javaService.getData());

scaDomain.close();
}
}


In step 2 we will call a jax-ws webservice. In this step we also need to add a reference to the component.

To make this work I created first a jax-ws service and deploy this to an application server.

package nl.whitehorses.soa.ws;

import javax.jws.WebService;

@WebService
public class Helloworld {

public String getResponse( String message){
return message;

}
}

In the tuscany client project we need to generate a webservice proxy client for this webservice.
Create an implemention class for this ws proxy client. In this class we need to add a reference with the name jaxws and a setter. We will use this in the composite xml

package nl.whitehorses.tuscany.step2;

import nl.whitehorses.soa.ws.proxy.Helloworld;
import org.osoa.sca.annotations.Reference;

public class HelloworldServiceImpl implements Helloworld{

private Helloworld jaxws;

@Reference
public void setJaxws(Helloworld jaxws) {
this.jaxws = jaxws;
}

public String getResponse( String message){
return jaxws.getResponse(message);

}
}

create a new composite file where we will add this component and its reference. In the reference we need to provide the web service binding

<?xml version="1.0" encoding="UTF-8"?>
<composite xmlns="http://www.osoa.org/xmlns/sca/1.0"
targetNamespace="http://whitehorses"
name="step2">

<component name="HelloworldCp">
<implementation.java class="nl.whitehorses.tuscany.step2.HelloworldServiceImpl" />
<reference name="jaxws">
<binding.ws wsdlElement="http://ws.soa.whitehorses.nl/#wsdl.port(HelloworldService/HelloworldPort)"
uri="http://localhost:7101/jaxws/HelloworldPort?wsdl#wsdl.interface(HelloworldService)"/>
</reference>
</component>

</composite>

And at last the test client

package nl.whitehorses.tuscany.step2;


import org.apache.tuscany.sca.host.embedded.SCADomain;
import nl.whitehorses.soa.ws.proxy.Helloworld;

public class ClientStep2 {

public final static void main(String[] args) throws Exception {

SCADomain scaDomain = SCADomain.newInstance("step2.composite");
Helloworld helloworld = scaDomain.getService(Helloworld.class, "HelloworldCp");

System.out.println("ws: " + helloworld.getResponse("hello"));

scaDomain.close();
}
}

In step 3 we will expose an component as a service. First step is to make an interface with the methods which we want to expose in this web service. We have to add Remotable annotation.

package nl.whitehorses.tuscany.step3;

import org.osoa.sca.annotations.Remotable;

@Remotable
public interface TuscanyService {

public String getJaxwsResponse( String message);

public String getJavaData();

public String getJavaData2();

}

The implementatation of this component with the Service annotation and off course the references to the other components.

package nl.whitehorses.tuscany.step3;

import nl.whitehorses.soa.ws.proxy.Helloworld;

import org.osoa.sca.annotations.Reference;
import org.osoa.sca.annotations.Service;
import nl.whitehorses.tuscany.step1.JavaService;

@Service(TuscanyService.class)
public class TuscanyServiceImpl implements TuscanyService {

private Helloworld helloworldComponent;
private JavaService javaComponent;
private JavaService javaComponent2;

@Reference
public void setHelloworldComponent(Helloworld helloworldComponent) {
this.helloworldComponent = helloworldComponent;
}

@Reference
public void setJavaComponent(JavaService javaComponent) {
this.javaComponent = javaComponent;
}

@Reference
public void setJavaComponent2(JavaService javaComponent2) {
this.javaComponent2 = javaComponent2;
}


public String getJaxwsResponse(String message) {
return helloworldComponent.getResponse(message) ;
}

public String getJavaData() {
return javaComponent.getData();
}

public String getJavaData2() {
return javaComponent2.getData();
}
}


The step3 composite file has a TuscanyServiceComponent with 3 references to the step 1 and 2 components and this component has also a service. In this service we have to provide the ws url.

<?xml version="1.0" encoding="UTF-8"?>
<composite xmlns="http://www.osoa.org/xmlns/sca/1.0"
targetNamespace="http://whitehorses"
name="step3">

<component name="TuscanyServiceComponent">
<implementation.java class="nl.whitehorses.tuscany.step3.TuscanyServiceImpl" />
<reference name="helloworldComponent" target="HelloworldCp" />
<reference name="javaComponent" target="JavaCp" />
<reference name="javaComponent2" target="JavaCp2" />
<service name="TuscanyService">
<binding.ws uri="http://localhost:8085/TuscanyService"/>
</service>
</component>

<component name="JavaCp">
<implementation.java class="nl.whitehorses.tuscany.step1.JavaServiceImpl" />
</component>

<component name="JavaCp2">
<implementation.java class="nl.whitehorses.tuscany.step1.JavaServiceImpl" />
</component>

<component name="HelloworldCp">
<implementation.java class="nl.whitehorses.tuscany.step2.HelloworldServiceImpl" />
<reference name="jaxws">
<binding.ws wsdlElement="http://ws.soa.whitehorses.nl/#wsdl.port(HelloworldService/HelloworldPort)"
uri="http://localhost:7101/jaxws/HelloworldPort?wsdl#wsdl.interface(HelloworldService)"/>
</reference>
</component>

</composite>

The client code which tests the main component and start the service on this component

package nl.whitehorses.tuscany.step3;

import java.io.IOException;
import org.apache.tuscany.sca.host.embedded.SCADomain;

public class ClientStep3 {

public final static void main(String[] args) throws Exception {

SCADomain scaDomain = SCADomain.newInstance("step3.composite");
TuscanyService tuscanyService = scaDomain.getService(TuscanyService.class, "TuscanyServiceComponent");

System.out.println("ws: "+tuscanyService.getJaxwsResponse("hello"));
System.out.println("java: "+tuscanyService.getJavaData());
System.out.println("java2: "+tuscanyService.getJavaData2());

try {
System.out.println("ws service started (press enter to shutdown)");
System.in.read();
} catch (IOException e) {
e.printStackTrace();
}

scaDomain.close();
}
}

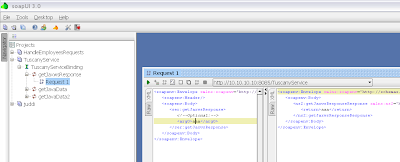
Now we can use soapui to test this web service.


In the last step in this blog I will use a second composite which will be called by the first composite.
First we create a new composite xml. We will copy a java component from the step3 composite to this composite. Give this composite a new name and target namespace. We will use these values to import this composite. This component needs a service else we can not call it from the main composite.

<?xml version="1.0" encoding="UTF-8"?>
<composite xmlns="http://www.osoa.org/xmlns/sca/1.0"
targetNamespace="http://whitehorses2"
name="step4_2">

<service name="JavaCpService" promote="JavaCp">
<interface.java interface="nl.whitehorses.tuscany.step1.JavaService"/>
</service>

<component name="JavaCp">
<implementation.java class="nl.whitehorses.tuscany.step1.JavaServiceImpl" />
</component>

</composite>

The main composite called step4_1 need the namespace of the second composite. The JavaCp2 component import the second composite by using the target namespace of the second composite and with its name. In the javaComponent2 reference of the TuscanyServiceComponent will call JavaCp2 component followed by the service name of the second composite.

<?xml version="1.0" encoding="UTF-8"?>
<composite xmlns="http://www.osoa.org/xmlns/sca/1.0"
targetNamespace="http://whitehorses"
xmlns:whitehorses2="http://whitehorses2"
name="step4_1">

<component name="TuscanyServiceComponent">
<implementation.java class="nl.whitehorses.tuscany.step3.TuscanyServiceImpl" />
<reference name="helloworldComponent" target="HelloworldCp" />
<reference name="javaComponent" target="JavaCp" />
<reference name="javaComponent2" target="JavaCp2/JavaCpService" />
<service name="TuscanyService">
<binding.ws uri="http://localhost:8085/TuscanyService"/>
</service>
</component>

<component name="JavaCp">
<implementation.java class="nl.whitehorses.tuscany.step1.JavaServiceImpl" />
</component>

<component name="HelloworldCp">
<implementation.java class="nl.whitehorses.tuscany.step2.HelloworldServiceImpl" />
<reference name="jaxws">
<binding.ws wsdlElement="http://ws.soa.whitehorses.nl/#wsdl.port(HelloworldService/HelloworldPort)"
uri="http://localhost:7101/jaxws/HelloworldPort?wsdl#wsdl.interface(HelloworldService)"/>
</reference>
</component>

<component name="JavaCp2">
<implementation.composite name="whitehorses2:step4_2"/>
</component>
</composite>


and at last the step 4 test client.

package nl.whitehorses.tuscany.step4;

import nl.whitehorses.tuscany.step3.TuscanyService;
import java.io.IOException;
import org.apache.tuscany.sca.host.embedded.SCADomain;

public class ClientStep4 {

public final static void main(String[] args) throws Exception {

SCADomain scaDomain = SCADomain.newInstance("step4_1.composite");
TuscanyService tuscanyService = scaDomain.getService(TuscanyService.class, "TuscanyServiceComponent");

System.out.println("ws: "+tuscanyService.getJaxwsResponse("hello"));
System.out.println("java: "+tuscanyService.getJavaData());
System.out.println("java2: "+tuscanyService.getJavaData2());

try {
System.out.println("ws service started (press enter to shutdown)");
System.in.read();
} catch (IOException e) {
e.printStackTrace();
}

scaDomain.close();
}
}

Here you can download my jdeveloper 11G test project.