Pages

Showing posts with label jdeveloper 11g. Show all posts

Sunday, January 27, 2013

Active Directory user management with the IdentityStore framework of FMW

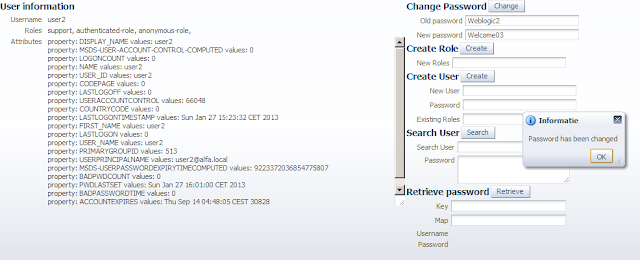
With the IdentityStore framework of Fusion Middleware you can change or create any user or role in almost every LDAP server. With this framework the authenticated user change their own password from ADF or in your own ADF Admin page you can create an user with its roles without knowing LDAP or know what LDAP server is used.

IdentityStore framework will automatically detect the configured WebLogic LDAP servers. Default is the internal WebLogic LDAP and this is also the first authenticator. You can also add other LDAP servers like Microsoft Active Directory or Oracle Internet Directory. For this you need to set the virtualize property with true as value to the idstore.ldap serviceInstance entry.
In this case I will set the AD Authenticator as first authenticator and don't use virtualize property, this way I can retrieve all the LDAP attributes and know for sure that new users are created in AD and not in the local WebLogic LDAP.

To create an user or change a password in AD we need to use LDAPS ( port 636 and not 389 ).  Else you will get this error javax.naming.OperationNotSupportedException: [LDAP: error code 53 - 00002077: SvcErr: DSID-03190E49, problem 5003 (WILL_NOT_PERFORM), data 0 ];

This means we need to configure SSL.

The first step is to import the AD ca key and the AD public key to the local WebLogic TrustStore keystore.


keytool.exe -importcert -trustcacerts -alias ad_ca -file C:\2008-ca.cer -keystore C:\oracle\JDEV11~1.6\WLSERV~1.3\server\lib\DemoTrust.jks -storepass DemoTrustKeyStorePassPhrase

Trust this certificate? [no]: yes

keytool.exe -importcert -trustcacerts -alias ad_pub -file C:\2008-pub.cer -keystore C:\oracle\JDEV11~1.6\WLSERV~1.3\server\lib\DemoTrust.jks -storepass DemoTrustKeyStorePassPhrase

We also need to set the Hostname verification to None.


Create the AD Authenticator and also put all Control Flag to Sufficient ( also the default Authenticator )


We need to use LDAPS so use 636 as Port and enable SSL


Restart the Weblogic server and check if you can see all the AD users and the AD roles in the WebLogic Console .


Here is the java code to change the password of the AD user


Here is the code to create an AD User with a password, add an AD role to this user and set the UserAccountControl to 66048.


Here you can download the demo application at github


Monday, November 19, 2012

JPA SQL and Fetching tuning ( EclipseLink )

When you use JPA in your project and your model project contains many entities with some Eager fetching relation attributes then you probably notice that EclipseLink can fire a lot of SQL queries on the database. This works ok & fast on Dev or Test but in production these queries can lead to big problems ( higher load and more data).
In our project we also use ADF DataControls, Web Services or Entity Transient attributes which does not support Lazy loading. So we need to tune this entities fetching.

In this blogpost I will use the department and employee entity of the HR Oracle demo schema to explain the JPA options you have to control the SQL statements and the JPA relation Fetching.


These two entities has the following relations
  • Department has a Manager
  • Department has Employees
  • Employee belongs to a Department
  • Employee has a Manager
  • Manager has Employees
First step is to set or leave all OneToMany relations to Lazy Fetching ( this is the default ). If you put everything on Eager then you will create an loop and EclipseLink will detect this and will throw an error.
If we only set the Department entity relations to Eager then the department named queries will be Ok but we can't retrieve everything from the Employee entity.   

But when you want to retrieve a Department with its Employees and Manager or a Manager with its Employees and Department plus you want to tune the fired SQL queries then you got the following options.


Here you see all the Department Named Queries.

Departments.findByName
select o from Departments o where o.departmentName = :name" 

this query will get all the Departments with a particular name and it retrieves all the ManyToOne relations like the department Manager. But this does not retrieve the Employees of the Department.


Departments.findByNameFetch
select o from Departments o left join fetch o.employeesList where o.departmentName = :name
If we want to fetch all the Employees of this department we can use join fetch. Fetch with join is necessary if you want to do Eager fetching. Also left join fetch ( outer join )  is necessary if you also want to query Departments without Employees. Plus this will do it in one SQL query.

Departments.findByNameFetch2
select o from Departments o where o.departmentName = :name
hints= { @QueryHint( name =QueryHints.LEFT_FETCH, value="Departments.employeesList") }
We can do the same with EclipseLink and use @QueryHint( name =QueryHints.LEFT_FETCH
This does the same as Departments.findByNameFetch , you can also use QueryHints.FETCH but this won't do an outer join.

You can also do the same on the Query, like this
em.createNamedQuery("Departments.findByName")
.setParameter("name", "Finance")
.setHint(QueryHints.LEFT_FETCH, "Departments.employeesList")
.getResultList();

Departments.findByNameFetch3
select o from Departments o where o.departmentName = :name
hints= { @QueryHint( name =QueryHints.LEFT_FETCH, value="Departments.employeesList.manager") }
EclipseLink can even do more than the standard JPA JQL query, in this example it can also retrieve the manager of the employees in the same SQL query instead of using separate queries ( this is not possible with normal JPA).

To see the all the executed SQL statements put the EclipseLink Logging to the Fine level.
This is the test client I used to test these queries
Here you can download or see all the code of my test project on github.

Tuesday, July 3, 2012

Do WebLogic configuration from ANT

With WebLogic WLST you can script the creation of all your Application DataSources or SOA Integration artifacts( like JMS etc). This is necessary if your domain contains many WebLogic artifacts or you have more then one WebLogic environment. If so, you want to script this so you can configure a  new WebLogic domain in minutes and you can repeat this task with always the same result.

I started a new project on Github https://github.com/biemond/soa_tools/tree/master/ant_wls which can do this from ANT, for this I created some WLST ANT macrodefs. These ANT targets can be invoked many times ( great for Continuous Integration ) and if the object already exists it rollbacks the edit action and give a BeanAlreadyExists exception. Great way to keep all your environments in sync.

These ANT scripts can do the following configuration.

  • Create users and roles
  • Reset or create JDBC DataSources 
  • File or JDBC persistence stores
  • JMS servers
  • JMS modules
  •    Sub Deployments
  •    Foreign Servers
  •       Foreign Server Destinations
  •       Foreign Server Connection Factories
  •    Connection Factories
  •    Queues ( Distributed )
  •    Topics ( Distributed )
  •    SAF Remote Contexts
  •    SAF Imported Destinations 
  • SAF agents 

Still to do  is the creation of SAF Imported Destinations.   

An example of an ANT macrodef with the WLST code for the creation of a Queue or a Topic on a WebLogic server or cluster, also supports distributed Queue or Topics plus re-directing to an other Queue.


Snippet of the ANT build.xml with the ANT target which calls this Macrodef and uses the build.properties for all the JMS objects definitions. The foreach is provided by the ANT Contrib library, this is not part of ANT and need to downloaded separately .


Snippet of the build.properties with all the weblogic environments. Just change wls.environment to acc or   some other value.

wls.environment=dev

# dev deployment server weblogic
dev.serverURL=t3://localhost:7001
dev.user=weblogic
dev.password=weblogic1
dev.target=AdminServer

# acceptance deployment server weblogic
acc.serverURL=t3://soaps3:7001
acc.user=weblogic
acc.password=weblogic1
acc.target=soa_server1


# All jms objects entries like Queue, Topic or distributed
queuesOrTopics=error1,queue1

# JMS module name
error1.jmsModule=JMSModule1
# JMS module subdeployment.
error1.subDeployment=JmsServer
error1.jmsName=ErrorQueue      
error1.jmsJNDIName=jms/ErrorQueue
# queue, topic
error1.jmsType=queue
# distributed true ,false
error1.distributed=false
error1.balancingPolicy=xxxxx
# redirect to an error Queue
error1.redirect=false
error1.limit=xxxxx
error1.policy=xxxxx      
error1.errorObject=xxxxx

queue1.jmsModule=JMSModule1
queue1.subDeployment=JmsServer
queue1.jmsName=Queue1      
queue1.jmsJNDIName=jms/Queue1
queue1.jmsType=queue
queue1.distributed=false
queue1.balancingPolicy=xxxxx
queue1.redirect=true
queue1.limit=3
queue1.policy=Redirect
queue1.errorObject=ErrorQueue

And we can run the ANT target when we execute the following command.

ant -f build.xml createCreateJMSQueuesOrTopics


https://github.com/biemond/soa_tools/tree/master/ant_wls

Friday, May 18, 2012

SOA Suite PS5 Email (UMS) Adapter

With the release of Soa Suite Patch Set 5 we can now try out the new UMS Email adapter. The UMS adapter allows you to listen for new mail or send a mail from a service component. Combined with BPEL it’s now relative easy to process email bodies or attachments.  To read more and test it yourself check my blogpost on Amis Technology.

Wednesday, April 4, 2012

Deploy your ADF UIX applications to WebLogic

Just a quick blogpost how you can deploy your old ADF UIX ( 10.1.2)  applications to the WebLogic 11g ( 10.3.5 ) application server. Off course this is not supported by Oracle, who cares, your old 10.1.2 OC4J container is also end of life.  When it works, it works :-)

First you need to create a JDBC DataSource in the WebLogic Console.

You need to use the oracle.jdbc.OracleDriver driver class ( don't use XA, disable global commit ) else you will get some strange oracle BLOB errors.

Set Statement cache size to 0 ( in the connection pool Tab of the datasource )

also in the advanced options of the datasource you should de-select Wrap Data Types.
By default, data type objects for Array, Blob, Clob, NClob, Ref, SQLXML, and Struct, plus ParameterMetaData and ResultSetMetaData objects are wrapped with a WebLogic wrapper.


If you don't do this then ADF BC ( BC4J ) can't do its passivation in the ps_txn table ( this contains a BLOB datatype) and your applications behaves very strange
or you can set jbo.passivationstore to file


Next step is to make a shared library ( just use a war template ), For this I use an exploded folder so I can easily add and remove some jars.

I have a folder called adf.uix ( or a war with this name )

Folder META-INF
   File MANIFEST.MF with the following content

     Manifest-Version: 1.0
     Extension-Name: adf.uix
     Specification-Title: adf.uix
     Specification-Version: 1.0
     Implementation-Version: 10.1.2


Folder WEB-INF
  A empty web.xml file with the following content

     <?xml version = '1.0' encoding = 'windows-1252'?>
     <!DOCTYPE web-app PUBLIC "-//Sun Microsystems, Inc.//DTD Web Application 2.3//EN"     "http://java.sun.com/dtd/web-app_2_3.dtd">
     <web-app>
     </web-app>
  
  Folder lib with all the 10.1.2 jars which I needed.


Deploy the shared library to WebLogic.

Next step is to unpack the war of your uix application ( we don't need the ear )

We need to create a weblogic deployment descriptor called weblogic.xml and put this in the WEB-INF folder. ( you can delete the orion one )

This weblogic descriptor contains a reference to our just created shared library. Also set the WEB-INF/lib as preferred classloading.


<?xml version = '1.0' encoding = 'windows-1252'?>
<weblogic-web-app xmlns:xsi="http://www.w3.org/2001/XMLSchema-instance"
     xsi:schemaLocation="http://www.bea.com/ns/weblogic/weblogic-web-app
     http://www.bea.com/ns/weblogic/weblogic-web-app/1.0/weblogic-web-app.xsd"
     xmlns="http://www.bea.com/ns/weblogic/weblogic-web-app">
  <container-descriptor>
    <prefer-web-inf-classes>true</prefer-web-inf-classes>
  </container-descriptor>
  <library-ref>
    <library-name>adf.uix</library-name>
  </library-ref>
</weblogic-web-app>

This is the content of my WEB-INF/lib folder 


Zip everything to a new war file or use the exploded folder.

When you use jdk1.6 or higher you can set -Djava.awt.headless=true so cabo uix does not need X-Windows or Windows desktop to generate gif images.

And when you don't see the images then you should also use an exploded folder instead of a war so cabo uix has a file path to store the generated images. Or make an UIX configuration class which contains cabo paths to a folder of the weblogic server.

Deploy the war or exploded folder  to weblogic, test it and delete your own OC4J Container.


Tuesday, February 28, 2012

Changing your ADF Connections in Enterprise Manager with PS5

With Patch Set 5 of Fusion Middleware you can finally change your ADF connections ( like a Web Service connection ) in the Enterprise Manager Web Application. So you can make one application deployment and deploy it to acceptance and production.
In many cases ADF and JDeveloper automatically creates connections ( like a ADF WS DataControl )  which could not be changed after deployment, you need to do this before deployment or change the EAR.
With PS5 you can change these connections in the "Configure ADF Connections" menu option on the application deployment ( EM ). This is also possible with WLST where you can change and persist the attributes of the application connection MBean.

If you want to do this you need to do the following steps

  • Have a WebLogic domain which has a configured MDS repository.
  • Add some listeners to the web.xml ( for the MBean support). 
  • Enable MDS ( else the connection details won't be persisted ).
  • Add an ADF Connection on the Web Service entry when you use a Web Service Proxy.   

In this blogpost I will show you the steps how to make this work and change in this example the endpoint of a web service.

We start for example by adding an ADF WS DataControl.


This will always add a ws connection to the connection.xml file in the ADF META-INF Folder.


This is also possible on a Web Service Proxy when you don't use an ADF WS DataControl.


Select the service and right click on Create ADF Web Service Connection.


Click on OK


Use the service and finish your Application.


Prepare your Application for allowing to change your ADF Connections.

First we need to add the ADFConnectionLifeCycleCallBack and the ADFConfigLifeCycleCallBack listeners  to the web.xml. This enables the ADF Connection Mbean support.


Enable User Customizations ( across sessions using MDS ) and Enable Seeded Customizations.


We are ready to deploy our application.

You should see the MDS and Connections Tabs when you deploy from JDeveloper.


Optional look at the connections.


After deployment we change the WSDL URL and endpoint in the Enterprise Manager.

First select your application deployment.


Here we can see our connection. Because we enabled MDS on the application we can change the connection else you won't see the Edit , Delete buttons.


Change the WSDL URL by clicking on the Edit button. Click on OK and apply the changes. The new URL is stored in the MDS repository.


Also click on Advanced Connection Configuration where we also need to change the endpoint address and click on Apply.


We are ready to test the application with the new WSDL url and endpoint.

Optional
You can also change these with WLST,
for this you need to go the System MBean Browser of EM to find your mbean for example oracle.adf.share.connections:ApplicationName=YourApp,Location=WLSserver,name=ADFConnections,beantype=Runtime,type=ADFConnections,Application=YourApp


Friday, August 26, 2011

Single Sign On with windows / kerberos on WebLogic

In this blogspot I will show you the steps I did to achieve SSO kerberos windows authentication on an ADF or a Web Application deployed on a WebLogic application server.

Before we can start you should know the supported encryption types of your Windows Environment. For example Windows XP or Windows 2003 Domain Controller ( not SP1 ) does not support every encryption type.

I got this working with a Windows 7 client and a Windows 2008 R2 Domain Controller and my encryption type is RC4-HMAC-NT, which is also supported in Java 1.6

My Active Directory domain = ALFA.LOCAL  ( always use it in uppercase )

Make sure that all server can be found in the DNS ( and reverse )  and that the time is synchronized on all machines.

We start by creating a unique service account ( it must not exists, not as computer and not as an user ), in my case is that soaps3_kerb.


I used Welcome01 as password and make sure that the password never expires.


On the Windows 2008 DC server I did the following to generate a service account called HTTP/soaps3.alfa.local and map this to soaps3_kerb AD account. soaps3 is the server name of the WebLogic Server.


First generate a keytab file for the HTTP/soaps3.alfa.local@ALFA.LOCAL account,  HTTP is a container ( IIS also uses this convention ) and ALFA.LOCAL is my AD domain.

ktpass -princ HTTP/soaps3.alfa.local@ALFA.LOCAL -pass Welcome01 -mapuser soaps3_kerb@ALFA.LOCAL -out c:\soaps3.keytab -ptype KRB5_NT_PRINCIPAL -crypto RC4-HMAC-NT

my output
Targeting domain controller: AD-WIN2008R2.alfa.local

Using legacy password setting method
Successfully mapped HTTP/soaps3.alfa.local to soaps3_kerb.Key created.
Output keytab to c:\soaps3.keytab:
Keytab version: 0x502
keysize 68 HTTP/soaps3.alfa.local@ALFA.LOCAL ptype 1 (KRB5_NT_PRINCIPAL) vno 3 etype 0x17 (RC4-HMAC) keylength 16 (0x1d863479e1ab3bd62a2bfafa1abaa2dd)


copy the generated soaps3.keytab file to the WebLogic machine. I put it in the c:\oracle folder.

Now we need to modify the Service Principal Names with the SPN utility.
setSpn -A HTTP/soaps3.alfa.local@ALFA.LOCAL soaps3_kerb

my output
Registering ServicePrincipalNames for CN=soaps3_kerb,CN=Users,DC=alfa,DC=local
        HTTP/soaps3.alfa.local@ALFA.LOCAL
Updated object


Now we can continue with the WebLogic Server configuration.

Start by making create a text file called krb5.ini and put it in c:\windows
ALFA.LOCAL is my AD domain and soaps3 is my WebLogic server and it exists in the alfa.local dns domain.  ad-win2008r2.alfa.local is my domain controller.
-------------------

[libdefaults]
default_realm = ALFA.LOCAL
default_tkt_enctypes = rc4-hmac
default_tgs_enctypes = rc4-hmac
permitted_enctypes = rc4-hmac

[domain_realm]
.soaps3.alfa.local = ALFA.LOCAL
soaps3.alfa.local = ALFA.LOCAL
.alfa.local = ALFA.LOCAL
alfa.local = ALFA.LOCAL

[realms]
ALFA.LOCAL = {
kdc = ad-win2008r2.alfa.local
admin_server = ad-win2008r2.alfa.local
default_domain = alfa.local
}
[appdefaults]
autologin = true
forward = true
forwardable = true
encrypt = true

---------------

On the soaps3 WebLogic machine we need to create a new Kerberos ticket which will be used by WebLogic.

First let's flush the current ones
go to c:\ ( not in the java bin folder )
klist purge

go to the bin folder of your java home ( jdk )
cd c:\oracle\jrockit-jdk1.6.0_26-R28\bin

kinit HTTP/soaps3.alfa.local@ALFA.LOCAL

My output
Password for HTTP/soaps3.alfa.local@ALFA.LOCAL:
New ticket is stored in cache file C:\Users\admin\krb5cc_admin


This should work and it will use the krb5.ini located at c:\windows.


Create or change an application with ADF Security or a normal Web Application which got security enabled. Open the web.xml and change the auth-method to CLIENT-CERT


  <login-config>
    <auth-method>CLIENT-CERT</auth-method>
  </login-config>


Deploy the application to the WebLogic Server.

Open the WebLogic console application and go to myrealm security realm -&gt; providers -&gt; authentication.

create a NegotiateIdentityAsserter called Microsoft.


Open the NegotiateIdentityAsserter and go to Provider Specific and de-select Form Based Negotiation Enabled.

Next step is to create a kerberos login configuration which will be read by WebLogic.
Create a text file called kerberos.login located in the c:\oracle. This is the content which will work with Java 1.6
-------

com.sun.security.jgss.krb5.initiate {
     com.sun.security.auth.module.Krb5LoginModule required
     principal="HTTP/soaps3.alfa.local@ALFA.LOCAL"
     useKeyTab=true
     keyTab="c:/oracle/soaps3.keytab"
     storeKey=true
     debug=true;
};

com.sun.security.jgss.krb5.accept {
     com.sun.security.auth.module.Krb5LoginModule required
     principal="HTTP/soaps3.alfa.local@ALFA.LOCAL"
     useKeyTab=true
     keyTab="c:/oracle/soaps3.keytab"
     storeKey=true
     debug=true;
};
-------

Add the following parameters to the EXTRA_JAVA_PROPERTIES in the setDomainEnv.bat of your domain.
-Dsun.security.krb5.debug=true 
-Djavax.security.auth.useSubjectCredsOnly=false 
-Djava.security.auth.login.config=C:/oracle/kerberos.login 
-Djava.security.krb5.realm=ALFA.LOCAL 
-Djava.security.krb5.kdc=ad-win2008r2.alfa.local 


We are finished with the WebLogic and the AD configuration.

Just add the login name of the window user and its groups to the myrealm security realm, so you can test the Web Application.

Log on a machine which is part of your AD domain.

use Internet Explorer and trust the weblogic site and enable authentication in the advanced options of IE.
or
use Google Chrome and start chrome.exe with the following parameter --args --auth-server-whitelist="*alfa.local" This allows SSO with chrome.

Saturday, August 13, 2011

Contract First web service with JDeveloper

In this blogpost I will explain the options you have when you use JDeveloper to generate a web service based on a WSDL, so called top down or contract first. In my previous blogpost I showed you the bottom up approach. This works great but it can lead to a ugly WSDL which it is not so great for interoperability. Off course you can control it all with some web service annotations but then you really need to know what you are doing.

Here is an example of a bottom up WSDL. It matches with the java methods

Let's change it to this and use this WSDL in JDeveloper.

Before we can start lets copy the WSDL and its XSD to the project folder. This way JDeveloper can detect it.

In JDeveloper we can choose for Java Web Service from WSDL.

We can select our WSDL from the listbox and in this dialog we can choose for some important options.

First we can choose Java or for EJB 3.0 as Service Type. With Java as Service Type JDeveloper will add the Web Service as servlet to the web.xml. This is not the case with EJB.
With EJB as Service Type you will get transaction, security support, can use interceptors and the timer service. If you enable the Add Service Endpoint Interface option and add an Remote annotations to this interface you can call the Remote interface of this EJB with RMI (t3:) besides invoking this Web Service with HTTP.

The Service Endpoint Interface (SEI) is a Java interface that declares the methods that a client can invoke on the service. It provides the client's view of the web service and hiding the implementation from the client.


Provide the package names for the web service and the java types.

This will generate the following code. We need this JAXB code in completing the service implementation.  

The generated service interface.

The service implementation.

To complete the service we can for example inject an EJB and include the JAXB ObjectFactory.
And the contract first web service is finished.

Wednesday, August 10, 2011

Expose your Session Bean as a Web Service with JAX-WS and Eclipselink

In this blogpost I will show you how you can expose your EJB Session Bean as a Web Service, also tell you everything what I encountered and how I solved my issues. I will do this in JDeveloper and I will use the following frameworks: Eclipselink, JAX-WS and test it on WebLogic.

First let's start with the JPA part. In my project I generated some entities based on the Emp &amp;amp; Dept tables of the Scott schema.

In this demo I want to retrieve one department so I need to add a NamedQuery. I added Dept.findByPK to the NamedQueries annotation. Normally you only need to add the following JQL statement select o from Dept o where o.deptno = :deptid 
In this case I didn't want to set the OneToMany relation between Emp and Dept to eager. This can cause a fetch loop, so let's use the default value ( lazy ). I still need to fetch the employees on a department so I can return the department with all its employees in the Web Service response. To also fetch the employees I can add join fetch o.empList to the JQL statement.  


The Emp entity also got some important adjustments.
This entity got an attribute called hiredate with  timestamp as java type. First I added the Temporal annotation with a Date value and also change the java type to Calendar else it will be ignored by the Web Service.
Because this entity has a getter to the Dept entity and Dept got one to Emp we need to break the loop for the Web Service response. You can do this by adding the XmlTransient annotation to the getDept() method. Else you will get an empty response or this error
javax.xml.stream.XMLStreamException: Premature end of file encountered


This is my Session Bean where I added the WebService, WebMethod and WebParam annotation to the session bean to control the WSDL.

When you change one of these annotations you can get an deployment compiler error  like

weblogic.utils.AssertionError: ***** ASSERTION FAILED ***** Caused by: java.lang.ClassNotFoundException: nl.amis.model.services.ScottSessionBean_esxgzy_WSOImpl
at weblogic.utils.classloaders.GenericClassLoader.findLocalClass(GenericClassLoader.java:297).

To fix this you need to remove the EJBCompilerCache folder located in MiddlewareJDevPS5\jdeveloper\system11.1.1.5.37.60.13\DefaultDomain\servers\DefaultServer\cache

Also in Eclipselink I used getResultList() and return a list instead of using GetSingleResult(). With GetSingleResult you get an error when there is no result. So you need to handle that when you use it.
At last we can also remove the Web Service annotations from the Session Bean, create a new class and maybe do Contract first . ( this will fix the EJBcompiler errors and keeps it more clean.) In this class I inject the Session Bean to a private variable and call it's ejb methods.
Now you can run it and test the EJB Web Service.

Sunday, March 6, 2011

Set the Initial Focus on a component in a Page or a Fragment

In ADF 11g you can use the initialFocusId property of the af:document component to set the input focus on a UIComponent. On the UIComponent you need to set id property and set the clientComponent property to true. And use this id in the initialFocusId property of the af:document component which is only located in a ADF Page. This is not so hard to do, but sometimes it can be tricky to find the id of a component when you use regions ( Bounded Task Flows ). To solve this you can use the developer tool of Google Chrome or the Firebug plugin of  Mozilla FireFox. Select the UIComponent and take a look at this id, you can remove the ::content part.


To set the focus on an UIComponent in a dynamic Region can be hard because this id of the component is not always the same. It depends which Task Flow you open first ( sometimes it is region1:1:input1 or region1:2:input1 ) . And the second problem you have that you need to use some javascript to set the focus.
The solution is to lookup the region UIComponent and try to find the UIComponent from there, get the clientId and use this value.

Here are some screenshot of the possible scenarios.
Set the focus on the Label 2 item, this is in the ADF page.
Same page but now I set the focus on the DepartmentName in the Department Dynamic Region.
New page but with a static Employee Region.

Example page with the af:document and initialFocusId property set on a managed bean
The managed bean which controls the focus
Here is the example workspace

Sunday, January 23, 2011

Some handy code for your managed Beans ( ADF & JSF )

Back in 2009, I already a made a blogpost about some handy code which you can use in your ADF Web Application. You can say this blogspot is part 2 and here I will show you the code, I use most  in my own managed Beans.

I start with FacesContext class, with this class you can use to find a JSF Component, change the Locale, get the ELContext, Add a message to your view and get the ExternalContext
The ExternalContext class, with this you can retrieve all the java init & context (web.xml) parameters, the Request & Session parameters and your web application url.
AdfFacesContext class, you can use this class for Partial Page Rendering ( PPR), get the PageFlowScope and ViewScope variables
ADFContext class, with this you can get all the memory scopes variables even the application scope variables, ELContext and the SecurityContext.
SecurityContext class, retrieve the current user and its roles.
BindingContext, BindingContainer and DCBindingContainer class. These classes are well known when you want to retrieve the ADF pagedef objects.
The last class is ControllerContext, which you can use to retrieve the exceptions

Thursday, January 20, 2011

Get the PageFlowScope of a Region Bounded Task Flow

Sometimes you need to access the PageFlowScope of a Task Flow Region( child Bounded Task Flow ) and get a handle to a pageFlowScope managed Bean. Normally you don't need to do this and Oracle don't want you, to do this. To make this work you need three internal classes so there is no guarantee that it works in 11g R1 PS4 or higher, but it work in PS2 & PS3.

Basically this is what you need to do.

  • Get the Task Flow binding of the region in the page definition, you need to have the full name
  • Get the RootViewPortContext
  • Find the ChildViewPortContext , use the TaskFlow full name
  • Get the pageFlowScope Map of the ChildViewPortContext 

Here some demo code.

Here you can download the demo workspace

Monday, July 26, 2010

ADF Task Flow Region interaction with Parent Action activity

When you use Task Flows in your ADF 11g Web Application then you probably need to have some ADF Region interaction with other Regions or its containing JSF page. In this blogpost I will show you can control a dynamic Region from a other Region ( Task Flow ) with a Parent Action Activity. Off course you change the bean used for the dynamic region from backing bean scope to session bean scope and call this bean from every Task Flow. This works perfectly but you ADF has a better solution for this and you don't need to change the scope of the dynamic Task Flow bean.

For this blogpost I made an Example with one JSPX page and this page contains two Regions. The first is the Top TF and the second is a dynamic Region with Center 1 & 2 TF. Start is part of the JSPX page and can call the Center 1 & 2 methods directly in the dynamic region bean.
For showing the Center Task Flows from the Top Task Flow you can use the Parent Action activity. 

Here is the code of the main JSPX page with in the start facet ,the two buttons which can call the backingbean methods.
<?xml version='1.0' encoding='UTF-8'?>
<jsp:root xmlns:jsp="http://java.sun.com/JSP/Page" version="2.1"
          xmlns:f="http://java.sun.com/jsf/core"
          xmlns:af="http://xmlns.oracle.com/adf/faces/rich">
  <jsp:directive.page contentType="text/html;charset=UTF-8"/>
  <f:view>
    <af:document id="d1" title="Example">
      <af:form id="f1">
        <af:panelStretchLayout id="psl1" startWidth="239px" topHeight="95px">
          <f:facet name="center">
            <af:region value="#{bindings.dynamicRegion1.regionModel}" id="centerRegion"/>
          </f:facet>
          <f:facet name="start">
            <af:panelHeader text="Start" id="ph1" inlineStyle="width:239px; height:423px;">
              <f:facet name="toolbar">
                <af:toolbar id="t1">
                  <af:commandToolbarButton text="Center1"
                                           id="ctb1"
                                           action="#{backingBeanScope.MainRegionHandler.showCenter1TF}"/>
                  <af:commandToolbarButton text="Center2"
                                           id="ctb2"
                                           action="#{backingBeanScope.MainRegionHandler.showCenter2TF}"/>
                </af:toolbar>
              </f:facet>
            </af:panelHeader>
          </f:facet>
          <f:facet name="top">
            <af:region value="#{bindings.top1.regionModel}" id="centerTop"/>
          </f:facet>
        </af:panelStretchLayout>
      </af:form>
    </af:document>
  </f:view>
</jsp:root>
The dynamic region bean with the showCenter1TF and showCenter2TF methods.
package nl.whitehorses.adf.tf.view.beans;

import javax.faces.component.UIComponent;
import javax.faces.context.FacesContext;

import oracle.adf.controller.TaskFlowId;
import oracle.adf.view.rich.context.AdfFacesContext;

public class MainRegionHandler {

    private String taskFlowIdCenter1 = "/WEB-INF/center1.xml#center1";
    private String taskFlowIdCenter2 = "/WEB-INF/center2.xml#center2";
    private String taskFlowId = taskFlowIdCenter1;

    public MainRegionHandler() {
    }

    public TaskFlowId getDynamicTaskFlowId() {
        return TaskFlowId.parse(taskFlowId);
    }

    public String showCenter1TF() {
        taskFlowId = taskFlowIdCenter1;
        AdfFacesContext.getCurrentInstance().addPartialTarget(getUIComponent("centerRegion"));  
        return null;
    }

    public String showCenter2TF() {
        taskFlowId = taskFlowIdCenter2;
        AdfFacesContext.getCurrentInstance().addPartialTarget(getUIComponent("centerRegion"));  
        return null;
    }

    private UIComponent getUIComponent(String name) {
        FacesContext facesCtx = FacesContext.getCurrentInstance();
        return facesCtx.getViewRoot().findComponent(name);
    }

}
From the Start facet on the main page it is easy to show the right Center Task Flow. From the Top Task Flow you need to do more. First you need to change the parent Task Flow. ( this works in a bounded or unbounded Task Flow ). Add two Method Call activities and a Wildcard Control Flow Rule.
You will later call the goCenter1 and goCenter2 Control Flow cases  from the Top Task Flow. This will activate the method call which call the right method in the dynamic region bean. After a successful invocation, it will use the return Control Flow case to return to the page.
The property window of the showCenter1TF Method Call activity looks like this. Here you need to provide the Method value and provide the Fixed Outcome.
Next step is to change the Top Task Flow where you also need to add a Wildcard Control Flow Rule together with two Parent Action activities.
The Parent Action property window looks like this. Here you need to provide the Parent Outcome , this must match with the Control Flow Case of the parent Task Flow and here is the Outcome also return.


And at last the Top fragment with the two buttons which calls the right Control Flow Case.
<?xml version='1.0' encoding='UTF-8'?>
<jsp:root xmlns:jsp="http://java.sun.com/JSP/Page" version="2.1"
          xmlns:af="http://xmlns.oracle.com/adf/faces/rich"
          xmlns:f="http://java.sun.com/jsf/core">
  <af:panelHeader text="Top TF" id="ph1"
                  inlineStyle="width:995px; height:84px;">
              <f:facet name="toolbar">
                <af:toolbar id="t1">
                  <af:commandToolbarButton text="Center1"
                                           id="ctb1"
                                           action="showCenter1TF"/>
                  <af:commandToolbarButton text="Center2"
                                           id="ctb2"
                                           action="showCenter2TF"/>
                </af:toolbar>
              </f:facet>
  </af:panelHeader>
</jsp:root>
That's all and here is the example workspace.

Saturday, May 1, 2010

Lets SOA Suite UMS do your Application Messaging

With User Messaging Service you can let Soa Suite 11g do all your Messaging. And UMS can do a lot: like Email with Attachments, Instant Messaging (XMPP, like Google Talk), SMS Text messages (SMPP), Fax or Voice Messages and deliver messages to the Soa & Webcenter Task List. Besides this, UMS keeps track of delivery status information provided by messaging gateways and makes this information available to applications so that they can respond to a failed delivery.
In Patch Set 2 of Soa Suite 11g Oracle added a simple java API for UMS and in this blogpost I will use this API in a EJB Session Bean with a Remote Interface and also expose this Session Bean as a Web Service. This Session Bean & Web Service can be used in your custom applications so you don't need to have or build your own messaging methods because Soa Suite can do more and much better and even keeps track of your messages. Just call the Web Service or the Session Bean, deliver a list of Receivers with names and the media delivery type and it will return a MessageId with this you can check the status of your send messages.

In this blogpost I will use the email and instant messaging driver to deliver my messages. And as a demo I can send email attachements, deliver a message to IM and Email Client. ( Multi part Message , plain text part for IM and HTML part for Email ) and at last get retrieve the status of these messages. And you can use this in SoapUI, a web service proxy or in a EJB java client.

First you need to enable and configure the UMS Email and Instant Messaging Driver ( XMPP).
Go to the Weblogic console of your Soa Domain probably http://xxxxx:7001/console and select the XMPP UMS driver and go the the target tab and enable the Soa servers or soa cluster.

You need to reboot the Soa Server managed Servers.
In the User Messaging Service part of the Enterprise Manager Website http://xxxx:7001/em you can select the xmpp driver and go the XMPP Driver Properties.
In my case I will use Google Talk as IM service. Provide the server and a Talk user account.
Do the Same for your UMS Email driver. Provide the SMTP server.
And enable all the Work Flow communications in the WorkFlow Notifications Properties page of the Soa Infrastructure part..

You need to reboot the Soa Server managed Servers.

Now you can go to the developer part and create a JDeveloper project and add an new Application. Your project needs to have the UMS library located at jdeveloper\communications\modules\oracle.sdp.messaging_11.1.1\sdpmessaging.jar and your application also needs to have a reference to the oracle.sdp.messaging shared library. Do this in the weblogic-application.xml.
This EJB / WS needs to deployed on the Soa Suite Managed Servers.

To make things more simple I made two entities Receiver and Status.
The Receiver just needs an email address and type ( EMAIL or IM )
package nl.whitehorses.soa.ums.entities;

import java.io.Serializable;

public class Receiver implements Serializable{
    public Receiver() {

    }

    private String receiver;
    private String channel;

    public Receiver(String receiver, String channel) {
        super();
        this.receiver = receiver;
        this.channel = channel;
    }

    public void setReceiver(String receiver) {
        this.receiver = receiver;
    }

    public String getReceiver() {
        return receiver;
    }

    public void setChannel(String channel) {
        this.channel = channel;
    }

    public String getChannel() {
        return channel;
    }
}
The Status entity gives some simple info about the send messages.
package nl.whitehorses.soa.ums.entities;

import java.io.Serializable;
import java.util.Date;

public class Status implements Serializable {
    public Status() {
    }
      
    private String messageId;
    private Date   sendTime;
    private String receiver;
    private String status;

    public Status(String messageId, Date sendTime, String receiver,
                  String status) {
        super();
        this.messageId = messageId;
        this.sendTime = sendTime;
        this.receiver = receiver;
        this.status = status;
    }

    public void setMessageId(String messageId) {
        this.messageId = messageId;
    }

    public String getMessageId() {
        return messageId;
    }

    public void setSendTime(Date sendTime) {
        this.sendTime = sendTime;
    }

    public Date getSendTime() {
        return sendTime;
    }

    public void setReceiver(String receiver) {
        this.receiver = receiver;
    }

    public String getReceiver() {
        return receiver;
    }

    public void setStatus(String status) {
        this.status = status;
    }

    public String getStatus() {
        return status;
    }
    
    public String toString() {
      return "message id: "+ messageId+" time: "+sendTime.toString()+ " status: " +status + " receiver: " + receiver;  
    }
}
Here the main code with three method sendMailAttachmentMsg, sendMixedMsg and getMessageStatus.
The sendMailAttachmentMsg method will only send Mail with Attachments and sendMixedMsg method can send messages to Google Talk and Email, it depends on the receivers and getMessageStatus returns the Statusses of the send messages.
package nl.whitehorses.soa.ums.services;


import javax.ejb.Remote;
import javax.ejb.Stateless;

import java.util.HashMap;
import java.util.Map;

import java.util.ArrayList;
import java.util.List;

import javax.activation.DataHandler;

import javax.jws.WebMethod;
import javax.jws.WebParam;
import javax.jws.WebResult;
import javax.jws.WebService;

import javax.mail.internet.MimeBodyPart;
import javax.mail.internet.MimeMultipart;

import nl.whitehorses.soa.ums.entities.Receiver;
import nl.whitehorses.soa.ums.utilities.ReceiverConvertor;

import oracle.sdp.messaging.Address;
import oracle.sdp.messaging.ApplicationInfo;
import oracle.sdp.messaging.DeliveryType;
import oracle.sdp.messaging.Message;
import oracle.sdp.messaging.MessagingFactory;
import oracle.sdp.messaging.MessagingClient;
import oracle.sdp.messaging.MessagingClientFactory;
import oracle.sdp.messaging.MessagingException;
import oracle.sdp.messaging.Status;
import oracle.sdp.messaging.util.ByteArrayDataSource;
import oracle.sdp.messaging.util.StringDataSource;

@Stateless(name="SessionEJB", mappedName = "SoaUMSMessaging-SessionEJB")
@Remote
@WebService(name        = "UMSMessagingService", 
            serviceName = "UMSMessagingService",
            portName    = "UMSMessagingServicePort")
public class SessionEJBBean implements SessionEJB {

    MessagingClient mClient = null;
    Map<String, Object> params = new HashMap<String, Object>();

    public SessionEJBBean() {
      params.put(ApplicationInfo.APPLICATION_NAME, "CompanyMsgr");
      params.put(ApplicationInfo.APPLICATION_INSTANCE_NAME, "CompanyInstance");
    }

    @WebMethod
    @WebResult(name = "messageId")
    public String sendMailAttachmentMsg(
                                        @WebParam(name = "sender")    String sender, 
                                        @WebParam(name = "receivers") List<Receiver> receivers,
                                        @WebParam(name = "subject")   String subject,
                                        @WebParam(name = "message")   String message,
                                        @WebParam(name = "data") byte[] data,
                                        @WebParam(name = "mimetype") String mimetype,
                                        @WebParam(name = "filename") String fileName) {

      MimeMultipart mp = null;

      try {
          // plain msg for the body
          MimeBodyPart mp_partPlain = new MimeBodyPart();
          mp_partPlain.setText(message);
        
          // binary attachement
          MimeBodyPart mp_partBinary = new MimeBodyPart();
          ByteArrayDataSource dataSource = new ByteArrayDataSource(data, mimetype);
          mp_partBinary.setDataHandler(new DataHandler(dataSource));
          mp_partBinary.setFileName(fileName);

          mp = new MimeMultipart("alternative");
          mp.addBodyPart(mp_partPlain);
          mp.addBodyPart(mp_partBinary);
      
      } catch (javax.mail.MessagingException e) {
          e.printStackTrace();
      }   

        try {
          Message soaMessage = MessagingFactory.createMessage();
          Address soaSender =
              MessagingFactory.buildAddress(sender, 
                                            DeliveryType.EMAIL,
                                            null);

          soaMessage.setSubject(subject);
          soaMessage.setContent(mp, "multipart/alternative");
          
          soaMessage.addSender(soaSender);
          soaMessage.addAllRecipients(ReceiverConvertor.convertReceiver(receivers));

          mClient = MessagingClientFactory.createMessagingClient(params);
          String messageId = mClient.send(soaMessage);
          return messageId;

        } catch (MessagingException e) {
             e.printStackTrace();
        }
 
        return null;
    }


    @WebMethod
    @WebResult(name = "statusses")    
    public List<nl.whitehorses.soa.ums.entities.Status> getMessageStatus(
            @WebParam(name = "messageId") String messageId) {

        try {
            mClient = MessagingClientFactory.createMessagingClient(params);
            Status[] msgStatuses = mClient.getStatus(messageId);
            List<nl.whitehorses.soa.ums.entities.Status> statusses =
                new ArrayList<nl.whitehorses.soa.ums.entities.Status>();

            for (Status msgStatus : msgStatuses) {
                nl.whitehorses.soa.ums.entities.Status status =
                    new nl.whitehorses.soa.ums.entities.Status();
                status.setMessageId(msgStatus.getMessageId());
                status.setReceiver(msgStatus.getAddress().toString());
                status.setStatus(msgStatus.getType().toString());
                status.setSendTime(msgStatus.getDate().getTime());
                statusses.add(status);
            }
            return statusses;
        } catch (MessagingException e) {
            e.printStackTrace();
        }
        return null;
    }

    @WebMethod
    @WebResult(name = "messageId")
    public String sendMixedMsg(@WebParam(name = "subject") String subject,
                               @WebParam(name = "message") String message, 
                               @WebParam(name = "sender") String sender, 
                               @WebParam(name = "receivers") List<Receiver> receivers) {


        Message soaMessage = MessagingFactory.createMessage();
        MimeMultipart part_mp = null;

        try {
          // IM Message  
          MimeBodyPart part_mp_partPlain = new MimeBodyPart();
          // set IM  
          part_mp_partPlain.addHeader(soaMessage.HEADER_SDPM_PAYLOAD_PART_DELIVERY_TYPE,
                                      "IM");
          part_mp_partPlain.setText(message);
 
          // Email Message             
          MimeBodyPart part_mp_partRich = new MimeBodyPart();
          // set Email  
          part_mp_partRich.addHeader(soaMessage.HEADER_SDPM_PAYLOAD_PART_DELIVERY_TYPE,
                                     "EMAIL");
          StringDataSource htmlDataSource = 
              new StringDataSource("<html><head></head><body><b><i>"+
                                   message+ 
                                   "</i></b></body></html>",
                                   "text/html; charset=UTF-8");
          part_mp_partRich.setDataHandler(new DataHandler(htmlDataSource));
    
          part_mp = new MimeMultipart("alternative");
          part_mp.addBodyPart(part_mp_partPlain);
          part_mp.addBodyPart(part_mp_partRich);

        } catch (javax.mail.MessagingException b) {
              b.printStackTrace();
        }


        try {
            mClient = MessagingClientFactory.createMessagingClient(params);

            soaMessage.setSubject(subject);
            soaMessage.setContent(part_mp, "multipart/alternative");
            // Enabled for IM and Email
            soaMessage.setMultiplePayload(true);

            Address soaSender = MessagingFactory.buildAddress(sender,
                                                              DeliveryType.EMAIL,
                                                              null);

            soaMessage.addSender(soaSender);
            soaMessage.addAllRecipients(ReceiverConvertor.convertReceiver(receivers));

            String messageId = mClient.send(soaMessage);
            return messageId;
        } catch (oracle.sdp.messaging.MessagingException b) {
            b.printStackTrace();
        }
        return null;
    }

}

My EJB test client
package nl.whitehorses.soa.ums;

import java.io.FileInputStream;
import java.io.FileNotFoundException;

import java.io.IOException;

import java.nio.ByteBuffer;
import java.nio.channels.FileChannel;

import java.util.ArrayList;
import java.util.Hashtable;

import java.util.List;

import javax.naming.Context;
import javax.naming.InitialContext;
import javax.naming.NamingException;

import nl.whitehorses.soa.ums.entities.Receiver;
import nl.whitehorses.soa.ums.entities.Status;
import nl.whitehorses.soa.ums.services.SessionEJB;

public class SessionEJBClient {
    public static void main(String[] args) {
        try {
            final Context context = getInitialContext();
            SessionEJB sessionEJB =
                (SessionEJB)context.lookup("SoaUMSMessaging-SessionEJB#nl.whitehorses.soa.ums.services.SessionEJB");

            List<Receiver> receivers = new ArrayList<Receiver>();
            Receiver receiver  = new Receiver("xxx@gmail.com", "EMAIL");
            Receiver receiver2 = new Receiver("xxxx@tiscali.nl", "EMAIL");
            receivers.add(receiver);
            receivers.add(receiver2);


            String messageId =
                sessionEJB.sendMailAttachmentMsg( "xxxx@xs4all.nl",
                                                   receivers,
                                                   "hello subject",
                                                   "hello body"
                                                   ,doDownload("C:/temp/logo.png"),
                                                   "image/png",
                                                   "logo.png");

            System.out.println("MessageId is " + messageId +
                               " lets wait 2 seconds for the status");
            Thread.sleep(2000);

            if (messageId != null) {
              List<Status> statusses =
                  sessionEJB.getMessageStatus(messageId);
              for (Status status : statusses) {
                  System.out.println(status.toString());
              }
            }


            Receiver receiver3 = new Receiver("nl2en@bot.talk.google.com", "IM");
            receivers.add(receiver3);

            messageId = sessionEJB.sendMixedMsg("Hello",
                                                "Hello world",
                                                "xxxx@xs4all.nl",
                                                receivers );


            System.out.println("MessageId is " + messageId +
                               " lets wait for the status");
            Thread.sleep(4000);

            if (messageId != null) {
                List<Status> statusses =
                    sessionEJB.getMessageStatus(messageId);
                for (Status status : statusses) {
                    System.out.println(status.toString());
                }
            }

        } catch (Exception ex) {
            ex.printStackTrace();
        }
    }

    private static Context getInitialContext() throws NamingException {
        Hashtable env = new Hashtable();
        env.put(Context.INITIAL_CONTEXT_FACTORY,
                "weblogic.jndi.WLInitialContextFactory");
        env.put(Context.PROVIDER_URL, "t3://localhost:8001");
        return new InitialContext(env);
    }

    public static byte[] doDownload(String fileName) {
        FileInputStream fis;
        byte[] data = null;
        FileChannel fc;

        try {
            fis = new FileInputStream(fileName);
            fc = fis.getChannel();
            data = new byte[(int)(fc.size())];
            ByteBuffer bb = ByteBuffer.wrap(data);
            fc.read(bb);
        } catch (FileNotFoundException e) {
            // TODO
        } catch (IOException e) {
            // TODO
        }
        return data;
    }
}
If you send messages with this EJB Session or WS then you can take a look at the application client in the UMS service overview.

Here you can download my example workspace.