Pages

Sunday, October 12, 2008

Dynamic Regions with Task Flow in Jdeveloper 11G

I made a new dynamic region example but now build with the JDeveloper 11G production release. In this project I have a jsf page which has a Tree and a dynamic region. This example uses the the department and employee tables of the HR demo schema.
Here are some pictures of the result.
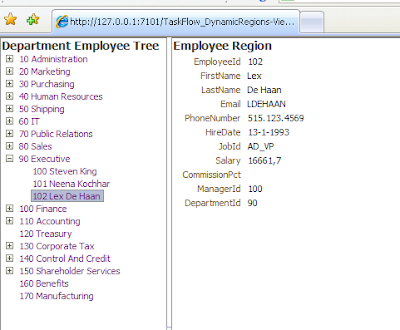
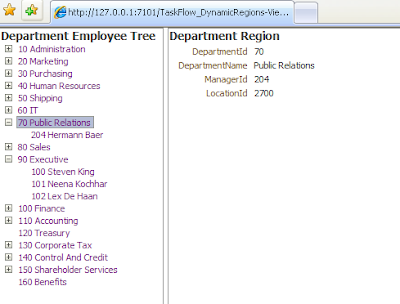
These are the steps I did to get this result.
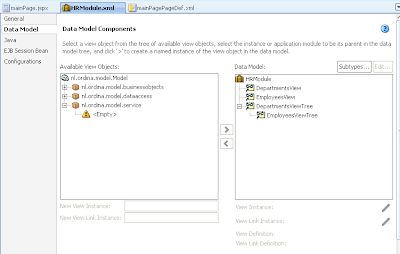
First I used the ADF Business Components wizard the fill the model project. I changed the Application Module so the tree has its own iterators.
Create a new JSF template in the viewcontroller project with 2 facets definitions. In this template I add a panel splitter with two facet ref's.
Open the adfc-config and create a view called mainPage to the Task Flow. Select the view and create the jsf page based on the just created template.
Drag the departmentsViewTree viewobject from the datacontrol to the Tree facet of the jsf page and select the ADF Tree option.
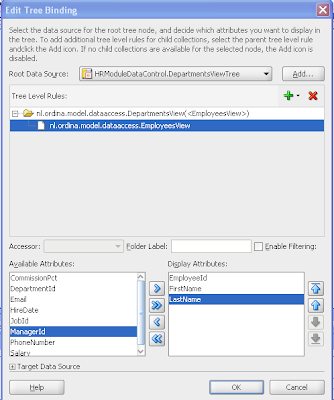
Also add the EmployeeTreeView to the tree binding.
Create two task flows called employee-task-flow-definition and department-task-flow-definition.
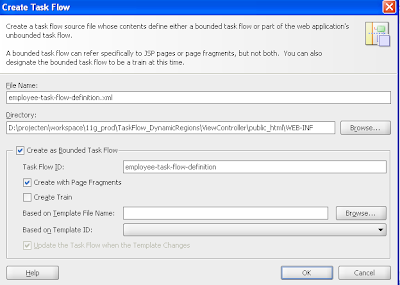
First we open employee-task-flow-definition where we add a view and we also drag the SetCurrentRowWithKeyValue operation of the employeesView to the task flow. ( do this from the datacontrol). Next we add a control flow case between the SetCurrentRowWithKeyValue method and the view. Make sure you set the SetCurrentRowWithKeyValue method as the default activity ( so it fires when the region is loaded).
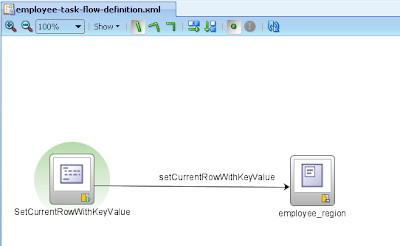
It looks a bit strange to add an SetCurrentRowWithKeyValue operation in the Task Flow to lookup the right employee because in JDeveloper 10.1.3 we used an invoke action in the page definition to fire the SetCurrentRowWithKeyValue operation on an iterator. Invoke action in JDeveloper still works but has some side effects.
Select the employee_region view and create the JSF page fragment. In this page fragment we can drag the employeesView from the datacontrol and select a read only form option.
The last step is to add an input parameter to the Task Flow so this parameter can be used by the SetCurrentRowWithKeyValue method.
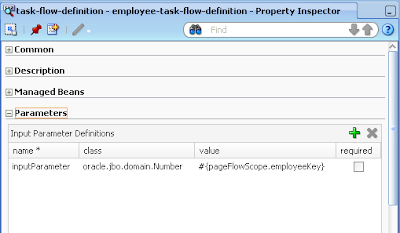
Select the SetCurrentRowWithKeyValue method and go to the page definition of this task flow method, where we will use the input parameter value.


Do the same with the department task flow.
Go the main jsf page where we will drag the employee or department Task Flow to the body facet of the main jsf page. We will get an option if we want to create a dynamic region.
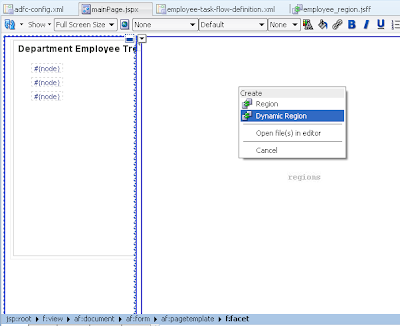
JDeveloper gives you the option to create a new backing bean where it will add the necessary code for the dynamic region. Here the code of the backing bean.

package nl.ordina.view.backing;

import oracle.adf.controller.TaskFlowId;
public class MainPageBean {
private String taskFlowId = "/WEB-INF/employee-task-flow-definition.xml#employee-task-flow-definition";

public MainPageBean() {
}

public TaskFlowId getDynamicTaskFlowId() {
return TaskFlowId.parse(taskFlowId);
}

public String employeeRegionLayout() {
taskFlowId = "/WEB-INF/employee-task-flow-definition.xml#employee-task-flow-definition";
return null;
}

public String departmentRegionLayout() {
taskFlowId = "/WEB-INF/department-task-flow-definition.xml#department-task-flow-definition";
return null;
}
}

We have to change this backing bean scope to session or application. Open the adfc-config for this
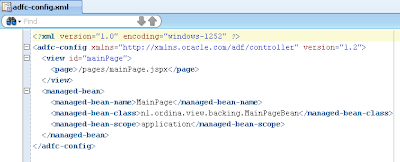
Now we can change the tree in the mainpage so the right key is passed on and the right region is activated. We use a switcher and setActionListener for this. The setActionListener copies the department or employee Id to a pageflowscope variable. The value is passed on to the input parameter of the region task flow. ( This happens in the page definition of the main page)

<af:panelHeader text="Department Employee Tree">
<af:tree value="#{bindings.DepartmentsViewTree.treeModel}"
var="node"
selectionListener="#{bindings.DepartmentsViewTree.treeModel.makeCurrent}"
rowSelection="single">
<f:facet name="nodeStamp">
<af:switcher facetName="#{node.hierType.viewDefName}">
<f:facet name="nl.ordina.model.dataaccess.DepartmentsView">
<af:commandLink text="#{node}"
action="#{MainPage.departmentRegionLayout}">
<af:setActionListener from="#{node.DepartmentId}"
to="#{pageFlowScope.TreeKey}"/>
</af:commandLink>
</f:facet>
<f:facet name="nl.ordina.model.dataaccess.EmployeesView">
<af:commandLink text="#{node}"
action="#{MainPage.employeeRegionLayout}">
<af:setActionListener from="#{node.EmployeeId}"
to="#{pageFlowScope.TreeKey}"/>
</af:commandLink>
</f:facet>
</af:switcher>
</f:facet>
</af:tree>
</af:panelHeader>

The last step is to change the page definition of the main page. Where we need to change the refresh conditions and the value of the inputparameter. This inputparameter has to have the same name as the inputparameter name of the region task flows.
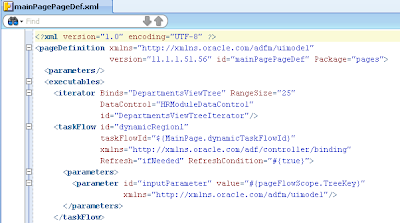

We are finished. Here you can download the project

Friday, October 10, 2008

JMS in JDeveloper 11g and WebLogic 10.3

JMS is a bit different in JDeveloper 11G and WebLogic 10.3 then when you use OC4J 10.1.3. This blog will show you how you can create a Queue and Connection Factory in WebLogic and use this in one of your JDeveloper 11g projects.
First you have to add two libraries to the project, The first is the AQJMS library ( even when we don't use AQ ) and the second library is the WebLogic 10.3 thin Client

Start the weblogic server. Menu Run , Start Server Instance


The url is http://localhost:7101/console. Username weblogic password weblogic.


Default the weblogic server has an empty configuration. We need to create a new jms server with a database of file persistance. We need this for the queue or topic persistence

create a new jms system module. In this module we will create a new connection factory and queue
Select the just created jms module and create a new connection factory first.


Create a new queue

Make sure that the queue uses the jms server. See the targets this can't be empty

And here is the java code to test the connection factory and the queue

The difference with oc4j is that you use other jndi properties. This are the right properties for WebLogic 10.3 in JDeveloper 11g

java.naming.factory.initial weblogic.jndi.WLInitialContextFactory
java.naming.provider.url t3://localhost:7101
java.naming.security.principal weblogic
java.naming.security.credentials weblogic


package nl.ordina.jms;

import java.io.FileInputStream;
import java.io.FileNotFoundException;
import java.io.IOException;
import java.sql.Timestamp;
import java.util.Properties;
import javax.jms.JMSException;
import javax.jms.Queue;
import javax.jms.QueueConnection;
import javax.jms.QueueConnectionFactory;
import javax.jms.QueueReceiver;
import javax.jms.QueueSender;
import javax.jms.QueueSession;
import javax.jms.Session;
import javax.jms.TextMessage;
import javax.naming.Context;
import javax.naming.InitialContext;

public class WeblogicClient {

private QueueConnection connection = null;
private QueueSession session = null;
private QueueSender sender = null;
private QueueReceiver receiver = null;
private Queue queue = null;
private long waitTime = 0;


public WeblogicClient() {
setUp();
put();
get();
tearDown();
}

public static void main(String[] args) {
WeblogicClient weblogicClient = new WeblogicClient();
}

public void tearDown() {
try {
sender.close();
receiver.close();
session.close();
connection.close();

} catch (JMSException je) {
je.printStackTrace();
} finally {
}
}

public void get(){
try {
javax.jms.TextMessage textMessage = (javax.jms.TextMessage)receiver.receive();
System.out.println("Receiving message [" + textMessage.getJMSMessageID() + "] enqueued at " + new Timestamp(textMessage.getJMSTimestamp()).toString());
String xmlText = textMessage.getText();
System.out.println(xmlText);
} catch (JMSException jmse) {
jmse.printStackTrace();
}
}

public void put(){
String messageId = null;
String xmlData = "";
FileInputStream fis;
try {
fis = new FileInputStream("D:\\projecten\\mhs_esb\\delfor.xml");
int x= fis.available();
byte b[]= new byte[x];
fis.read(b);
xmlData = new String(b);
} catch (FileNotFoundException e) {
// TODO
} catch (IOException e) {
// TODO
}
try {
TextMessage message = session.createTextMessage(xmlData);
sender.send(message);
} catch (JMSException jmse) {
jmse.printStackTrace();
}
}

protected void setUp() {

String queueName = "jms/QTest";
String queueConnectionFactoryName = "jms/CFTest";
Context ctx;

try {
Properties parm = new Properties();
parm.setProperty("java.naming.factory.initial","weblogic.jndi.WLInitialContextFactory");
parm.setProperty("java.naming.provider.url","t3://localhost:7101");
parm.setProperty("java.naming.security.principal","weblogic");
parm.setProperty("java.naming.security.credentials","weblogic");

ctx = new InitialContext(parm);

QueueConnectionFactory connectionFactory =
(QueueConnectionFactory)ctx.lookup(queueConnectionFactoryName);

connection = connectionFactory.createQueueConnection();
connection.start();
session = connection.createQueueSession(false, Session.CLIENT_ACKNOWLEDGE);
queue = (Queue)ctx.lookup(queueName);
sender = session.createSender(queue);
receiver = session.createReceiver(queue);


} catch (JMSException je) {
throw new RuntimeException("Fout opgetreden bij het starten ",je);
} catch (Throwable t) {
throw new RuntimeException("Fout opgetreden bij het starten ",t);

}
}

}


Wednesday, October 8, 2008

Group column in an ADF Rich Table

I noticed a small new group feature in the new JDeveloper 11G Rich Table component. You can group table columns together in a group column. Here you see an example of a rich table with two groups.

You can achieve this by dragging a viewobject from the datacontrol and selecting a table layout. Just select a few columns and press the group button.
JDeveloper creates a new column with the selected employee columns as childern