I am now building a Mail Handling System for a customer and one of the customer non functional requirement is high availibility. So I made a MySQL cluster. Now I can run at the same time two instances of this Mail Handling System in different sites. Now one site can fail and the other site can still work on. The MySQL cluster software make sure that the data is always stored, available and in sync on two nodes. Off course you can use Oracle Data guard or RAC but this is much easier and a lot cheaper.
I was suprised how easy it is to make a cluster. This blog entry will show you the steps.
I will use three x86 sun solaris 10 servers. Two servers are the storage nodes and one is the management node (The load of the management node is very low so you can easily add this to a existing server).
First I downloaded the MySQL 6.2.15 cluster edition from
http://dev.mysql.com/downloads/cluster/index.html#solaris_tar in my case the solaris software.
I don't use the default mysql folders. This are my mysql folder locations.
mysql folder /mysql/mysql
mysql data folder /mysql/mysql/data
mysql cluster folder /mysql/cluster
And I changed the default mysql parameters because we need to support big xml files.
Just change it or remove these parameters.
First step, installation of the mysql software.
Storage node ac-mhs20 (193.176.63.50)
mysql-ndb-1# mkdir /mysql
mysql-ndb-1# cd /mysql
mysql-ndb-1# put the mysql software in the /mysql folder
mysql-ndb-1# gunzip *.gz
mysql-ndb-1# tar xvf *.tar
mysql-ndb-1# rm *.tar
mysql-ndb-1# ln –s mysql-cluster-gpl-6.2.15-solaris10-i386 mysql
mysql-ndb-1# vi /etc/profile add PATH=$PATH:/mysql/mysql/bin
Let's make the mysql configuration file
mysql-ndb-1# vi /etc/my.cnf
[mysqld]
basedir=/mysql/mysql
datadir=/mysql/mysql/data
max_allowed_packet=64M
key_buffer_size=192M
table_cache=512
sort_buffer_size=12M
read_buffer_size=8M
wait_timeout=172800
interactive=172800
mysql-ndb-1# groupadd mysql
mysql-ndb-1# useradd -g mysql mysql
mysql-ndb-1# cd mysql ( /mysql/mysql )
mysql-ndb-1# scripts/mysql_install_db --user=mysql
mysql-ndb-1# chown -R root .
mysql-ndb-1# chown -R mysql data
mysql-ndb-1# chgrp -R mysql .
mysql-ndb-1# cp support-files/mysql.server /etc/init.d/mysql.server
change the mysqld_safe file located in /mysql/mysql/bin
first change
if test -f ./share/mysql/english/errmsg.sys -a -x ./bin/mysqld
to
if test -f ./share/english/errmsg.sys -a -x ./bin/mysqld
second change
elif test -f ./share/mysql/english/errmsg.sys -a -x ./libexec/mysqld
to
elif test -f ./share/english/errmsg.sys -a -x ./libexec/mysqld
Do the same steps for storage node two
Storage node ac-mhs21 (193.176.63.51)
Now we can put the mysql management software to the management server
Management server ac-mhs22 (193.176.63.52)
mysql-ndb-mgt # mkdir /mysql
mysql-ndb-mgt # cd /mysql
mysql-ndb-mgt # mkdir cluster
mysql-ndb-mgt # cd cluster
mysql-ndb-mgt # ftp or rcp /mysql/mysql/bin/ndb_mgm and ndb_mgmd from storage node A or B to /mysql/cluster folder of the management server
mysql-ndb-mgt # chmod u+x ndb_
Step 2 Add the cluster configuration
Management server ac-mhs22 (193.176.63.52)
Create a new file called config.ini and put this in the /mysql/cluster folder
[NDBD DEFAULT]
NoOfReplicas=2
DataDir=/mysql/cluster
DataMemory=80M
IndexMemory=18M
[MYSQLD DEFAULT]
[NDB_MGMD DEFAULT]
[TCP DEFAULT]
# Management Server
[NDB_MGMD]
id=1
HostName=193.176.63.52 # IP address of this server
# Storage Nodes
[NDBD]
id=2
HostName=193.176.63.50 # IP address of storage-node-1
DataDir= /mysql/cluster
[NDBD]
id=3
HostName=193.176.63.51 # IP address of storage-node-2
DataDir=/mysql/cluster
[MYSQLD]
[MYSQLD]
[MYSQLD]
[MYSQLD]
Storage node ac-mhs20 (193.176.63.50)
mysql-ndb-1# vi /etc/my.cnf and add this to it
ndbclusterndb-connectstring='host=193.176.63.52' # IP address of the management server
default-table-type=NDBCLUSTER
[mysql_cluster]ndb-connectstring='host=193.176.63.52' # IP address of the management
Storage node ac-mhs21 (193.176.63.51)
mysql-ndb-2# vi /etc/my.cnf and add this to it
ndbclusterndb-connectstring='host=193.176.63.52' # IP address of the management server
default-table-type=NDBCLUSTER
[mysql_cluster]ndb-connectstring='host=193.176.63.52' # IP address of the management
Step 3 Let's start the cluster
Management server ac-mhs22 (193.176.63.52)
mysql-ndb-mgt # cd /mysql/cluster
mysql-ndb-mgt # ./ndb_mgmd
Storage node ac-mhs20 (193.176.63.50)
mysql-ndb-1# cd /mysql/cluster
mysql-ndb-1# /mysql/mysql/bin/ndbd --initial
mysql-ndb-1# /etc/init.d/mysql.server start
Storage node ac-mhs21 (193.176.63.51)
mysql-ndb-2# cd /mysql/cluster
mysql-ndb-2# /mysql/mysql/bin/ndbd --initial
mysql-ndb-2# /etc/init.d/mysql.server start
Step 4 Check the cluster status
Management server ac-mhs22 (193.176.63.52)
Start the management console
mysql-ndb-mgt # cd /mysql/cluster
mysql-ndb-mgt # ndb_mgm
ndb_mgm> show
Step 5 Create a new database
Storage node ac-mhs20 (193.176.63.50)
mysql-ndb-1# mysql -u root
mysql-ndb-1# create database foo;
mysql-ndb-1# use foo;
mysql-ndb-1# create table test1 ( i int );
mysql-ndb-1# insert into test1 () values (1);
Storage node ac-mhs21 (193.176.63.51)
mysql-ndb-2# mysql -u root
mysql-ndb-2# use foo;
mysql-ndb-2# select * from test1;
That's all the cluster is working
For more info check this great white paper. http://www.lod.com/whitepapers/mysql-cluster-howto.html
Tuesday, September 16, 2008
Thursday, September 11, 2008
JDeveloper 11g is Coming
Today I heard some rumours that JDeveloper 11G ADF edition will be released this month. This is very great news. I thought that it will take at least another 6 months before Oracle will release JDeveloper 11G.
I saw today that a JDeveloper 11g ADF application works perfectly with BEA as the embedded application server in JDeveloper 11g. I must say the execution of a webapp in JDeveloper has changed a little bit. In OC4J you can run the webapp without a deployment. With BEA as embedded AS, JDeveloper has to create a war and ear file first and then these files are deployed to the BEA application server ( You have to start BEA first).
I saw today that a JDeveloper 11g ADF application works perfectly with BEA as the embedded application server in JDeveloper 11g. I must say the execution of a webapp in JDeveloper has changed a little bit. In OC4J you can run the webapp without a deployment. With BEA as embedded AS, JDeveloper has to create a war and ear file first and then these files are deployed to the BEA application server ( You have to start BEA first).
Tuesday, September 9, 2008
Using Exadel Fiji for Flex in JDeveloper 11g
With Exadel Fiji you can use Flex in a JSF page. For more infomations see my previous blog. This blog will show you how you use fiji & flex in JDeveloper 11g. This will not work in jdeveloper 10.1.3.
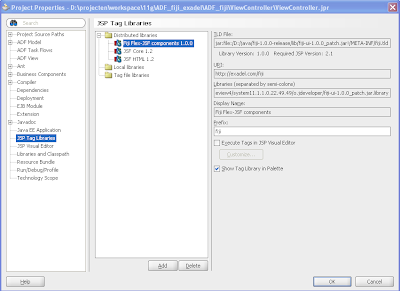
The first step is to download Fiji from http://exadel.com. To make this work in JDeveloper, we need to disable the trinidad code and configure Exadel Richfaces and Ajax4jsf. We need to add the fiji taglib to the project. To do this, Go to the project options / jsp tag libraries and press Add, click user and press the New button. Now we can select the fiji-ui-1.0.0.jar. We need to remove all other taglibs except jsf-core and jsf-html.
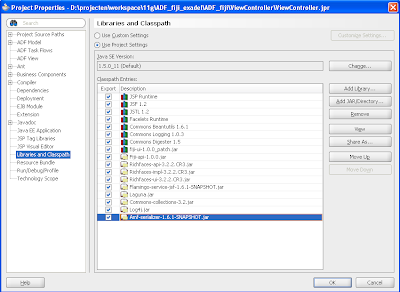
Now we can add the right libraries to the project. We can use the following libraries of JDeveloper 11G Facelets runtime, commons-logging, common-digester and common-beanutils. The rest of libraries comes from the fiji lib folder. See the picture for all the used fiji libs. Don't use the commons-digester of JDeveloper. Use version 1.8 of fiji download.
This is how the web.xml look like. You can better make this file readonly else JDeveloper 11g will try to add the Trinidad filters.
We had to remove the oracle default render kit from the faces-config.xml and add FaceletViewHandler for Ajax4jsf. Make this file readonly else JDeveloper will try to add the default render kit.
The backing bean code with the retrieveWelcomeText method which I use in the remote object (Flex).
jsf xhtml page with the fiji:swf component. This element has two sub elements the first is a simple param component which pass its values to flex as a parameter. The second component is a endpoint and this is used by the remoteobject.
Here is the flex code where we use Application.application.parameters to retrieve the parameter value or a reference url for the remoteobject.
That's all. Here you can download the JDeveloper 11g project.
The first step is to download Fiji from http://exadel.com. To make this work in JDeveloper, we need to disable the trinidad code and configure Exadel Richfaces and Ajax4jsf. We need to add the fiji taglib to the project. To do this, Go to the project options / jsp tag libraries and press Add, click user and press the New button. Now we can select the fiji-ui-1.0.0.jar. We need to remove all other taglibs except jsf-core and jsf-html.

Now we can add the right libraries to the project. We can use the following libraries of JDeveloper 11G Facelets runtime, commons-logging, common-digester and common-beanutils. The rest of libraries comes from the fiji lib folder. See the picture for all the used fiji libs. Don't use the commons-digester of JDeveloper. Use version 1.8 of fiji download.

This is how the web.xml look like. You can better make this file readonly else JDeveloper 11g will try to add the Trinidad filters.
<?xml version = '1.0' encoding = 'windows-1252'?>
<web-app xmlns:xsi="http://www.w3.org/2001/XMLSchema-instance"
         xsi:schemaLocation="http://java.sun.com/xml/ns/javaee http://java.sun.com/xml/ns/javaee/web-app_2_5.xsd"
         version="2.5" xmlns="http://java.sun.com/xml/ns/javaee">
    <description>Empty web.xml file for Web Application</description>
    <context-param>
        <param-name>javax.faces.DEFAULT_SUFFIX</param-name>
        <param-value>.xhtml</param-value>
    </context-param>
    <context-param>
        <param-name>javax.faces.STATE_SAVING_METHOD</param-name>
        <param-value>client</param-value>
    </context-param>
    <filter>
        <display-name>Ajax4jsf Filter</display-name>
        <filter-name>ajax4jsf</filter-name>
        <filter-class>org.ajax4jsf.Filter</filter-class>
        <init-param>
            <param-name>createTempFiles</param-name>
            <param-value>false</param-value>
        </init-param>
        <init-param>
            <param-name>maxRequestSize</param-name>
            <param-value>100000</param-value>
        </init-param>
    </filter>
    <filter-mapping>
        <filter-name>ajax4jsf</filter-name>
        <servlet-name>Faces Servlet</servlet-name>
        <dispatcher>FORWARD</dispatcher>
        <dispatcher>REQUEST</dispatcher>
        <dispatcher>INCLUDE</dispatcher>
        <dispatcher>ERROR</dispatcher>
    </filter-mapping>
    <servlet>
        <servlet-name>Faces Servlet</servlet-name>
        <servlet-class>javax.faces.webapp.FacesServlet</servlet-class>
        <load-on-startup>1</load-on-startup>
    </servlet>
     <servlet-mapping>
        <servlet-name>Faces Servlet</servlet-name>
        <url-pattern>*.jsf</url-pattern>
    </servlet-mapping>
    <session-config>
        <session-timeout>35</session-timeout>
    </session-config>
</web-app>
We had to remove the oracle default render kit from the faces-config.xml and add FaceletViewHandler for Ajax4jsf. Make this file readonly else JDeveloper will try to add the default render kit.
<?xml version="1.0" encoding="windows-1252"?>
<faces-config version="1.2" xmlns="http://java.sun.com/xml/ns/javaee">
  <managed-bean>
    <managed-bean-name>Test</managed-bean-name>
    <managed-bean-class>nl.ordina.fiji.backing.TestBean</managed-bean-class>
    <managed-bean-scope>session</managed-bean-scope>
  </managed-bean>
  <application>
    <view-handler>com.sun.facelets.FaceletViewHandler</view-handler>
  </application>
</faces-config>
The backing bean code with the retrieveWelcomeText method which I use in the remote object (Flex).
package nl.ordina.fiji.backing;
import java.util.Date;

public class TestBean {
    public TestBean() {
    }

    private String welcomeText = "Hello Flex in JSF";


    public void setWelcomeText(String welcomeText) {
        this.welcomeText = welcomeText;
    }

    public String getWelcomeText() {
        return welcomeText;
    }

    public String retrieveWelcomeText(Object obj) {
        this.welcomeText = "Hello Flex in JSF" + new Date().toString();
        return this.welcomeText;
    }

}
jsf xhtml page with the fiji:swf component. This element has two sub elements the first is a simple param component which pass its values to flex as a parameter. The second component is a endpoint and this is used by the remoteobject.
<!DOCTYPE html PUBLIC "-//W3C//DTD XHTML 1.0 Transitional//EN" "http://www.w3.org/TR/xhtml1/DTD/xhtml1-transitional.dtd">
<html xmlns="http://www.w3.org/1999/xhtml"
      xmlns:ui="http://java.sun.com/jsf/facelets"
      xmlns:h="http://java.sun.com/jsf/html"
      xmlns:f="http://java.sun.com/jsf/core"
      xmlns:a4j="http://richfaces.org/a4j"
      xmlns:rich="http://richfaces.org/rich"
      xmlns:fiji="http://exadel.com/fiji">

    <ui:composition>
        <p>
            <h:form></h:form>
            <fiji:swf src="/Flex_fiji.swf" id="simpleFlex"
                 bgcolor="#FFFFFF" width="450" height="250" >
               <f:param name="welcomeText" value="#{Test.welcomeText}" />
               <fiji:endpoint name="endpoint2" binary="true" service="#{Test.retrieveWelcomeText}"/>
           </fiji:swf>
        </p>
    </ui:composition>
</html>
Here is the flex code where we use Application.application.parameters to retrieve the parameter value or a reference url for the remoteobject.
<?xml version="1.0" encoding="utf-8"?>
<mx:Application xmlns:mx="http://www.adobe.com/2006/mxml"
 layout="absolute" creationComplete="onCreationComplete();">

   <mx:Script>
       <![CDATA[
            import mx.rpc.events.ResultEvent;
            import mx.controls.Alert;

            private function refresh():void {
         myService.getWelcomeObject();
            }

            public function handleResult(event:ResultEvent):void {
          welcome.text = event.result as String;
            }

            public function onCreationComplete():void{
             Alert.show(Application.application.parameters.endpoint2);
                myService.endpoint = Application.application.parameters.endpoint2;
            }
        ]]>
    </mx:Script>
    <mx:RemoteObject id="myService" destination="bean"
     result="handleResult(event)" />
 <mx:Form x="22" y="10" width="280">
        <mx:TextInput id="welcome" styleName="text"
         text="{Application.application.parameters.welcomeText}" />
        <mx:Button label="Refresh"
         click="refresh()"/>
    </mx:Form>
</mx:Application>
That's all. Here you can download the JDeveloper 11g project.
Subscribe to:
Posts (Atom)