Pages

Saturday, April 26, 2008

Flex or Flash JSF Component

For my goal to have Adobe Flex integrated into JSF, I made a jsf component which display flash and flex in a jsf page. This jsf component detects if the flashplayer is installed and if it is the right version, if not then it display a link to install flashplayer.
This is version 1 where I display the flash client in the jsf page. The next version of this jsf component allows flex to interact with the backing beans. I will provide a guide how to achieve this in Flex. This JSF component is like blazeds but then for JSF. If it all works then I shall donates this to the opensource community
This is how it works. First download the jsf component and then add the jar to the taglibs.

Open the jsf page and add xmlns:od to the jsp:root
<jsp:root xmlns:jsp="http://java.sun.com/JSP/Page" version="2.0" xmlns:od="http://www.ordina.nl">

Now we can add od:flex jsf component
<od:flex id="first" height="620" width="333" name="dragtree" source="DragTree-debug/DragTree.swf" scriptaccess="sameDomain"/>
Here is an example jsf page where I also use it in a backing bean

<?xml version='1.0' encoding='windows-1252'?>
<jsp:root xmlns:jsp="http://java.sun.com/JSP/Page" version="2.0"
xmlns:h="http://java.sun.com/jsf/html"
xmlns:f="http://java.sun.com/jsf/core"
xmlns:af="http://xmlns.oracle.com/adf/faces"
xmlns:afh="http://xmlns.oracle.com/adf/faces/html"
xmlns:cust="http://xmlns.oracle.com/adf/faces/customizable"
xmlns:od="http://www.ordina.nl">
<jsp:output omit-xml-declaration="true" doctype-root-element="HTML"
doctype-system="http://www.w3.org/TR/html4/loose.dtd"
doctype-public="-//W3C//DTD HTML 4.01 Transitional//EN"/>
<jsp:directive.page contentType="text/html;charset=windows-1252"/>
<f:view>
<afh:html>
<afh:head title="flex_jsf">
<meta http-equiv="Content-Type"
content="text/html; charset=windows-1252"/>
</afh:head>
<afh:body>
<h:form>
<af:panelGroup layout="horizontal">
<od:flex id="first"
height="620"
width="333"
name="dragtree"
source="DragTree-debug/DragTree.swf"
scriptaccess="sameDomain"/>

<od:flex id="second" binding="#{flexjsf.binding}"/>

</af:panelGroup>
</h:form>
</afh:body>
</afh:html>
</f:view>
</jsp:root>

Here is the code of the backing bean

package nl.ordina;

import nl.ordina.flex.component.FlexDisplayer;

public class FlexBean {
private FlexDisplayer binding;

public FlexBean() {
}
public void setBinding(FlexDisplayer binding) {
this.binding = binding;
binding.setHeight(500);
binding.setWidth(400);
binding.setName("dragtree");
binding.setScriptaccess("sameDomain");
binding.setSource("DragTree-debug/DragTree.swf");
}
public FlexDisplayer getBinding() {
return binding;
}
}


Please let me know if it works or there is something wrong with it. Good luck. The next version will be more impressive.

Wednesday, April 23, 2008

Get JSF trace and performance info with Faces Trace

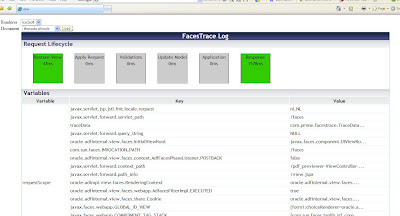
On the serverside I saw a great post about Faces Trace with this library you can get trace information and performance information of the jsf page. The trace and performance information can be displayed on the jsf page. Here an example how it looks

You can also see this demo page
In this blog I will show you can use this library in your jsf pages created with jdeveloper.
The first step is to download the jar file and add this to the project libraries.
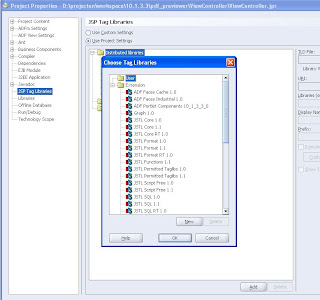
We also have to make a new taglib entry. Go the project options and go the jsp tag libraries entry and click the add button.

Click user( top of the page ) then new and select the faces trace jar file.

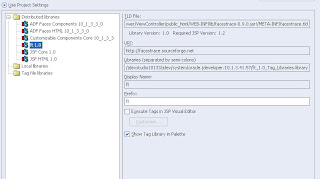
This is how it looks. It uses the ft prefix.
Now we can add a context parameter to the web.xml so we can disable the trace information in production

<context-param>
<param-name>com.prime.facestrace.DISABLE_TRACE</param-name>
<param-value>false</param-value>
</context-param>

The last step is to add faces trace to the jsf page. We add the following line xmlns:ft="http://facestrace.sourceforge.net" to jsp:root element.

<?xml version='1.0' encoding='windows-1252'?>
<jsp:root xmlns:jsp="http://java.sun.com/JSP/Page" version="2.0"
xmlns:h="http://java.sun.com/jsf/html"
xmlns:f="http://java.sun.com/jsf/core"
xmlns:af="http://xmlns.oracle.com/adf/faces"
xmlns:afh="http://xmlns.oracle.com/adf/faces/html"
xmlns:cust="http://xmlns.oracle.com/adf/faces/customizable"
xmlns:ft="http://facestrace.sourceforge.net">
<jsp:output omit-xml-declaration="true" doctype-root-element="HTML"
doctype-system="http://www.w3.org/TR/html4/loose.dtd"
doctype-public="-//W3C//DTD HTML 4.01 Transitional//EN"/>

Add <ft:trace/> under the end tag of the body element

</body>
<ft:trace/>
</html>
</f:view>
</jsp:root>

We are ready to test the jsf page

Saturday, April 19, 2008

Flex and web services using blazeds

I had a request how you can use a web service created with JDeveloper and use it in a flex client. For this I use blazeds (it acts like a proxy), this is not really necessary because you can call the web service from an other domain directly from flex if you use the crossdomain xml.
In this blog I use a normal java class and create with jdeveloper (I use the right mouse button on this class ) a java web service. In the wizard I also check the rest property so I can call this web service as a rest service. This is how the java class looks.

package nl.ordina.ws;

import java.util.ArrayList;
import java.util.List;
import javax.jws.WebService;
import oracle.webservices.annotations.Deployment;

@WebService(name = "CitiesService")
@Deployment(restSupport = true)
public class Cities {
public Cities() {
}
public List getCities(String countryCode) {
List result = new ArrayList();
if ( countryCode.equalsIgnoreCase("nl") ) {
City c = new City();
c.setCountry("NL");
c.setName("PUTTEN");
result.add(c);
City c2 = new City();
c2.setCountry("NL");
c2.setName("AMSTERDAM");
result.add(c2);
} else if ( countryCode.equalsIgnoreCase("de") ) {
City c = new City();
c.setCountry("DE");
c.setName("BERLIN");
result.add(c);
City c2 = new City();
c2.setCountry("DE");
c2.setName("FRANKFURT");
result.add(c2);
} else {
City c = new City();
c.setCountry(countryCode);
c.setName("NOT FOUND");
result.add(c);
}
return result;
}
}

It has a method getCities with one parameter countryCode and it returns arraylist with cities.
I can run the rest webservice by /CitiesServiceSoapHttpPort/getCities?countryCode=nl
with the following result

<ns0:getCitiesResponse xmlns:ns0="http://ws.ordina.nl/">
<ns0:return xsi:type="ns1:arrayList" xmlns:xsi="http://www.w3.org/2001/XMLSchema-instance">
<ns1:item xsi:type="ns0:City" xmlns:ns1="http://www.oracle.com/webservices/internal/literal">
<ns0:country>NL</ns0:country>
<ns0:name>PUTTEN</ns0:name>
</ns1:item>
<ns1:item xsi:type="ns0:City" xmlns:ns1="http://www.oracle.com/webservices/internal/literal">
<ns0:country>NL</ns0:country>
<ns0:name>AMSTERDAM</ns0:name>
</ns1:item>
</ns0:return>
</ns0:getCitiesResponse>

This is the web service call

<soap:Body xmlns:ns1="http://ws.ordina.nl/">
<ns1:getCities>
<ns1:countryCode>NL</ns1:countryCode>
</ns1:getCities>
</soap:Body>

result envelope

<env:Envelope
xmlns:env="http://schemas.xmlsoap.org/soap/envelope/"
xmlns:xsd="http://www.w3.org/2001/XMLSchema"
xmlns:xsi="http://www.w3.org/2001/XMLSchema-instance"
xmlns:ns0="http://ws.ordina.nl/"
xmlns:ns1="http://www.oracle.com/webservices/internal/literal">
<env:Body>
<ns0:getCitiesResponse>
<ns0:return
xsi:type="ns1:arrayList">
<ns1:item
xsi:type="ns0:City">
<ns0:country>NL</ns0:country>
<ns0:name>PUTTEN</ns0:name>
</ns1:item>
<ns1:item
xsi:type="ns0:City">
<ns0:country>NL</ns0:country>
<ns0:name>AMSTERDAM</ns0:name>
</ns1:item>
</ns0:return>
</ns0:getCitiesResponse>
</env:Body>
</env:Envelope>

Now we know how the result look like, this is important for displaying the result in Flex
Let's look at the flex configuration xml, First the services-config.xml which import the proxy-config.xml

<?xml version="1.0" encoding="UTF-8"?>
<services-config>
<services>
<service-include file-path="proxy-config.xml" />

<default-channels>
<channel ref="my-amf"/>
</default-channels>
</services>

<channels>
<channel-definition id="my-amf"
class="mx.messaging.channels.AMFChannel">
<endpoint url="http://{server.name}:{server.port}/{context.root}/messagebroker/amf"
class="flex.messaging.endpoints.AMFEndpoint"/>
<properties>
<polling-enabled>false</polling-enabled>
</properties>
</channel-definition>
<channel-definition id="my-http" class="mx.messaging.channels.HTTPChannel">
<endpoint url="http://{server.name}:{server.port}/{context.root}/messagebroker/http" class="flex.messaging.endpoints.HTTPEndpoint"/>
</channel-definition>

</channels>

<logging>
<target class="flex.messaging.log.ConsoleTarget" level="Debug">
<properties>
<prefix>[Flex] </prefix>
<includeDate>false</includeDate>
<includeTime>false</includeTime>
<includeLevel>false</includeLevel>
<includeCategory>false</includeCategory>
</properties>
</target>
</logging>
</services-config>

The proxy-config.xml has two definitions one for the rest service and one for the web service.

<?xml version="1.0" encoding="UTF-8"?>
<service id="proxy-service" class="flex.messaging.services.HTTPProxyService">

<properties>
<connection-manager>
<max-total-connections>100</max-total-connections>
<default-max-connections-per-host>2</default-max-connections-per-host>
</connection-manager>
<allow-lax-ssl>true</allow-lax-ssl>
</properties>

<default-channels>
<channel ref="my-http"/>
<channel ref="my-amf"/>
</default-channels>

<adapters>
<adapter-definition id="http-proxy" class="flex.messaging.services.http.HTTPProxyAdapter" default="true"/>
<adapter-definition id="soap-proxy" class="flex.messaging.services.http.SOAPProxyAdapter"/>
</adapters>

<destination id="ws-rest-cities">
<properties>
<url>http://{server.name}:{server.port}/flex_ws-ws-context-root/CitiesServiceSoapHttpPort/getCities?</url>
</properties>
</destination>
<destination id="ws-cities">
<properties>
<wsdl>http://{server.name}:{server.port}/flex_ws-ws-context-root/CitiesServiceSoapHttpPort?WSDL</wsdl>
<soap>*</soap>
</properties>
<adapter ref="soap-proxy"/>
</destination>
</service>

We are ready for flex application, make sure you select the j2ee server.

<?xml version="1.0" encoding="utf-8"?>
<mx:Application xmlns:mx="http://www.adobe.com/2006/mxml" backgroundColor="#FFFFFF">

<mx:Script>
<![CDATA[
import mx.rpc.events.ResultEvent;

[Bindable]
private var items:ArrayCollection;

private function resultHandler(event:ResultEvent):void {
if ( event.result != null ) {
// ws
items= event.result.item;
// this is for the rest service
if ( items == null ) {
items= event.result.getCitiesResponse['return'].item;
}
grid1.dataProvider=items;
}
}
]]>
</mx:Script>

<mx:HTTPService id="ws_rest"
destination="ws-rest-cities"
result="resultHandler(event)"
useProxy="true"
showBusyCursor="true">
<mx:request>
<countryCode>{country.selectedItem.data}</countryCode>
</mx:request>
</mx:HTTPService>


<mx:WebService id="ws"
destination="ws-cities"
result="resultHandler(event)"
useProxy="true"
showBusyCursor="true">
<mx:operation name="getCities">
<mx:request>
<countryCode>{country.selectedItem.data}</countryCode>
</mx:request>
</mx:operation>
</mx:WebService>

<mx:Form label="Search geonames" id="form" width="332">
<mx:FormItem label="Country">
<mx:ComboBox id="country" width="150">
<mx:dataProvider>
<mx:ArrayCollection>
<mx:source>
<mx:Object label="Netherlands" data="NL"/>
<mx:Object label="Germany" data="DE"/>
</mx:source>
</mx:ArrayCollection>
</mx:dataProvider>
</mx:ComboBox>
</mx:FormItem>
<mx:Button label="Get Data with WS Rest" click="ws_rest.send()"/>
<mx:Button label="Get Data with WS" click="ws.getCities()"/>
</mx:Form>

<mx:DataGrid id="grid1" width="337" height="175">
<mx:columns>
<mx:DataGridColumn dataField="country" headerText="country"/>
<mx:DataGridColumn dataField="name" headerText="city"/>
</mx:columns>
</mx:DataGrid>


</mx:Application>

I use for the rest web service mx:HTTPService and mx:request to add the parameter countryCode and for the web service I use mx:WebService with the mx:operation getCities and use mx:request to add the parameter countryCode. To handle the result I made resultHandler in actionscript.
This how the flex app looks like.

Here is the jdeveloper and flex example code

Monday, April 14, 2008

PDF previewer in jdeveloper 10.1.3

This blog I will show you how can make a free pdf previewer by generating images of pdf files and stream this png with a servlet to the objectImage of the jsf page.
If you have a web application where people can download pdf files, then this can be handy to provide a sort of previewer where the first page is shown, so they don't have to download or open every pdf file in acrobat reader to find the right document.
I use for the pdf to image generation the library of jpedal and some great code of Richard Braman for the scaling and generating of the png files.
Here is how it looks. First you have to select a pdf document.

If we press the load button then the first page is shown with the total pagecount of the document.


Here is the jsf page.

<?xml version='1.0' encoding='windows-1252'?>
<jsp:root xmlns:jsp="http://java.sun.com/JSP/Page" version="2.0"
xmlns:h="http://java.sun.com/jsf/html"
xmlns:f="http://java.sun.com/jsf/core"
xmlns:af="http://xmlns.oracle.com/adf/faces"
xmlns:afh="http://xmlns.oracle.com/adf/faces/html"
xmlns:cust="http://xmlns.oracle.com/adf/faces/customizable">
<jsp:output omit-xml-declaration="true" doctype-root-element="HTML"
doctype-system="http://www.w3.org/TR/html4/loose.dtd"
doctype-public="-//W3C//DTD HTML 4.01 Transitional//EN"/>
<jsp:directive.page contentType="text/html;charset=windows-1252"/>
<f:view>
<html>
<head>
<meta http-equiv="Content-Type"
content="text/html; charset=windows-1252"/>
<title>view</title>
</head>
<body>
<h:form id="form1">
<af:panelGroup layout="vertical">
<af:panelGroup layout="horizontal">
<af:selectOneChoice id="choice" label="Document"
valueChangeListener="#{ViewerBean.changeChoice}">
<af:selectItem label="doc1" value="javascript"/>
<af:selectItem label="doc2" value="threads"/>
</af:selectOneChoice>
<af:commandButton text="Load" id="laden"/>
</af:panelGroup>
<af:panelGroup rendered="#{ViewerBean.showImage}" >
<af:commandButton text="Previous" id="vorige" actionListener="#{ViewerBean.vorigePagina}">
</af:commandButton>
<af:outputText value="#{ViewerBean.pagesOverview}"/>
<af:commandButton text="Next" id="volgende" actionListener="#{ViewerBean.volgendePagina}">
</af:commandButton>
</af:panelGroup>
<af:objectImage id="objectImage1"
partialTriggers="volgende vorige laden"
binding="#{ViewerBean.image}" rendered="#{ViewerBean.showImage}" />
</af:panelGroup>
</h:form>
</body>
</html>
</f:view>
</jsp:root>

I have to use partialtriggers on the objectImage else it won't refresh from the servlet if I press the load or previous / next buttons.

In the faces-config.xml I have defined two beans, the first is for the jsf page and the second is for the servlet. This hashmap I use to pass the parameters to the servlet

<managed-bean>
<managed-bean-name>ViewerBean</managed-bean-name>
<managed-bean-class>nl.ordina.pdf.backing.Viewer</managed-bean-class>
<managed-bean-scope>session</managed-bean-scope>
</managed-bean>
<managed-bean>
<managed-bean-name>ImageParametersBean</managed-bean-name>
<managed-bean-class>java.util.HashMap</managed-bean-class>
<managed-bean-scope>session</managed-bean-scope>
</managed-bean>

The backing bean of the jsf page. Basically I fill the servlet hashmap with the right values.

package nl.ordina.pdf.backing;

import java.util.HashMap;
import javax.faces.context.FacesContext;
import javax.faces.event.ActionEvent;
import javax.faces.event.ValueChangeEvent;
import nl.ordina.pdf.ImageGenerator;
import oracle.adf.view.faces.component.core.output.CoreObjectImage;

public class Viewer {

private String tempPath = "d:/temp/";
private String imageUrl = "http://XPCND7010XMP:8988/pdf_previewer-ViewController-context-root/preview";
private String pdfArchivePath = "D:/documenten/MyeBooks/";
private int page = 1;
private int totalPages = 1;
private String pagesOverview;
private ImageGenerator img = new ImageGenerator();
private CoreObjectImage image;
private boolean showImage = false;
private HashMap parameters;

public Viewer() {
parameters = getHashMapServlet();
parameters.put("temppath",tempPath);
parameters.put("pdfarchivepath",pdfArchivePath);
}

public void volgendePagina(ActionEvent event){
if ( page <> 1 ){
page = page -1;
setServletPage(page);
}
}

public void changeChoice(ValueChangeEvent valueChangeEvent) {
page = 1;
setServletPage(page);
setServletDocument(valueChangeEvent.getNewValue().toString());
image.setSource(imageUrl);
showImage = true;
totalPages = img.pdfTotalPages(pdfArchivePath,valueChangeEvent.getNewValue().toString());
}

private HashMap getHashMapServlet(){
FacesContext fctx = FacesContext.getCurrentInstance();
return (HashMap)fctx.getApplication().createValueBinding("#{ImageParametersBean}").getValue(fctx);
}
private void setServletDocument(String doc){
parameters.put("document",doc);
}
private void setServletPage(int page){
parameters.put("page",page);
}

public void setImage(CoreObjectImage image) {
this.image = image;
}

public CoreObjectImage getImage() {
return image;
}

public void setShowImage(boolean showImage) {
this.showImage = showImage;
}

public boolean isShowImage() {
return showImage;
}

public String getPagesOverview() {
pagesOverview = page + " / " + totalPages;
return pagesOverview;
}
}


The servlet code which reads the hashmap , generates the png and streams it back to the jsf page

package nl.ordina.pdf.servlet;

import java.io.IOException;
import java.util.HashMap;
import javax.servlet.ServletConfig;
import javax.servlet.ServletException;
import javax.servlet.http.HttpServlet;
import javax.servlet.http.HttpServletRequest;
import javax.servlet.http.HttpServletResponse;
import nl.ordina.pdf.ImageGenerator;

public class PreviewServlet extends HttpServlet {

public void init(ServletConfig config) throws ServletException {
super.init(config);
}

public void doGet(HttpServletRequest request, HttpServletResponse response) throws ServletException, IOException {
doPost(request, response);
}

public void doPost(HttpServletRequest request, HttpServletResponse response) throws ServletException, IOException {
HashMap parameters = (HashMap)request.getSession().getAttribute("ImageParametersBean");
Integer page = 1;
String documentName = null, temp = null, archive = null;

if (parameters != null) {
documentName = parameters.get("document").toString();
page = new Integer(parameters.get("page").toString());
temp = parameters.get("temppath").toString();
archive = parameters.get("pdfarchivepath").toString();
}
ImageGenerator img = new ImageGenerator();
byte[] data = img.getPic(documentName,page.intValue(),temp,archive );
response.setContentType("image/png");
response.setContentLength( data.length );
response.getOutputStream().write( data );
response.getOutputStream().flush();
response.setHeader("Cache-Control", "no-cache");
}
}

Here is the example project with the jpedal code for the png generations.

To get this working change the select one choice of the jsf page with not secured pdf files and without the .pdf extension. Change the variables in the viewer bean with your own values

private String tempPath = "d:/temp/";
private String imageUrl = "http://XPCND7010XMP:8988/pdf_previewer-ViewController-context-root/preview";
private String pdfArchivePath = "D:/projecten/justid/cdd_archief/PEN_ARCH/01/01/45/";

Update
JPedal released a new jar where they changed something and you can get the following exception 08/05/26 17:07:21 java.awt.HeadlessException
08/05/26 17:07:21 at sun.java2d.HeadlessGraphicsEnvironment.getDefaultScreenDevice(HeadlessGraphicsEnvironment.java:65)

Here is the code of the new imagegenerator

package nl.ordina.pdf;

import java.io.FileInputStream;
import java.io.IOException;
import java.io.InputStream;
import org.jpedal.*;
import org.jpedal.exception.PdfException;
import java.io.*;
import java.awt.Graphics2D;
import java.awt.Image;
import java.awt.image.BufferedImage;


public class ImageGenerator {
public ImageGenerator() {
}

public byte[] getPic( String document,Integer picture
, String temp, String archive, String generateAlways) {
byte[] data = null;
String path = temp+document+"_"+picture+".png";

try {
boolean exists = (new File(path)).exists();
if (exists && generateAlways.equals("no") ) {
data = read(path);
} else {
path= PDFToPic(archive,document,picture,temp);
data = read(path);
}
} catch (IOException e) {
e.printStackTrace();
}
return data;

}

public int pdfTotalPages(String filepath,String doc)
{
try
{
PdfDecoder decoder = new PdfDecoder();
decoder.openPdfFile(filepath+doc+".pdf");
if (decoder.isFileViewable()) {

int PageCount = decoder.getPageCount() ;
return PageCount;
}
} catch(Exception err) {
err.printStackTrace();
}
return 0;
}


public byte[] read(String file) throws IOException {
InputStream in = new FileInputStream(file);
byte[] data = new byte[in.available()];
in.read(data);
return data;
}

public String PDFToPic(String filepath,String doc, int picture,String temppath)
{
try
{
PdfDecoder decoder = new PdfDecoder();
decoder.openPdfFile(filepath+doc+".pdf");
if (decoder.isFileViewable()) {

int PageCount = decoder.getPageCount() ;
double ImageWidth = 0;
double ImageHeight = 0;

if ( picture <= PageCount) {
//generate png files
generatePNGfromPDF(decoder, picture, ImageWidth, ImageHeight, doc,temppath);
return temppath+doc+"_"+picture+".png";

} else {
generatePNGfromPDF(decoder, PageCount, ImageWidth, ImageHeight, doc,temppath);
return temppath+doc+"_"+PageCount+".png";

}
}
} catch(Exception err) {
err.printStackTrace();
}
return null;
}


private void generatePNGfromPDF( PdfDecoder decoder
, int PageNumber
, double width
, double height
, String doc
, String temppath){
//int size = 100;
decoder.useHiResScreenDisplay(true);
decoder.setExtractionMode(PdfDecoder.RAWIMAGES+PdfDecoder.FINALIMAGES);


int scaling = 100;

try {
BufferedImage PDF = decoder.getPageAsImage(PageNumber);
if(scaling!=100){
int newWidth=PDF.getWidth()*scaling/100;
//only 1 new co-ord needed so use -1 for other as aspect ration does not change
Image scaledImage= PDF.getScaledInstance(newWidth,-1,BufferedImage.SCALE_SMOOTH);
PDF = new BufferedImage(scaledImage.getWidth(null),scaledImage.getHeight(null) , BufferedImage.TYPE_INT_RGB);
Graphics2D g2 = PDF.createGraphics();
g2.drawImage(scaledImage, 0, 0,null);

}
File fileToSave = new File( temppath+doc+"_"+PageNumber+".png");
boolean failed=decoder.getObjectStore().saveStoredImage(temppath+doc+"_"+PageNumber+".png",PDF,true,false,"png");
} catch (PdfException e) {
// TODO
e.printStackTrace();
}

}

}

Thursday, April 10, 2008

Exception page with ADF Taskflow

ADF Taskflow gives you the option to have one exception page in every bounded and unbounded taskflow. This page which you can design yourself will handle, the not handled errors like java nullpointer exceptions. It does not overrule business rules errors like a salary to high, these exceptions are still displayed at the right place. You can now handle the white screens with the stacktrace.
In this example I made a custom exception page where the stacktrace is displayed in an textarea and added a email action so the error can be send to support.
This is how you can add a exception page to the taskflow. First create a view in the taskflow and generate a page on this view. Select the view and press the mark Exception Handler button.
This is how it looks in the taskflow. You don't have to create a control flow rules because you can have only one exception view and every not handled error is redirected to this view
Here you see that a normal error like a duplicate key is still displayed at the right place
My jsf exception page looks like this.

<af:panelFormLayout>
<af:outputText value="Exception Occured"
inlineStyle="color:Red; font-size:large;"/>
<af:commandButton text="Send exception to support"
action="#{exception.sendMail}"/>
<af:inputText label="Message"
value="#{controllerContext.currentViewPort.exceptionData.message}"
rendered="#{controllerContext.currentViewPort.exceptionPresent}"
/>
<af:inputText label="Stacktrace"
value="#{exception.stacktrace}" rows="20"
readOnly="true"
rendered="#{controllerContext.currentViewPort.exceptionPresent}"
columns="100"/>
</af:panelFormLayout>


Here is the code of the backing bean which retrieves the stacktrace of the error and send the error to support.


package nl.ordina.bean;

import java.io.PrintWriter;
import java.io.StringWriter;

import java.util.Properties;

import javax.mail.Message;
import javax.mail.MessagingException;
import javax.mail.Session;

import javax.mail.Transport;
import javax.mail.internet.InternetAddress;
import javax.mail.internet.MimeMessage;

import oracle.adf.controller.ControllerContext;

public class Exception {
private ControllerContext cc;

public Exception() {
cc = ControllerContext.getInstance();
}

public String getStacktrace() {
if ( cc.getCurrentViewPort().getExceptionData()!=null ) {
StringWriter sw = new StringWriter();
PrintWriter pw = new PrintWriter(sw);
cc.getCurrentViewPort().getExceptionData().printStackTrace(pw);
return sw.toString();
}
return null;
}


public String sendMail()
{
Properties p = System.getProperties();
p.put("mail.transport.protocol","smtp");
p.put("mail.smtp.host","smtp.xs4all.nl");

Session session = Session.getInstance(p);
MimeMessage message = new MimeMessage(session);
try {
message.setFrom(new InternetAddress("xxxx@xxxx.nl"));
message.addRecipient(Message.RecipientType.TO,new InternetAddress("xxxx@xxxxx.nl"));
message.setSubject(cc.getCurrentViewPort().getExceptionData().getMessage());
message.setContent(getStacktrace(),"text/plain");
Transport.send(message);
} catch (MessagingException e) {
// TODO
e.printStackTrace();
}
System.out.println(message.toString());
return null;
}

}

Monday, April 7, 2008

Automatically save transactions with ADF Taskflow

ADF Taskflow has the option to automatically save all the transactions in bounded critical taskflows. This is called an implicit save. This save action happens when there is a timeout or when the user closes the browser and the transaction is still open. In this blog entry I will show what you have to do to enable this and I will show how you can restore it with a select one choice with the saved transaction. My previous blog give an example for an explicit save. With an explicit save the user decide to save the transaction so he or she can continu the transaction later.
The first step is to edit the adf-config.xml to enable automatically save in bounded taskflows.

<?xml version="1.0" encoding="windows-1252" ?>
<adf-config xmlns="http://xmlns.oracle.com/adf/config"
xmlns:sec="http://xmlns.oracle.com/adf/security/config">
<sec:adf-config-child xmlns="http://xmlns.oracle.com/adf/security/config">
<CredentialStoreContext credentialStoreClass="oracle.adf.share.security.providers.jps.CSFCredentialStore"
credentialStoreLocation="../../src/META-INF/jps-config.xml"/>
<sec:JaasSecurityContext initialContextFactoryClass="oracle.adf.share.security.JAASInitialContextFactory"
jaasProviderClass="oracle.adf.share.security.providers.jps.JpsSecurityContext"
authorizationEnforce="true"
authenticationRequire="true"/>
</sec:adf-config-child>
<adfc-controller-config xmlns="http://xmlns.oracle.com/adf/controller/config">
<savepoint-datasource>jdbc/scottDS</savepoint-datasource>
<savepoint-manager>DATABASE</savepoint-manager>
<savepoint-expiration>86400</savepoint-expiration>
<enable-implicit-savepoints>true</enable-implicit-savepoints>
</adfc-controller-config>
</adf-config>

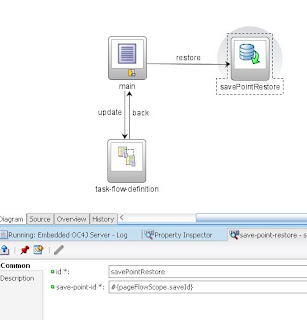
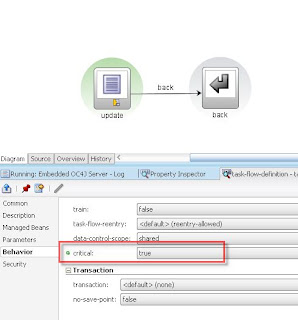
Now we can create two taskflows the first is unboundend taskflow with the restore savepoint functionality and the second is the bounded taskflow where ADf will save the open transactions. The unbounded taskflow looks like this. Here you see I call the bounded taskflow and I added a savepoint restore component which restores the session with this variable #{pageFlowScope.saveId}. I added also ADF security with the wizard so I only save and restore my own sessions.

The unbounded taskflow looks like this. It is very important to set critical on true else your transactions won't be saved.

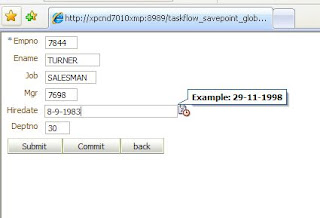
The bounded taskflow jsf page has a submit button else the webapp doesn't detect the changes to the record.

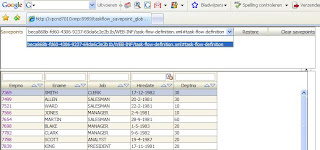
We are ready to add the restore functionality to the main page in the unbounded taskflow. For this I use a selectOneChoice with his own saved transactions, I also added a clear transactions button.


<af:panelGroupLayout layout="horizontal">
<af:selectOneChoice label="Savepoints" value="#{pageFlowScope.saveId}">
<f:selectItems value="#{savepoints.savepoints}"/>
</af:selectOneChoice>
<af:commandButton text="Restore" action="restore"/>
<af:commandButton text="Clear savepoints" action="#{savepoints.clearSavepoints}"/>
</af:panelGroupLayout>

I had to use a session bean to fill the selectonechoice, It didn't work with #{controllerContext.savePointManager.listSavePointIds}.

package nl.ordina.bean;

import java.util.ArrayList;
import java.util.List;

import javax.faces.model.SelectItem;
import oracle.adf.controller.ControllerContext;
import oracle.adf.controller.savepoint.SavePointAttributes;
import oracle.adf.controller.savepoint.SavePointManager;

public class Savepoint {

private ControllerContext cc;
private SavePointManager save;

public Savepoint() {
cc = ControllerContext.getInstance();
save = cc.getSavePointManager();
}

public List getSavepoints()
{
List options;
options = new ArrayList();
List saves = save.listSavePointIds();
SelectItem option;
int size = saves.size();
for ( int i = 0 ; i < saves.size() ; i++) {
SavePointAttributes att = save.getSavePointAttributes(saves.get(i));
option = new SelectItem(saves.get(i),saves.get(i)+att.getName());
options.add(option);
}
return options;
}
public String clearSavepoints() {
save.clearSavePoints();
return null;
}
}

Now we are ready to save and restore transactions.
Here you can download the example project Make sure you re-enable the security on the main pagedef else your system-jazn-data.xml isn't updated with the needed permissions.

Friday, April 4, 2008

Restoring transactions with ADF Taskflow

A great option of ADF taskflow in JDeveloper 11g is restoring savepoints, with this you can continu with your crashed or saved transaction. This can be handy if the user have filled in a lot of forms and he or she don't want to commit yet. The user can decide to store this session, this is called explicit save. The next time the user opens the application. He or she can restore this savepoint and returns to the right page with the right data. An another is option is to enable it for all the bounded taskflow in your application, this is called implicit save. Now the user can continu with its session after a timeout or when the user closes the browser and leaves a transaction open.
You can configure this in the adf-config. the adf-config is located in the .adf\META-INF folder of your application workfolder.

<?xml version="1.0" encoding="windows-1252" ?>
<adf-config xmlns="http://xmlns.oracle.com/adf/config"
xmlns:sec="http://xmlns.oracle.com/adf/security/config">
<sec:adf-config-child xmlns="http://xmlns.oracle.com/adf/security/config">
<CredentialStoreContext credentialStoreClass="oracle.adf.share.security.providers.jps.CSFCredentialStore"
credentialStoreLocation="../../src/META-INF/jps-config.xml"/>
</sec:adf-config-child>
<adfc-controller-config xmlns="http://xmlns.oracle.com/adf/controller/config">
<savepoint-datasource>jdbc/scottDS</savepoint-datasource>
<savepoint-manager>DATABASE</savepoint-manager>
<savepoint-expiration>86400</savepoint-expiration>
<enable-implicit-savepoints>false</enable-implicit-savepoints>
</adfc-controller-config>
</adf-config>

The open transactions can be saved on the the application server or default in a table. In my case I store these savepoints in the database see the element savepoint-manager, now I have to provide the datasource jndi name. If you make a connection in jdeveloper for example scott and then you can fill in jdbc/scottDS. JDeveloper automatically creates datasources for all your project connections.
ADF Taskflow creates now a new table called oradfcsavpt . The records looks like this.

If you use adf security then ADF Taskflow storew the transaction with the logged in username. So you can make a custom restore page where the user can see and restore his own transactions.
If you want to enable savepoint restore for the whole application then you have to use true by the enable-implicit-savepoints element. In my case is this false so I need a method to save the transaction. I will do this with a method call in ADF Taskflow.
In this example I used two taskflows, the first is an unbounded taskflow with a main view, this is a page with a department and employee overview, this taskflow also has a restore page with a simple inputtext where the user can put in the session id. This value is stored in #{pageFlowScope.savepoint} This value is used by the Save Point Restore component.

This is a picture of the main page

The main view call the second bounded taskflow where I can create a new department with a employee.

The first page is a page to create a new department, the second page is to create employees with this new department. On this page I have a commit and a save button.

The save button calls the following method #{controllerContext.currentViewPort.createSavePoint}. This creates a savepoint. The result of this method is the stored session id.

The return value is stored in the #{pageFlowScope.saveId} variable and displayed in the next page.
Now we can close the browser and open the application again. Now go the restore page, put in the session id and restore. You are now redirected to the employee page and continu the transaction.

Here you can download the example project.