Pages

Monday, October 27, 2008

Using OpenLDAP as security provider in WebLogic

The post of Frank Nimphius on OTN over using OID as security provider in WebLogic inspired me to use OpenLDAP instead of OID. I will be using the standard LDAPAuthenticator for OpenLDAP too. Here are my steps to make it work.

Here is the ldif file I used.

First we create a organisation unit called groups

Do the same for persons
Add some persons to the persons organisation unit.

We can create a new group called ICT in the groups organisation unit and add the just created persons as member attributes.

Go to the default security realm and a new LDAPAuthenticator provider called OpenLDAP

Select the OpenLDAP provider and go to the Provider Specific tab where we will change some properties.

These are the openldap settings
  • User Name Attribute: sn
  • Principal: o=sgi,c=us
  • Enable Propagate Cause For Login Exception
  • Host: localhost
  • User Object Class: person
  • Static Member DN Attribute: member
  • Group From Name Filter: (&(cn=%g)(objectclass=groupofNames))
  • Static Group DNs from Member DN Filter: (&(member=%M)(objectclass=groupofNames))
  • Enable Use Retrieved User Name as Principal
  • Credential: your ldap password
  • Confirm Credential: your ldap password
  • Group Base DN: ou=groups, o=thecompany, o=sgi,c=us
  • User From Name Filter: (&(sn=%u)(objectclass=person))
  • Static Group Name Attribute: cn
  • User Base DN: ou=persons, o=thecompany, o=sgi,c=us
  • Static Group Object Class: groupofNames
Restart Weblogic and go the users and groups tab of the default security realm

Saturday, October 25, 2008

Oracle Service Bus 10.3

Oracle has just released the new Oracle Service Bus ( AquaLogic Service Bus ) which is a combination of the Oracle ESB and BEA AquaLogic Service Bus. So let's install it and give it a testdrive. ( I am a Soa Suite expert so I am very curious to see how aqualogic works) .
In this blog I will make a small ESB example where I use a JMS Queue and a Web service ( this are proxy services ) as input and the Service Bus will route these messages to my local C or D drive ( these are my business services). In this example I will only use the OSB console to configure my project, off course you can do it too in the eclipse workshop.
First we have to start the Service Bus Console.

use this url http://localhost:7021/sbconsole/ weblogic as username and password. Now we can go the project explorer where we will create a new Project called TestDrive.
Click the just created TestDrive project. In this project we will create two folders called wsdl and xsd.
We can now add a wsdl to the wsdl folder ( this wsdl is use for the proxy service) and a xml schema to the xsd folder. The xml we use in this TestDrive is based on this schema

Let add the business functions first. Create a new resource and select business service. Use as service type "Any XML Service"

Use File as protocol and add an file endpoint file:///c:/temp.
Do the same for the D drive business service.

We can add a JMS proxy service which retrieves a message from a queue and routes this message to to the C or D drive business service. Create a new resource and select the proxy service. Where we will use "Message Service" as service type
Now we can select the xml schema and the right element where the message is based on
Use JMS as protocol and as endpoint I use jms://localhost:7021/TestCF/TestQ . TestCF is the jms connection factory and TestQ is my demo queue. ( you can create these jms resources in the weblogic console)
Let add some routing to the JMS proxy
Click the JMSproxy and add "Add Route"
Edit this route
Add a routing table because I want to check an element in the message and then decides which business services I need use.
Click the expression and go to the variables structures where I select the body and the recipient element. From the property inspector I copy this value to the field above
If the receiver element has a particular value then route this message to the D drive
We have to add a default case. This case is used when the first expression is not valid.

Route the default case to the C drive business service and we are finished with the JMS proxy. Activate the project so we can test our services


Just add a message to the queue or launch the test console of the JMSproxy.

The next step is to to add a Web Service Proxy and add some routing to the C drive business service. Create a new proxy service resource and use the wsdl we uploaded in one of the first steps and select the consume operation.
Use the ws protocol, later we can use http://localhost:7021/TestDrive/WSproxy to test our ws or to retrieve the wsdl.
Add some routing to this proxy service. This time we only use the c drive business service so I can use Routing and not routing table.
Use the c drive business service

Activate the project and we are finished with our TestDrive project.

Conclusion: the Oracle Service Bus 10R3 is very easy to work with ( off course you need to have some basic knowledge about wsdl, xsd , jms ) and it was nice to see that you only have to use the sbconsole application to create the whole project. So the next time I will test the Oracle BPEL integration, Oracle Workshop, Data service providers, Performance and some complex routings.

Thursday, October 23, 2008

XML download in JDeveloper 11G

Making a download or an export was never so easy as in JDeveloper 11g just follow these steps and you have own a xml export file of a rich table or any viewobject used in the page definition. For this blog entry I will use ADF BC which supports writexml and the fileDownloadActionListener jsf component which handles the download of the file.
first we drag a new toolbar button to the panel collection of a rich table.
drag the file download action listener from the component palette to the new toolbar button

In the property window of this af:fileDownloadActionListener component we can fill in some values for the content type and filename properties.
Select the edit menu item of the method property so we create an new backing bean.

Press the New button to create a new backing bean


Now we can create a new method in this bean.


and here is method code and we are finished


package nl.ordina.richtable.view.beans;

import java.io.IOException;
import java.io.OutputStream;

import java.util.List;
import javax.faces.context.FacesContext;
import nl.ordina.richtable.model.dataaccess.EmployeesViewImpl;
import oracle.adf.model.BindingContext;
import oracle.adfinternal.view.faces.model.binding.FacesCtrlHierBinding;
import oracle.binding.BindingContainer;
import oracle.jbo.XMLInterface;
import oracle.xml.parser.v2.XMLNode;

public class ExportBean {
public ExportBean() {
}
public void exportXml(FacesContext facesContext,
OutputStream outputStream) {
// Add event code here...
BindingContainer bc = BindingContext.getCurrent().getCurrentBindingsEntry();

List controlBindings = bc.getControlBindings();
FacesCtrlHierBinding hierBinding = (FacesCtrlHierBinding) bc.getControlBinding("EmployeesView");
EmployeesViewImpl employees = (EmployeesViewImpl) hierBinding.getViewObject();
try {
((XMLNode)(employees.writeXML(-1,XMLInterface.XML_OPT_ALL_ROWS))).print(outputStream);
} catch (IOException e) {
e.printStackTrace();
}
}
}

That's all.

Sunday, October 19, 2008

Reusable ADF Task Flow exception handler

In this blog entry I will show you how powerful ADF Task Flow are and how it can save you a lot of time. You only have to build it ones and use it everywhere. In this example I use an Exception page in a bounded Task Flow as a reusable component. In every Task Flow you can define a Exception Handler which takes care of the not handled exceptions. So probably you build this exception page in every project. I only have to drag the exception Task Flow from the component palette to the Task Flow, define some input parameters and make this Exception TF the Exception handler of the application Task Tlow.
This is how my exception page looks like. The Title and the Branding are flexible so you can change it in every Task Flow ( Task Flow input parameters)


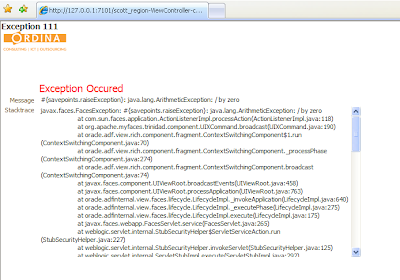
First we create a project where we add an exception JSF template. This template has two facets Top and Body and 3 attributes Title , Branding ( Image component ) and Stacktrace.
Now we can add a new deployment profile to this project , select the ADF Library JAR File and deploy this template.

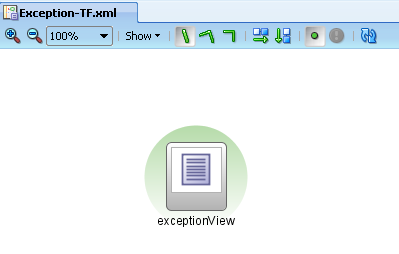
Create a new project with a bounded Task Flow ( de-select the page fragments option ) . In this Task Flow we add a new view.


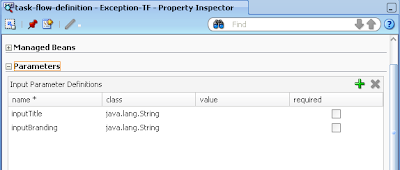
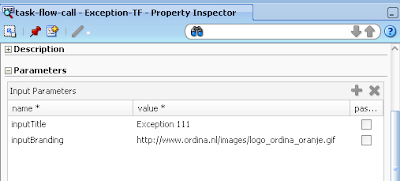
Add the Title and Branding input parameters to this Task Flow definition.

The next step is to add the template library so we can use the exception jsf template. Create a new page ( select the view in the TF and use the right button to create the page). In the create page dialog we can select exception template. Here is the source of the jsf page where the templates attributes are connected to the input parameter of the TF


<?xml version='1.0' encoding='windows-1252'?>
<jsp:root xmlns:jsp="http://java.sun.com/JSP/Page" version="2.1"
xmlns:f="http://java.sun.com/jsf/core"
xmlns:h="http://java.sun.com/jsf/html"
xmlns:af="http://xmlns.oracle.com/adf/faces/rich">
<jsp:directive.page contentType="text/html;charset=windows-1252"/>
<f:view>
<af:document>
<af:form>
<af:pageTemplate viewId="/templates/ExceptionTemplate.jspx">
<f:facet name="header"/>
<f:facet name="body"/>
<f:attribute name="branding" value="#{pageFlowScope.inputBranding}"/>
<f:attribute name="title" value="#{pageFlowScope.inputTitle}"/>
<f:attribute name="stacktrace" value="#{Exception.stacktrace}"/>
</af:pageTemplate>
</af:form>
</af:document>
</f:view>
</jsp:root>

To get the stacktrace, I need to use a bean and pass this value to the stacktrace attribute of the jsf template

package nl.ordina.view.exception.bean;

import java.io.PrintWriter;
import java.io.StringWriter;
import oracle.adf.controller.ControllerContext;

public class ExceptionBean {

private ControllerContext cc;

public ExceptionBean() {
cc = ControllerContext.getInstance();
}

public String getStacktrace() {
if ( cc.getCurrentViewPort().getExceptionData()!=null ) {
StringWriter sw = new StringWriter();
PrintWriter pw = new PrintWriter(sw);
cc.getCurrentViewPort().getExceptionData().printStackTrace(pw);
return sw.toString();
}
return null;
}
}

Add this bean as backing bean in the bounded TF.
Create a new deployment profile , select the ADF Library JAR File and deploy this Task Flow.
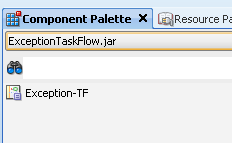
finally we can use this Exception page in our applications by adding the ADF library to the project and drag the exception TF to our application TF's

Make this view the exception handler

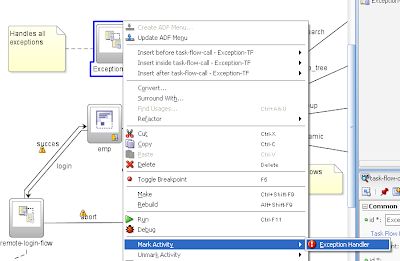
Put some values to the Title and Branding parameters and we are finished.

Here is the project code.

Saturday, October 18, 2008

ADF Task Flow dynamic region links

In my previous blog about ADF Task Flow Dynamic Regions I used a ADF Tree to switch from employee to department Task Flow region. In that example I added two commandLink to the tree and changed the backing bean of dynamic region to make it work.
I discovered that JDeveloper 11g can do this a lot faster. Just create a dynamic region. After this you can drag your Task Flow Region definition from the Page Flow folder in the Application Navigator and put it somewhere on the page where you want a commandLink then you will get Dynamic RegionLink option.
This will create a commandLink and adjust the dynamic region backing bean. If you also want a link to the first region of the page or more links to a particular region, just drag this Task Flow again on the page and it will create a new link.

Wednesday, October 15, 2008

Pimping your Rich Table in JDeveloper 11G

Probably you already know or saw that the new Rich Table of ADF 11G is very fancy but in this blog I will show you how to make it much cooler but adding some standard ADF components to it. With this as result.

You can reorder table columns or hide / show a column
With Detach you get a maximized page where only the table is shown.
Excel export.
This example based on the department and employees table of the HR demo schema.

The first step I did, is to drag the employee viewobject from the data control to the JSF page. I choose the ADF Master Table , Inline Detail Table option. Employee is my case the master and department is the inline table.

Select the columns of the employeesView
Press the green plus button to add the departmentView as an inline table

Then drag a PanelCollection to the page and move the just created table to this PanelCollection.


In the toolbar facet of the PanelCollection we add a toolbar with an commandToolbarButton. Drag the exportCollectionActionListener on this toolbar button and give the Rich Table as Id "table".

And we are finished.