Pages

Showing posts with label SAML. Show all posts

Thursday, September 22, 2011

Virtual Users with SAML in WebLogic

A small blogpost how you can use virtual users on your SAML Service Provider WebLogic Server. A virtual user is a user who is authenticated on the SAML Identity Provider and this user is transfered ( with all his attributes and roles )  in a SAML Token to the Service Provider, this user does not need to exists on the WebLogic server of the Service Provider.
Before you can use this feature you need to setup SAML 2.0 SSO on your WebLogic Domain. You can follow this blogpost for all the instructions. You can also do this with Web Services but then you need to follow this guide.

First we need to enable Generate Attributes on the Identity Provider Side.
Go to the myrealm security realm ->  Providers -> Credentials Mapping -> your SAML 2.0 Credential Mapping Provider -> Provider Specific.
Also do this on the imported Service Provider Partner located at the Management tab of your SAML 2.0 Credential Mapping Provider. Open the Service Provider Partner and also enable here Generate Attributes.

Next step is to configure the SAML Service Provider.
Go to the myrealm security realm ->  Providers ->  Authentication -> your SAML 2.0 Identity Assertion Provider -> Management Tab.
Open your imported Identity Provider Partner configuration.
Enable Virtual User and also enable Process Attributes.

Now we need to add an extra WebLogic SAML Authentication Provider. This provider will process the virtual user SAML token with all its attributes and roles.
Set the Control Flag to Sufficient also change the other authentication provider from Required to Sufficient.

That's all.

Monday, August 22, 2011

Do SAML with OWSM

In this blogpost I will explain the different SAML options and the advanced configurations you can do when you use the SAML client and server policies of Oracle Web Service Manager FMW 11gR1.
The following will be explained and configured in this blogpost.
  • A basic SAML authentication with 2 OWSM Servers.
  • Change the default SAML issuer name.
  • Allow only trusted SAML clients.
  • SAML Identity switching.
  • Virtual Users with User roles.
Creating a working SAML setup. 
For this we need two WebLogic domains and both have at least the Enterprise Manager web application and enabled the OWSM option. For this demo I will have one domain with SOA Suite and one with only a WebLogic Adminserver where we will deploy a JAX-WS Web Service which has an OWSM server policy. You can replace the SOA Suite with a OSB server ( it works in the same way ) . For OWSM, every domain need to have it's own MDS repository to store all the OWSM policies and for SOA Suite you also need a soa-infra database repos.

This will be our setup.
  • A client ( soapUI or WS client proxy ) calls an exposed web service of a SOA Suite composite and the client needs to provide a username token.
  • The exposed service has oracle/wss_username_token_service_policy as OWSM Server policy. The username token will be validated by WebLogic and the username will be passed on by SAML and signed with the signing certificate of the SOA Suite OWSM. The exposed service has a wire to a Mediator with a simple routing rule.
  • The Mediator has a wire to the Reference Web Service. This reference WS binding has oracle/wss11_saml_token_with_message_protection_client_policy as OWSM client policy.
  • The Reference WS binding calls a JAX-WS Web Service deployed on the other WebLogic Domain and this Web Service has oracle/wss11_saml_token_with_message_protection_service_policy as OWSM server policy. OWSM will validate the SAML issuer and check if it knows the username ( the password does not matter, because it is trusted )
The SOA Composite I used.

The JAX-WS service
Before we can test this SAML service, we need to generate some keystores, configure OWSM and add some users to WebLogic.
Execute the following commands to generate some self signed private keys and exchange the public keys ( this will trust each other certificates )

Go to the bin folder of your JDK.
cd c:\oracle\jrockit-jdk1.6.0_26-R28\bin

Generate a certificate for SOA ( server.jks ) and one for the JAX-WS server (  saml.jks )
keytool -genkey -alias serverKey -keyalg "RSA" -sigalg "SHA1withRSA" -dname "CN=server, C=US" -keypass welcome -keystore c:\temp\server.jks -storepass welcome -validity 3650
keytool -genkey -alias samlKey -keyalg "RSA" -sigalg "SHA1withRSA" -dname "CN=saml, C=US" -keypass welcome -keystore c:\temp\saml.jks -storepass welcome  -validity 3650

Export the public key
keytool -exportcert -alias serverKey -storepass welcome -keystore c:\temp\server.jks -file c:\temp\server.cer
keytool -exportcert -alias samlKey -storepass welcome -keystore c:\temp\saml.jks -file c:\temp\saml.cer

Import the keys in each other keystore ( for the trust (
keytool -import -alias serverKey -file c:\temp\server.cer -storepass welcome -keystore c:\temp\saml.jks
keytool -import -alias samlKey -file c:\temp\saml.cer -storepass welcome -keystore c:\temp\server.jks

Show the certificates in each keystore.
keytool -list -storepass welcome -keystore c:\temp\server.jks
keytool -list -storepass welcome -keystore c:\temp\saml.jks

Copy the server.jks to the config\fmwconfig folder of your SOA Suite domain. Do the same for the saml.jks keystore but then to fmwconfig of the JAX-WS server domain.

Go the Enterprise Manager (EM) application of the SOA Suite.  Open the WebLogic Domain treenode and select your SOA domain. In the Domain menu (right window)  go to Security -> Security Provider Configuration. Click on the Configure button in the keystore section.

  
Use ./server.jks in the Keystore Path field and serverKey in the Key and Crypt Alias. Use welcome for all the password fields.

We need to do the same at the JAX-WS server but then use the following values.
Use ./saml.jks in the Keystore Path field and samlKey in the Key and Crypt Alias. Use welcome for all the password fields.

Add a user with client as name and with weblogic1 as password in the myrealm security realm of the SOA Suite server. Do the same at the JAX-WS server but now use welcome1 as password.

Do a restart of the all the servers.

We can test the SAML setup by generating a Web Service Client proxy in JDeveloper. Here is an example how I add the client credentials.

that is all for the basic SAML test.

How to change the SAML issuer name. 
The default SAML issuer name is www.oracle.com , We can change this at the JAX-WS server. For this we need to go the EM application of the JAX-WS Server. Open the WebLogic Domain treenode and select your JAX-WS domain. In the Domain menu (right window)  go to Security -> Security Provider Configuration. Click on the Configure button in the Advanced section.

Here we can change the name attribute of saml.trusted.issuers.1 property to www.amis.nl and click on Ok. This way you will change the default trusted issuer for all the SAML login modules, if you only want to change this for SAML1.1 and not for SAML2 then you can open the saml.loginmodule instead (located at the Security Provider Configuration) and change it there. This will add an extra saml property name beside the one of www.oracle.com
You will need to restart the WebLogic server.

We also need to change an attribute on the reference web service binding of the SOA Composite. Select the reference binding and right click, to open the Configure WS Policies menu.

Click on the pencil to override the saml.issuer.name and use www.amis.nl

Deploy the composite and re-test it with the jdeveloper ws proxy client.

Allow only trusted SAML clients
In the current setup each public key found in the saml.jks keystore can sign a SAML token. In this part we can restrict this to only "CN=server, C=US", this is the DN of the signing certificate located at the SOA Suite server.

Go the Enterprise Manager (EM) application of the JAX-WS Server.  Open the WebLogic Domain treenode and select your JAX-WS domain. In the Domain menu (right window)  go to Web Services -> Platform Policy Configuration.

Go to the Trusted SAML clients Tab and add a new Trusted Issuer called www.amis.nl .
Select the just created Trusted Issuer and add a Trusted SAML Client and use CN=server, C=US as value.

Restart the JAX-WS Server and now only CN=server, C=US can sign the SAML token.

SAML Identity switching
In the last part of this blogpost we will change the identity of the SAML token. In the previous examples we used client as username and this is passed on to the JAX-WS server.  We will override this on the SOA Suite server.  In our test client we can now use weblogic as username and override to client in the SOA Composite.
Open the Mediator of the  SOA Composite where we will add an Assign to the request part of the Routing Rule.

Here we need to add the javax.xml.ws.security.auth.username property with client as value.

We also need to change the OWSM client policy to oracle/wss11_saml_token_identity_switch_with_message_protection_client_policy on the reference web service binding.

Deploy your composite.

Too bad, this is not enough we also need to give my SOA Composite the right permissions to do identity switching. Go the Enterprise Manager (EM) application of the SOA Suite.  Open the WebLogic Domain treenode and select your SOA domain. In the Domain menu (right window)  go to Security -> System Policies.

Select Codebase as Type and search. Select a Codebase policy and do Create Like.

Use file:${common.components.home}/modules/oracle.wsm.agent.common_11.1.1/wsm-agent-core.jar as value in the Codebase field and click on Edit.

Enter oracle.wsm.security.WSIdentityPermission in the Permission Class field. The action is always assert. The Resource Name is your Composite Name which does the identity switching.


Virtual Users with User roles
The last part is virtual users, in this section will we add some roles and change some attributes on the SOA Suite client user. Change the policy back on the composite reference ( oracle/wss11_saml_token_with_message_protection_client_policy ) and also use client as username in the web service proxy client.

First change some client user attributes. We can do this in the security realm of the SOA Suite WebLogic Domain.


Normally the user is only mapped to the user located at the JAX-WS server. To make virtual servers work we need to add a property to the saml.loginmodule located at the JAX-WS server.  For this we need to go the EM application of the JAX-WS Server. Open the WebLogic Domain treenode and select your JAX-WS domain. In the Domain menu (right window)  go to Security -> Security Provider Configuration.

Click on Edit and add a custom property oracle.security.jps.assert.saml.identity with value true.


Restart the JAX-WS WebLogic server.

We also need to do something in the SOA Composite.
Override the following properties

user.attributes with value  displayname,employeenumber ( use , to separate ldap attributes you want to pass on )
user.roles.include with value true
subject.precedence with value true

Deploy the composite and when you test your test client. You will see the following output on the JAX-WS Server.


virtual found
saml issuer: www.amis.nl

SAML attribute: employeenumber
value: 100

SAML attribute: Roles
value: Operators
value: AdminChannelUsers
value: IntegrationOperators
value: IntegrationMonitors
value: Monitors

SAML attribute: displayname
value: SAML client


Thursday, October 29, 2009

Securing Web Services with SAML Sender Vouches

After securing you web applications with SAML is the next step to secure your web services with SAML Sender Vouches ws-security policy, this can be complex because you need to know a lot over the weblogic server configuration and its java security frameworks. For example you need to configure two Weblogic servers, the first is the Web Service server and the second server is the Secure Token Service ( STS ). After that you need to add some client credential providers to the generated web service proxy client. Thanks to Vishal Jain of Oracle who provided me a working example.
This is how SAML Sender Vouches works and what we need to do in weblogic / java.
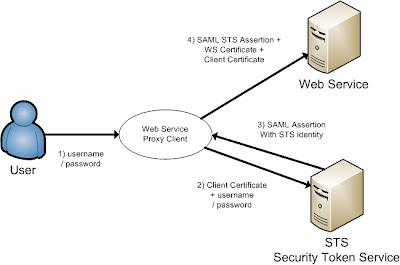
The short version is, the web service proxy client call the STS server to get an SAML assertion on behalf of the User to call the Web Service.

The long version, the user provides its credentials to the ws proxy client and the ws proxy client calls the STS server and provides the username / password of the user and the client key.
The STS validates the user and the ws proxy client certificate and the STS returns the STS identity assertion to the ws proxy client. The ws proxy client uses this STS assertion together with the ws client and ws server certificate to call the web service.

First we need to have 3 certificates, the first is alice, this will be used in the ws proxy client and the second certificate is bob, this will be used in the Weblogic web service server and the last we use wssipsts certificate for the Weblogic STS server. Add these keys into a java keystore.

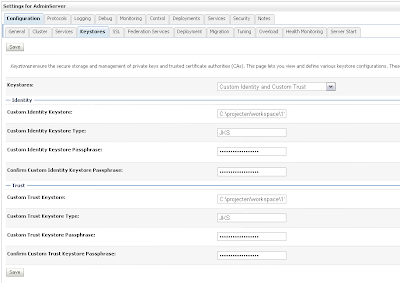
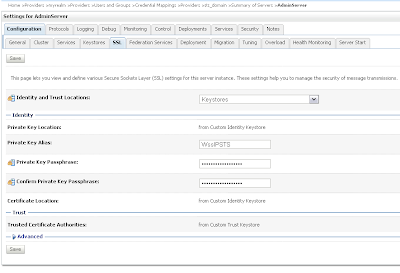
Setting up the Secure Token Service (STS)
Create a new Weblogic 10.3.1 domain and start the admin server. First we need to enable SSL in the general tab of the server and then add our keystores in the keystore tab.
Provide the STS certificate alias, in my case wssipprv

Go the myrealm security where we add the Alice user and provide a password, Very important the username must match with the CN of the Alice certificate. The user provides the credentials and must match with user in WLS and the ws proxy client provides the Alice certificate and this must match with the PKI Credential mapping.

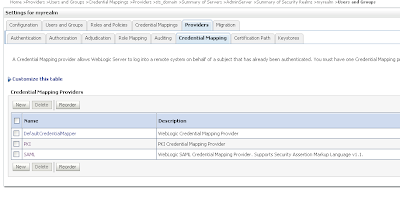
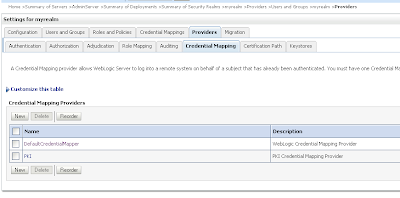
Go to the Credential mapping tab of the Provider tab and add a PKI Credential Mapping where we import the keystore and Add a SAML Credential Mapping version 2 where we add the Web Service URL.

Open the just created PKI credential mapping and add the keystore.

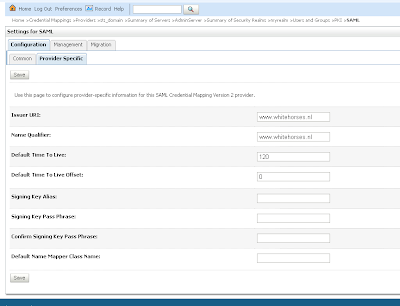
Next we open the SAML Credential Mapping version 2 and provide the Issuer URL and Name Qualifier.

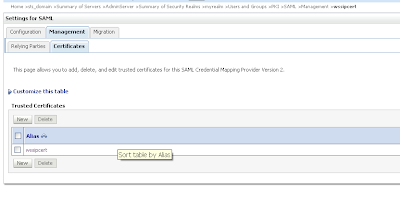
Add the public key of the wssipsts

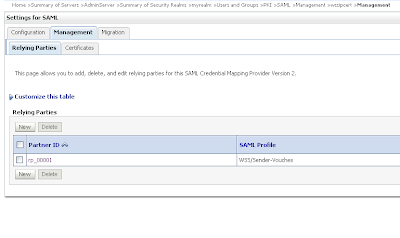
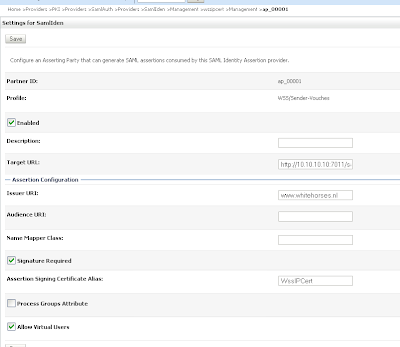
Add a WSS/Sender-Vouches Relying Party

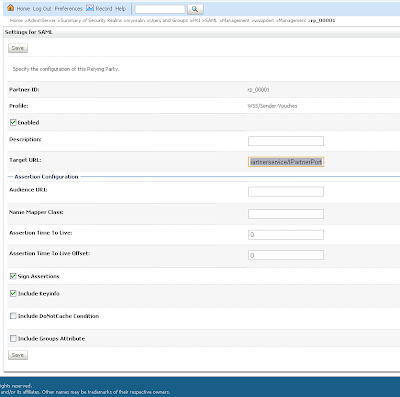
Enable this and provide the target url of the Web Service Url and assign assertions and include key info


That is all for the STS server and now we can deploy the STS web service.

package nl.whitehorses.sts;

import weblogic.jws.Policy;
import weblogic.wsee.security.saml.SAMLTrustTokenProvider;
import weblogic.wsee.security.wst.framework.TrustTokenProviderRegistry;

import javax.jws.WebMethod;
import javax.jws.WebService;

@WebService
@Policy(uri="policy:Wssp1.2-2007-Wssc1.3-Bootstrap-Https-UNT.xml")
public class StsUnt {

static {
init();
}

@WebMethod
@Policy(uri="policy:Wssp1.2-2007-SignBody.xml")
public String dummyMethod(String s) {
return s;
}

static void init() {
TrustTokenProviderRegistry reg = TrustTokenProviderRegistry.getInstance();
SAMLTrustTokenProvider provider = new MySAMLTrustTokenProvider();
reg.registerProvider("http://docs.oasis-open.org/wss/2004/01/oasis-2004-01-saml-token-profile-1.0#SAMLAssertionID", provider);
reg.registerProvider("http://docs.oasis-open.org/wss/oasis-wss-saml-token-profile-1.0#SAMLAssertionID", provider);
reg.registerProvider("http://docs.oasis-open.org/wss/oasis-wss-saml-token-profile-1.1#SAMLV2.0", provider);
reg.registerProvider("http://docs.oasis-open.org/wss/oasis-wss-saml-token-profile-1.1#SAMLV1.0", provider);
reg.registerProvider("http://docs.oasis-open.org/wss/oasis-wss-saml-token-profile-1.1#SAMLV1.1", provider);
}

static class MySAMLTrustTokenProvider extends SAMLTrustTokenProvider {

}
}


Configure the Weblogic server for the Web Services
Create a new Weblogic domain and use the same keystore, we don't need to setup SSL on this server.

Go the myrealm security and go to providers tab where we add a new PKI Credential Mapping in the credentials tab. ( Use the same setting as the STS server )
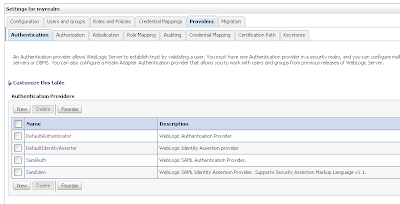
We need to add 2 authentication providers and change the 2 default providers.
Create a SAML Authentication and SAML Identity Assertion provider.

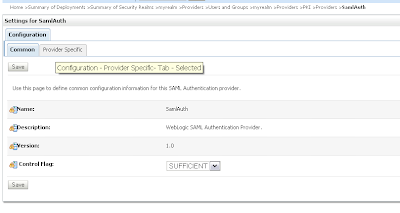
Every authentication provider need to have the SUFFICIENT control flag.

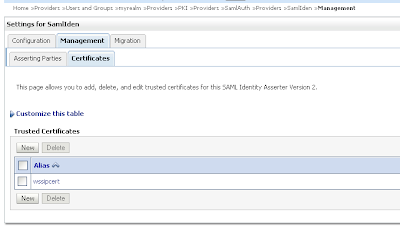
Change the SAML Identity Assertion by adding an asserting party and the STS public certificate

Import the STS certificate

Change the just create Sender-Vouches asserting party. Enable this and provide the target url of the web service and add the issuer url, signature required and expect the STS certificate and allow virtual user.


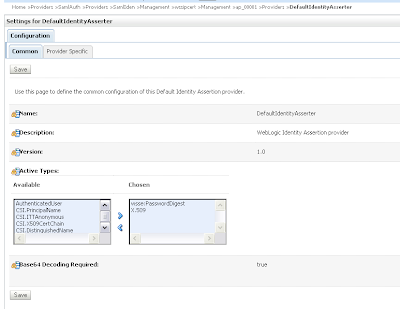
Change the defaultIdentityAsserter and add wsse:PasswordDigest and X.509 as active types.
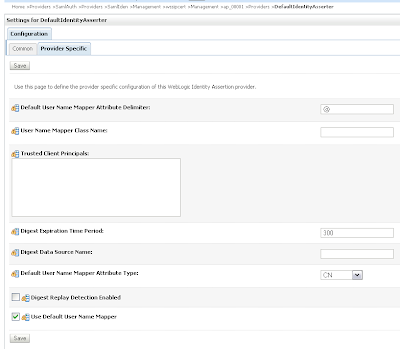
In the provider specific tab we need to set CN in the Default User Name Mapper Attribute Type and enable Use Default User Name Mapper.


In the DefaultAuthenticator we need to set control flag to SUFFICIENT
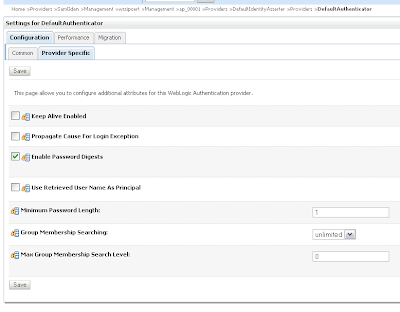
And in the provider specific tab. Enable Password Digests and Minimum Password Length to 1.

That's all for the Web Service server. Now we can deploy the webservice.

package nl.whitehorses.sts.ws;

import weblogic.jws.Policies;
import weblogic.jws.Policy;
import javax.jws.WebService;

@Policies(
{
@Policy(uri = "policy:Wssp1.2-2007-Saml1.1-SenderVouches-Wss1.0.xml"),
@Policy(uri = "policy:Wssp1.2-2007-SignBody.xml"),
@Policy(uri = "policy:Wssp1.2-2007-EncryptBody.xml")
}
)

@WebService
public class EchoService {
public String echo( String hello){
return hello;
}
}


Generating the Web Service Proxy Client
The last step we need to generate a web service proxy client and add the username and the client credentials mappings.

package nl.whitehorses.sts.ws.client;

import java.io.InputStream;
import java.io.ByteArrayInputStream;

import java.security.cert.X509Certificate;

import java.util.ArrayList;
import java.util.List;
import java.util.Map;

import java.net.URL;
import javax.xml.namespace.QName;


import javax.xml.ws.BindingProvider;
import javax.xml.ws.WebServiceRef;

import weblogic.security.SSL.TrustManager;

import weblogic.wsee.message.WlMessageContext;
import weblogic.wsee.security.bst.ClientBSTCredentialProvider;
import weblogic.wsee.security.saml.SAMLTrustCredentialProvider;
import weblogic.wsee.security.unt.ClientUNTCredentialProvider;

import weblogic.xml.crypto.wss.WSSecurityContext;
import weblogic.xml.crypto.wss.provider.CredentialProvider;

public class EchoServicePortClient
{
@WebServiceRef
private static EchoServiceService echoServiceService;

private static String stsUntPolicy =
"<?xml version=\"1.0\"?>\n" +
"<wsp:Policy\n" +
" xmlns:wsp=\"http://schemas.xmlsoap.org/ws/2004/09/policy\"\n" +
" xmlns:sp=\"http://docs.oasis-open.org/ws-sx/ws-securitypolicy/200702\"\n" +
" >\n" +
" <sp:TransportBinding>\n" +
" <wsp:Policy>\n" +
" <sp:TransportToken>\n" +
" <wsp:Policy>\n" +
" <sp:HttpsToken/>\n" +
" </wsp:Policy>\n" +
" </sp:TransportToken>\n" +
" <sp:AlgorithmSuite>\n" +
" <wsp:Policy>\n" +
" <sp:Basic256/>\n" +
" </wsp:Policy>\n" +
" </sp:AlgorithmSuite>\n" +
" <sp:Layout>\n" +
" <wsp:Policy>\n" +
" <sp:Lax/>\n" +
" </wsp:Policy>\n" +
" </sp:Layout>\n" +
" <sp:IncludeTimestamp/>\n" +
" </wsp:Policy>\n" +
" </sp:TransportBinding>\n" +
" <sp:SupportingTokens>\n" +
" <wsp:Policy>\n" +
" <sp:UsernameToken\n" +
" sp:IncludeToken=\"http://docs.oasis-open.org/ws-sx/ws-securitypolicy/200702/IncludeToken/AlwaysToRecipient\">\n" +
" <wsp:Policy>\n" +
" <sp:WssUsernameToken10/>\n" +
" </wsp:Policy>\n" +
" </sp:UsernameToken>\n" +
" </wsp:Policy>\n" +
" </sp:SupportingTokens>\n" +
"</wsp:Policy>";

public static void main(String[] args) {
System.setProperty("com.sun.xml.ws.transport.http.client.HttpTransportPipe.dump", "true");
try {

String wsURL = "http://10.10.10.10:7011/saml-ws-context-root/EchoServicePort?WSDL";

echoServiceService = new EchoServiceService( new URL(wsURL)
, new QName("http://ws.sts.whitehorses.nl/", "EchoServiceService"));
EchoService echoService = echoServiceService.getEchoServicePort();

System.setProperty("javax.net.ssl.trustStore", "C:/projecten/workspace/11g_prod/saml1.1_ws/wsttest1/certs/cacerts");

Map<String, Object> requestContext = ((BindingProvider)echoService).getRequestContext();

List<CredentialProvider> credList = new ArrayList<CredentialProvider>();

// Add the necessary credential providers to the list
InputStream policy = new ByteArrayInputStream(stsUntPolicy.getBytes("UTF-8"));
requestContext.put(WlMessageContext.WST_BOOT_STRAP_POLICY, policy );

String stsURL = "https://localhost:7022/sts/StsUntPort";


requestContext.put(WlMessageContext.STS_ENDPOINT_ADDRESS_PROPERTY, stsURL);
requestContext.put(WSSecurityContext.TRUST_MANAGER,
new TrustManager() {
public boolean certificateCallback(X509Certificate[] chain, int validateErr) {
// need to validate if the server cert can be trusted
return true;
}
});

credList.add(new SAMLTrustCredentialProvider());

String username = "Alice";
String password = "weblogic1";
credList.add(new ClientUNTCredentialProvider(username.getBytes(), password.getBytes()));

// ClientBSTCredentialProvider
String defaultClientcert = "C:/projecten/workspace/11g_prod/saml1.1_ws/wsttest1/certs/Alice.cer";
String clientcert = System.getProperty("target.clientcert", defaultClientcert);
String defaultClientkey = "C:/projecten/workspace/11g_prod/saml1.1_ws/wsttest1/certs/Alice.prv";
String clientkey = System.getProperty("target.clientkey", defaultClientkey);

String defaultServerCert = "C:/projecten/workspace/11g_prod/saml1.1_ws/wsttest1/certs/Bob.cer";
String serverCert = System.getProperty("target.serverCert", defaultServerCert);

credList.add(new ClientBSTCredentialProvider(clientcert, clientkey, serverCert));

requestContext.put(WSSecurityContext.CREDENTIAL_PROVIDER_LIST, credList);

// Add your code to call the desired methods.
System.out.println(echoService.echo("Hello"));

} catch (Exception ex) {
ex.printStackTrace();
}
}

}

Monday, September 14, 2009

SSO with WebLogic 10.3.1 and SAML2

In a previous blog entry I already explained how to setup Single Sign On (SSO) with SAML1.1. In this blogpost I do the same but then with SAML version 2 or SAML2 in Weblogic 10.3.1 server.
First we start with the SAML2 Identity Provider, in SAML1.1 this is called the source site. Because we can't do anything in the federation tab of the serve, we need to create a Credential Mapping Provider ( go to myrealm security, Providers , Credential Mappings. )
and choose the SAML2 credential mapping.

Fill the provider specific details and use the demoidentity keystore ( this is default)

Now we can go the Federation Services tab of the server configuration and create a SAML2 profile for this server, We need to save this to a file and import this later in the other SAML2 Service Providers.
The published site url is very important , choose url of this server , use http or https and add saml2 to this url. SAML needs this url to communicate with the other SAML services.

Second part of the SAML2 profile

Save this profile to a xml


Go the Identity provider tab and fill in these fields
Go to the second Weblogic server, this is called the Service provider or in SAML1.1 the destination. Here we need to create a new SAML2 Authentication provider ( Go to the myrealm Security realm , Providers and then Authentication )

Now we done this we can go the Federation Services Tab of this weblogic server and fill in this SAML2 profile. The published url is very important and it must match with the server url and have to end with saml2

Second part of this SAML profile

Save this metadata to a xml. This needs to be imported in the Credential Mapping Provider of the Identity Provider ( the first weblogic server).


Next step is to go the SAML2 Service Provider tab.
Go back to the SAML2 authentication provider where we will import the identity provider metadata xml.

Select the identity metadata xml.

You have to enable this and most important, fill in all the url's of your applications who needs SAML authentication.


Now we do the same for metadata xml of the service provider, We need to import this in the Credential Mapper provider of the Identity Provider
Select the Service Provider metadata xml

enable this Service Provider.

That's all

In this example I use http but it shoud also work with https and when it fails, please check your url's , don't mix localhost or pc name. Same for the domain name.

For more debug information in your server.log and set these java parameters in your setDomainEnv
set EXTRA_JAVA_PROPERTIES=-Dweblogic.debug.DebugSecuritySAMLAtn=true -Dweblogic.debug.DebugSecuritySAMLLib=true -Dweblogic.debug.DebugSecuritySAML2Service=true -Dweblogic.debug.DebugSecuritySAML2CredMap=true -Dweblogic.debug.DebugSecuritySAML2Atn=true %EXTRA_JAVA_PROPERTIES%