Pages

Friday, December 28, 2007

11g webcenter first impressions

With the release of jdeveloper tp3 we finally can test the new features. It looks very promising. With the 10.1.3 webcenter release was not working so well. With 11G they fixed the refreshing (partial page rendering) of the whole portlet page when you do a submit in a custom jsf portlet. Popup windows works too , we can use list of values pages. Now we finally can make small fusion applications and registered it as a portlet on the webcenter container.
To deploy your taskflow or jsf page as a portlet you only have to select the page or taskflow and use the right mouse button and create portlet entry.
The overview of the registered producers is much better, you can register producers to your application or to the resource palette so you can use it in more applications. See the picture.
In 11g webcenter you also get some standard taskflows which you can use in your portal.

Another nice feature is that personalizing your portal is now very easy, You have to use the adf security wizard. Step 2 go the pagedef of the page and add security to page.
Step 3, give customize or personalize permissions to the right roles and we are ready
and there are a lot of other features with is not yet availible in the tp3 release like the social networking components, forums, announcements, page Service, presence, tasks , worklist and recent activities. With 11g we can mix now portlets with jsf applications.

Monday, December 24, 2007

sdo webservices in soa suite 11g

In the jdeveloper 11g tp3 you can configure a soa project where you can use sdo webservice as a reference adapter. Too bad this is not working (at runtime) in TP3 but this blog will show you how you can use sdo web services in a bpel process and it gives an overview how soa suite 11g works.
First what is SDO ? This is a technology which is developed by IBM, SAP, BEA, Oracle etc. SDO or Service Data Objects is designed to simplify and unify the way in which applications handle data. Oracle made it very easy with adf bc (bc4j) to make sdo webservices. You only have to edit the application module, Go the service definitions link and enable support for service definitions. Select the viewobjects and the operations you want to use. Deploy this to the embedded oc4j and we have our sdo webservice.

In this example I used the customer table of the oe sample schema. In the viewobject of this customer table I had the remove the following attributes cust_address, phone_numbers, cust_geo_location because these types are not supported by sdo.

We are ready to make a soa 11g project. Create a new soa project and open the composite.xml Now drag the bpel process from the component windows to the components area of the composite.xml. Make sure you check create composite service.

Now we can add the sdo webservice. Drag the sdo webservice to the reference area of the composite.xml. Now fill in the wdsl entry of our customer sdo web service and select the operation. Now drag a line from the bpel proces to the sdo web service, so we can use it in the bpel process
This is a bit different as in 10.1.3. In the composite.xml we define our adapters and which adapters the bpel can use ( the line between the components) . Now we complete the bpel process by clicking on the bpel process in the composite.xml. Here we add an invoke service to call our sdo webservice and in this we select the right operation getCustomerView.
We add some assign activities to fill the input variable of the sdo web service and one to assign the output of the ws to the output of the bpel.
Run the composite.xml and go the following url http://localhost:8988/soa-infra/ to test our bpel web service. This goes wrong because in TP3 the runtime support of sdo is not supported in this release but let's look at the soa suite console why it goes wrong.

Now we can look at the details

In the TP4 release I will retest it and update this blog

Sunday, December 23, 2007

From edifact to the database with mapforce & soa suite 11g

A customer of me wants to have a message handling system which can process dutch energy edifact messages and routes these messages to the right backoffice system. The first problem I had, how to process edifact messages to xml. Oracle has a b2b solution for this but this was not suitable for this case. Then we tried Altova mapforce. This is a mapping tool where you can map xml, web services , files , database and edifact. When you are finished in mapforce you can generate java, .net or xslt and integrate this code in your own application.
You can map edifact to the oracle database but we want to use an esb or a mediator so we don't have to connect our front with the backoffice systems. Our solution is that we want to map edifact to a soa suite web service. The first step is to customize the edifact message to the dutch enerqy standard. The mapforce edifact definitions are xml files so can easily drop segments, elements and add your own enumerations until your have the right edifact definitions.
Because edifact to wsdl mapping is a bit limited by mapforce we make a xsd which looks the same as the final tables definitions. Now we have a edifact to xml to wsdl mapping. This xsd can we use later for our routing / mediator component in the soa suite.

Altova has a great library with a lot of functions and you can make your own functions. It is very easy to use it. Now we are ready with the first part of mapforce let's look if the edifact -> xml mapping looks fine, you can click on the output window for the result (the try and error principle).
Now we go the 11g soasuite ( this works in soasuite 10.1.3 too). Here we make a new soa project. In this project we add the db adapter where we select the tables for the inserts. For this adapter we have to add the db connection to the soa suite db adapter, change the oc4j-ra.xml file, this file is located in system11.1.1.0.22.47.96\o.j2ee\embedded-oc4j\application-deployments\default\DbAdapter
The next step is to add a mediator, make sure you use the xsd which we made for mapforce as input and output and check "create composite service".

We have now the web service wsdl which altova needs for the latest step ( xml -> wsdl mapping). Let's finish the soa project by making a routing rule to the db adapter with a xslt mapping.
Now we go http://localhost:8988/soa-infra/ to download the wsdl of the mediator.
Altova can not use this wdsl directly, we have to change it a little bit ( soa suite generates a wdsl which import a another wsdl). Now we add the wsdl to mapforce and finish the mapping.

The last step is generate java code in mapforce and import this code to jdeveloper. You can integrate this in your application, start the console or the swing application (altova generates this for you.

Starting with soa suite 11g

Oracle released jdeveloper 11g technical preview 3, in this release they added soasuite 11g and webcenter 11g. I already played with the soa suite and here are some tip to start with soasuite yourself.
By the way ESB is now called mediator and the mediator component is the same as routing in 10.1.3

First we install a separate jdeveloper home. Don't mix it with your normal adf jdeveloper 11g home.

Step 2 configure the soasuite schema
We have to install the soa schema in a database. Go to the jdev_home\rcu\integration\soainfra\sql folder and start sqlplus sys/password as sysdba and start this script @createuser_soainfra_oracle_all.sql adrs_soainfra welcome USERS TEMP
Now we log in as the soa suite schema user sqlplus adrs_soainfra/welcome @createschema_soainfra_oracle_all.sql adrs_soainfra

Step 3 configure the oc4j container for soa
Start jdeveloper go to tool menu / preferences -> run and select integrated oc4j , We are ready to configure the oc4j container. Go to tools menu / configure soa. We have to fill in the soa suite schema user / password. The installation takes a while ( 5 minutes).

Step 4 starting the soasuite container by pressing the blue round button with a green arrow point.

Step 5 some handy url's
Soa console http://localhost:8988/
Human workflow app http://localhost:8988/integration/worklistapp/
If you create for example a mediator or a bpel project as a web service than you access them with this url http://localhost:8988/soa-infra/

Step 6 make your soa project and deploy / start it by running the composite.xml

Here are some screenshots of a mediator project and a picture of new console.

Friday, December 21, 2007

JHeadstart roadmap to 11g

Steven, the architect of the jheadstart made a new blog entry over the value of jheadstart when jdeveloper 11g is released. I think jheadstart will always be handy, You can easily generate c.r.u.d. pages, implement security , flex fields , language support , dynamic menu etc. Your customer will be satisfied that you can show a whole application so fast. So you have time over to do make the complex pages.
Steven mentioned in this blog some nice jheadstart 11g features/ plans. Here are the main new features
  • other data controls support besides adf bc, Maybe wsdl , ejb , jmx etc
  • of course the new rich faces ui components
  • the use bounded task flows
  • drag and drop support so you can drag an employee to an another department
  • Jheadstart can set the security on the adf binding ( in the pagedef)
I hope the jheadstart team releases some technical previews else we have to wait a long time because jdeveloper 11g will be released next fall.

Wednesday, December 19, 2007

Dynamic jsf menu

In this blog I will explain how you can create a dynamic menu in jsf pages from a bean. The data of the menu can for example come from a xml or from a database table. In my other blog I use adf taskflow with a xml menu, this time I use menu items.

First we create a taskflow with two views and with two control flow cases

Now we can create a jsf template with the menubar where we add our menu items.

We create the menu bean and defined it as a request managed bean in the adfc-config.xml

private RichMenuBar initMenu;

public void createMenus(PhaseEvent phaseEvent) {

boolean addMenu = true;
for (Iterator iterator = initMenu.getChildren().iterator(); iterator.hasNext();) {
UIComponent component = (UIComponent) iterator.next();
if ( component.getId().equalsIgnoreCase("menuMain")){
addMenu = false;
}
}
if (addMenu) {
//Create Menu and set id and text
RichMenu menuMain = new RichMenu();
menuMain.setId("menuMain");
menuMain.setText("Main");

RichCommandMenuItem menuPage1 = new RichCommandMenuItem();
menuPage1.setId("page1");
menuPage1.setText("Page 1");
menuPage1.setActionExpression(getMethodExpression("page1"));

RichCommandMenuItem menuPage2 = new RichCommandMenuItem();
menuPage2.setId("page2");
menuPage2.setText("Page 2");
menuPage2.setActionExpression(getMethodExpression("page2"));

menuMain.getChildren().add(menuPage1);
menuMain.getChildren().add(menuPage2);
initMenu.getChildren().add(menuMain);
}
}
private MethodExpression getMethodExpression(String name) {
Class [] argtypes = new Class[1];
argtypes[0] = ActionEvent.class;
FacesContext facesCtx = FacesContext.getCurrentInstance();
Application app = facesCtx.getApplication();
ExpressionFactory elFactory = app.getExpressionFactory();
ELContext elContext = facesCtx.getELContext();
return elFactory.createMethodExpression(elContext,name,null,argtypes);
}


private ValueExpression getValueExpression(String name) {
FacesContext facesCtx = FacesContext.getCurrentInstance();
Application app = facesCtx.getApplication();
ExpressionFactory elFactory = app.getExpressionFactory();
ELContext elContext = facesCtx.getELContext();
return elFactory.createValueExpression(elContext, name, Object.class);
}

We are ready to create the two pages and we only have to add beforePhase attribute to f:view element.
And we are finished. Here is the 11g example project

JDeveloper 11g documentation update

Oracle christmas gift is that they updated the documentation of jdeveloper 11g. In a quickscan they explained some subjects more (Like MDS). here is the link for the developer guide and here for the web developer guide

Friday, December 14, 2007

Dynamic jsf page

In this example I made a simple jsf page where I can add or remove inputtext items and action buttons. It uses the pagedef of the page as input for the items and the buttons. This is how it looks


On the left side you have a panelFormLayout where we add the items on it. The panelFormLayout has a footer facet where we add the buttons. On the right side we have two selectOneChoice with 3 buttons. The first selectOneChoice is for the items and buttons which we can add. If we add an item we remove this entry in the add choice and add this entry in the remove choice. The Init button fills the add choice with the values of the pagedef.

The add method for putting values and actions on the jsf page

public String add() {
String item = add_item.substring(add_item.indexOf("_")+1);
if ( add_item.startsWith("value")) {
RichInputText input = new RichInputText();
input.setValueExpression("value",getValueExpression("#{bindings."+item+".inputValue}"));
input.setValueExpression("label",getValueExpression("#{bindings."+item+".hints.label}"));
input.setId(item);
form.getChildren().add(input);
addRemoveNewItemToList(add_item);
removeItemFromList(add_item);
}
if ( add_item.startsWith("action")) {

RichCommandButton button = new RichCommandButton();
button.setValueExpression("disabled",getValueExpression("#{!bindings."+item+".enabled}"));
button.setId(item);
button.setText(item);
MethodExpression me = getMethodExpression("#{bindings."+item+".execute}");
button.addActionListener(new MethodExpressionActionListener(me));
footer.getChildren().add(button);
addRemoveNewItemToList(add_item);
removeItemFromList(add_item);
}
return null;
}

the remove method

public String remove() {

String item = remove_item.substring(remove_item.indexOf("_")+1);
if ( remove_item.startsWith("value")) {

for (Iterator iterator = form.getChildren().iterator(); iterator.hasNext();) {
UIComponent component = (UIComponent) iterator.next();
if ( component.getId().equals(item)){
iterator.remove();
removeRemoveItemFromList(remove_item);
addNewItemToList(remove_item);
}
}
}
if ( remove_item.startsWith("action")) {

for (Iterator iterator = footer.getChildren().iterator(); iterator.hasNext();) {
UIComponent component = (UIComponent) iterator.next();
if ( component.getId().equalsIgnoreCase(item)){
iterator.remove();
removeRemoveItemFromList(remove_item);
addNewItemToList(remove_item);
}
}
}
return null;
}

the init method to fill choice

public String init() {
List values = new ArrayList();
values = getBindings().getAttributeBindings();
for (Iterator iterator = values.iterator(); iterator.hasNext();) {
Object o = iterator.next();
if (o != null) {
if (o instanceof FacesCtrlAttrsBinding) {
addNewItemToList("value_"+((FacesCtrlAttrsBinding)o).getName());
}
}
}
values = getBindings().getOperationBindings();
for (Iterator iterator = values.iterator(); iterator.hasNext();) {
Object o = iterator.next();
if (o != null) {
if (o instanceof FacesCtrlActionBinding) {
addNewItemToList("action_"+((FacesCtrlActionBinding)o).getName());
add_item = "action_"+((FacesCtrlActionBinding)o).getName();
}
}
}
return null;
}

Some other handy methods

private UIComponent getUIComponent(String name) {
FacesContext facesCtx = FacesContext.getCurrentInstance();
return facesCtx.getViewRoot().findComponent(name) ;
}

private MethodExpression getMethodExpression(String name) {
Class [] argtypes = new Class[1];
argtypes[0] = ActionEvent.class;
FacesContext facesCtx = FacesContext.getCurrentInstance();
Application app = facesCtx.getApplication();
ExpressionFactory elFactory = app.getExpressionFactory();
ELContext elContext = facesCtx.getELContext();
return elFactory.createMethodExpression(elContext,name,null,argtypes);
}


private ValueExpression getValueExpression(String name) {
FacesContext facesCtx = FacesContext.getCurrentInstance();
Application app = facesCtx.getApplication();
ExpressionFactory elFactory = app.getExpressionFactory();
ELContext elContext = facesCtx.getELContext();
return elFactory.createValueExpression(elContext, name, Object.class);
}


private BindingContainer getBindings() {
FacesContext fc = FacesContext.getCurrentInstance();
Application app = fc.getApplication();
ExpressionFactory elFactory = app.getExpressionFactory();
ELContext elContext = fc.getELContext();
ValueExpression valueExp = elFactory.createValueExpression(elContext, "#{bindings}", Object.class);
return (BindingContainer) valueExp.getValue(elContext);
}


public void addNewItemToList(String value)
{
if(value != null && !value.equals(""))
{
SelectItem si = new SelectItem();
si.setLabel(value);
si.setValue(value);
listOfItems.add(si);
listComponent.setValue(value);
}
}

public void removeItemFromList(String value)
{
if(value != null && !value.equals(""))
{
for(int i = 0; i < listOfItems.size(); i++)
{
SelectItem si = (SelectItem)listOfItems.get(i);
if(si.getValue().equals(value))
{
listComponent.setValue(null);
listOfItems.remove(i);
}
}
}
}


Here you have the example project for jdeveloper 11g. Thanks for larry.phillips on the otn forums for that the actions now works.

Tuesday, December 11, 2007

Business rules in adf bc ( bc4j )

As an old school oracle developer I developed my business rules in plsql. I did this with cdm ruleframe or with triggers and packages. But now I want to make a demo on the oe sample schema. In this demo I used the orders and the order_items tables and because it is a demo I want to use bc4j for my business rules.
This are the business rules I want to implement. Every order item has to update the total order amount of the order. The Line Item Id of the order items has to an autonumber 1, 2, etc and not a sequence. On the order table the order date has to be current date and the order Id must be the next value of the orders_seq sequence.
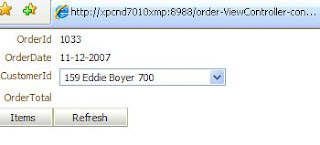
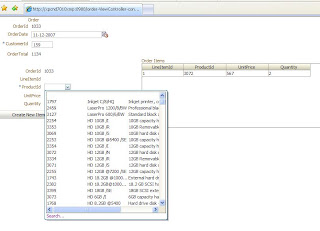
Here some pics of the order and items page


This is how I did it on the orders view. First I made two calculated attributes CalculatedOrderTotal and CalculatedOrderLines on the orders entity. These attributes I use on the orders items entity. Then I generate the impl java class of the orders entity so I can change the getters of these calculated attributes.


/**Gets the attribute value for CalculatedOrderTotal, using the alias name CalculatedOrderTotal.
*/
public Double getCalculatedOrderTotal() {

RowIterator rowItr = this.getOrderItems();
Double total = 0.0;
while(rowItr.hasNext()){
Row row = rowItr.next();
Number unitPrice = (Number)row.getAttribute("UnitPrice");
Number quantity = (Number)row.getAttribute("Quantity");
total += (unitPrice.doubleValue() * quantity.intValue());
}
return total;
}
/**Sets value as the attribute value for CalculatedOrderTotal.
*/
public void setCalculatedOrderTotal(Double value) {
setAttributeInternal(CALCULATEDORDERTOTAL, value);
}

/**Gets the attribute value for CalculatedOrderLines, using the alias name CalculatedOrderLines.
*/
public Number getCalculatedOrderLines() {
RowIterator rowItr = this.getOrderItems();
Number lineId = new Number(0);

while(rowItr.hasNext()){
Row row = rowItr.next();
Number lineIdRow = (Number)row.getAttribute("LineItemId");
// check the current Id is greater than lineId

if ( lineIdRow != null && lineIdRow.compareTo(lineId) == 1 ) {
lineId = lineIdRow;
}
}
return lineId;
}

/**Sets value as the attribute value for CalculatedOrderLines.
*/
public void setCalculatedOrderLines(Number value) {
setAttributeInternal(CALCULATEDORDERLINES, value);
}

Now we add some code to the impl of the order items. First I try to set the next number for the line item , Then I set the unit item price of the selected product ( I can do this by using the association between order items and product information )the last step is to update the total order amount of the order


protected void prepareForDML(int dml, TransactionEvent evt) {
if (dml == DML_INSERT || dml == DML_UPDATE || dml == DML_DELETE) {
super.prepareForDML(dml,evt);
businessRules( dml);
}
}

public void businessRules(int dml){
if ( dml == DML_INSERT) {
Number row = this.getOrders().getCalculatedOrderLines();
this.setLineItemId(row.add(1));
}

if ( dml == DML_INSERT || dml == DML_UPDATE) {
ProductInformationImpl product = (ProductInformationImpl) this.getProductInformation();
if(product != null){
Number listPrice = product.getListPrice();
this.setUnitPrice(listPrice);
}
}
if ( dml == DML_UPDATE) {
Number oldQuantity = (Number)getPostedAttribute(getAttributeIndexOf("Quantity"));
System.out.println("new quantity "+this.getQuantity().toString()+" old "+oldQuantity.toString());
}
try {
this.getOrders().setOrderTotal(new Number(this.getOrders().getCalculatedOrderTotal()));;
}
catch ( Exception e) {
e.printStackTrace();
}
}

If you want to check the old and new values of an attribute then you can use getPostedAttribute to get the old value of the attribute. This is the same as :old and :new in the plsql triggers.
Now we implement the business rules on the orders entity. We add the following code to the orders impl

protected void prepareForDML(int dml, TransactionEvent evt) {
if (dml == DML_INSERT || dml == DML_UPDATE || dml == DML_DELETE) {
super.prepareForDML(dml,evt);
businessRules(dml);
}
}

public void businessRules(int dml){
if ( dml == DML_INSERT) {
SequenceImpl sequence = new SequenceImpl("ORDERS_SEQ", getDBTransaction());
this.setOrderId(sequence.getSequenceNumber());
this.setOrderDate(new Date(Date.getCurrentDate()));
}
}

In this method I set a database sequence on the Order Id and the current Date in the Order Date attribute.
Here you have the sample project it works on jdeveloper 11g and on the oe sample schema

Saturday, December 8, 2007

11g plsql web service

Making a plsql web service in 11g is very easy but you have to think about your function, procedure and parameters names else it can result in a strange wsdl method and parameter names.
Here is a example of a function.

create or replace package scott_ws is
function get_current_time ( date_format varchar2)
return varchar2
;
end scott_ws;

create or replace package body scott_ws is
function get_current_time ( date_format varchar2)
return varchar2
is
v_time varchar2(20);
begin
if date_format is null
then
return 'empty format';
end if;
select to_char(sysdate,date_format) into v_time from dual;
return v_time;
exception
when others
then
return 'error';
end;
end scott_ws;

The package name is not used in the wsdl creation. If you want to have a capital character then you have to use a underscore _ . Jdelevoper automatically remove the underscore and capitalize the following character. In Oracle plsql is common to use p_format as a parameter of a function but this results in pFormat.
So we are ready to create a plsql web service.

Here we make a database connection and we select the oracle package.

Select our function. And we are ready with our webservice. Here is how the wsdl looks like

Let's make it a bit more interesting by using security and logging.

Let's start the webservice and look at the result. As username I use a standard account oc4jadmin. You can also use an another account but you have to edit the jazn of the embedded oc4j.

Wednesday, December 5, 2007

11g list of values LOV

In JDeveloper 11g TP2 ( In TP3 is the af:inputListOfValues a bit different) can you define a List of values on an attribute of a bc4j viewobject. This is very easy but you can do it also manually so you can use it with toplink or with webservices. In this blog I make an jsf page on employees where you can update the department of this employee with a list of values or a lov combobox.This is a very simple LOV but you can make it more complex by using a search area in this. I will explain this in a other blog. But how do we manually create a LOV page. First we drop employees view from the data control on the jsf page. We select an ADF Form
We use all employees attributes with include navigation controls plus include submit button.

Now go to the pagedef of this page where we create a list of values binding on the department iterator. We need this for the lov page

We don't have the department iterator so we have to select it first.
We select all the attributes of the department iterator.
Open the pagedef and rename the list of values ID to DeptnoLOV. This is how the list of values looks in the pagedef.

Now go to the page and select the last column and insert input list of values.

Now we update the af:inputListOfValues element in jspx page with this one

returnPopupListener attribute of inputListOfValues is very important, here is the method defined which copies the value of the lov to the deptno of the employee. You can also have launchPopupListener where you can limit the records of the lov.


package nl.ordina.beans;

import javax.el.ELContext;
import javax.el.ExpressionFactory;
import javax.el.ValueExpression;
import javax.faces.application.Application;
import javax.faces.context.FacesContext;

import oracle.adf.model.binding.DCIteratorBinding;
import oracle.adf.view.rich.event.ReturnPopupEvent;
import oracle.binding.BindingContainer;
import oracle.jbo.Row;

public class LovDepartment {


public void DeptLOVReturnListener(ReturnPopupEvent returnPopupEvent) {
// Add event code here...
DCIteratorBinding EmpViewIterator = (DCIteratorBinding) getBindings().get("EmpView1Iterator");
Row rw = EmpViewIterator.getViewObject().getCurrentRow();
rw.setAttribute("Deptno",getDeptLovID());

}

private BindingContainer getBindings() {
FacesContext fc = FacesContext.getCurrentInstance();
Application app = fc.getApplication();
ExpressionFactory elFactory = app.getExpressionFactory();
ELContext elContext = fc.getELContext();
ValueExpression valueExp = elFactory.createValueExpression(elContext, "#{bindings}", Object.class);
return (BindingContainer) valueExp.getValue(elContext);
}

private String getDeptLovID() {
FacesContext fc = FacesContext.getCurrentInstance();
Application app = fc.getApplication();
ExpressionFactory elFactory = app.getExpressionFactory();
ELContext elContext = fc.getELContext();
ValueExpression valueExp = elFactory.createValueExpression(elContext, "#{bindings.DeptnoLOV.inputValue}", Object.class);
return valueExp.getValue(elContext).toString();
}
}

We only have to register this bean in the adfc-config.xml

Now we can delete in the jsf page the deptno column of the employee form because we have now the lov. If you don't like the LOV or inputListOfValues you can also use a combobox or inputComboboxListOfValues. You only have to use this code in the page and replace the inputListOfValues element.

Here you have the example project

Monday, December 3, 2007

11g web services and policies

Creating web service in jdeveloper 11G with logging, security and mtom policies is a lot easier then in 10.1.3 . 11G support version 2 of JAX-RPC named JAX-WS. You can make a web service now by just putting some annotations like @WebService before the class name. JDeveloper automatically assist you by making the project web service enabled. We have a working web service with only one class. The oc4j container handles the rest. Here you have a simple example

package nl.ordina.ws;

import javax.jws.WebService;

@WebService
public class Welcome {

public String WelcomeText() {
return "hello";
}
}

you can configure it a little bit more

package nl.ordina.ws;

import javax.jws.WebService;

import oracle.webservices.annotations.AddressingPolicy;
import oracle.webservices.annotations.Deployment;
import oracle.webservices.annotations.ManagementPolicy;
import oracle.webservices.annotations.ReliabilityPolicy;

@WebService(name = "WebService", serviceName = "WebService", portName = "WebServicePort")
@Deployment(restSupport = true)
@ReliabilityPolicy("oracle/wsrm11_policy")
@AddressingPolicy("oracle/wsaddr_policy")
@ManagementPolicy( { "oracle/log_policy" })
public class Welcome {

public String WelcomeText() {
return "hello";
}
}

You can see that I use annotations for applying policies. Oracle provides a good example for this where for example the username_token_service_policy is explained. Too bad on the other security policies there is in this TP2 release no documentation or examples providid. In 10.1.3 there was a wizard which does the same but it's generate a lot of code. The policies are located at
j2ee\home\gmds\owsm\policies.
You can always use the option of creating web service the old fashion way ( jax-rpc annotated web service). This generates the wsdl and some more xml's but here you can use the same policies. This time the policies are stored in the oracle-webservices.xml file. see the xml file below

Sunday, December 2, 2007

ADF taskflow with WS method call + router

ADF taskflow supports indirect web services. This gives us new possibilities such as calling esb and bpel web services or integrating a normal web service in our flow. Integrating web services in our taskflow is easy. You can do it in 3 steps. The first step is done by making a web service proxy or much easier an web service datacontrol. The second step is making a taskflow method call (drop the datacontrol method on the taskflow) and the last step evaluating the result of the method call by using a taskflow router.
This blog gives you a guide to do this. This example is a credit check if you put in the start page a value below 200 then it is approved and above 200 it is declined. The credit is done with a router and with a method call /router.
First we create a fusion project. Now we have an empty adfc-config.xml, this is the unbounded taskflow. In this taskflow I create 3 views start, approved and declined. On the pages approved and declined I only put in an outputtext with approved or declined.
This is the start page.


In the taskflow routing and in the start page I use the following simple backing bean.

I put this bean in the adfc-config as a pageFlow managed bean. The price variable is used for the start page inputtext and the isapproved method for the router priceCheck. We are ready to drop now a router on the adfc-config.xml

In this taskflow you are already see the web server method call. I will explain this later in this blog. Let's look at the properties of the router priceCheck.

The default outcome is declined, this value is used when StartPage.approved = false when this is true then the outcome is approved. We are ready with the router example.

Let's make it a little bit interesting by calling a web service which does the credit check. We make a new empty project in the same workspace. Make a java class with a method which has 1 parameter price and it returns true when the price is below 200 else false. Create a web service on this method and deploy this on the oc4j server in the jdeveloper home. We go back to the viewcontroller project where we create a web service datacontrol on this web service. We drop the created datacontrol on the taskflow. Now automatically a method call with a pagedef is created.
I only have to fill in the fixed outcome so the control flow case goes the router where the result of the ws is evaluated.

We have the store the result of the web service in a variable so the router can used it.

The router is almost the same as the first router. We are ready to test it.

Here you have the example project. To run it you have to deploy the web service to the jdeveloper oc4j server first.