Pages

Showing posts with label MySQL. Show all posts

Saturday, March 31, 2012

JCache on NoSQL MySQL Cluster 7.2 ( Memcached )

With the release of MySQL Cluster 7.2 and the support for the native Memcached API we can also use the HA cluster for NoSQL besides JPA, SQL.
In this blogpost I will try out this NoSQL feature with JCache ( alias JSR 107 or javax.cache , it will be part of Java EE 7 and it will also work in Java 6 ).  JCache defines a standard Java Caching API for use by developers and a standard SPI (“Service Provider Interface”) for use by implementers. Coherence of Oracle will also support JCache. For more information see Greg Luck's blog.

With JCache and MySQL Cluster alone we can't get this example running. We also need to have Memcached JCache provider.  Leen Toelen already did the hard work, he made one which uses spymemcached as memcache client. So for this we need to download his code at github, after this we also need to download the latest spymemcached jars.

The code of Leen will work with JCache version 0.4, so we need to download the 0.4 version jars at https://oss.sonatype.org/index.html#nexus-search;quick~javax-cache . You can find the source code at JSR107 github repositories. For the JCache provider you also need to download the CDI-API jar.

For more information on Memcached or MySQL you can read this great blog of clusterdb, he explains it really well, like
  • How to setup your MySQL and Memcached environment
  • What is memcached
  • How it works 
  • Let it work on your existing tables 
or you can read the MySQL Cluster 7.2 whitepaper which can be downloaded at MySQL.com

So we start by downloading MySQL Cluster 7.2 and configuring this cluster. I won't explain this here, there are a lot of great blogs or guides which can help you with this.

After we got the cluster running we need to create the memcached database.

Also we need to have at least 10 API or MYSQLD entries in the config.ini of the cluster. After this change you need to reload this config file with the ndb_mgmd daemon.


[NDBD DEFAULT]
NoOfReplicas=2
DataDir=/usr/cluster/data
DataMemory=80M
IndexMemory=18M

[MYSQLD DEFAULT]
[NDB_MGMD DEFAULT]
DataDir= /usr/cluster/data

[TCP DEFAULT]

# Management Server
[NDB_MGMD]
NodeId=1
HostName=172.16.0.20 # IP address of this server

# Storage Nodes
[NDBD]
NodeId=2
HostName=172.16.0.21 # IP address of storage-node-1
DataDir= /usr/cluster/data

[NDBD]
NodeId=3
HostName=172.16.0.22 # IP address of storage-node-2
DataDir= /usr/cluster/data

[MYSQLD]
[MYSQLD]
[MYSQLD]
[MYSQLD]
[MYSQLD]
[MYSQLD]
[MYSQLD]
[MYSQLD]
[MYSQLD]
[MYSQLD]
[MYSQLD]
[MYSQLD]
[MYSQLD]
[MYSQLD]
[MYSQLD]
[MYSQLD]
[MYSQLD]
[MYSQLD]
[MYSQLD]
[MYSQLD]
[MYSQLD]


Then we need to create the ndbmemcache database

mysql -p < /usr/share/mysql/memcache-api/ndb_memcache_metadata.sql
mysql> show databases;
+--------------------+
| Database           |
+--------------------+
| information_schema |
| mysql              |
| ndbinfo            |
| ndbmemcache        |
| performance_schema |
| test               |
+--------------------+


We can start memcached on the cluster nodes (what you like  ) and it needs to connect to the NDB management service.


/usr/sbin/memcached -E /usr/lib64/ndb_engine.so -u mysql -e "connectstring=mgt.alfa.local:1186;role=db-only" -vv

you should see a output like  this.

17-Mar-2012 21:12:55 CET NDB Memcache 5.5.19-ndb-7.2.4 started [NDB 7.2.4; MySQL 5.5.19]
Contacting primary management server (mgt.alfa.local:1186) ... 
Connected to "mgt.alfa.local:1186" as node id 6.
Retrieved 3 key prefixes for server role "db-only".
The default behavior is that: 
    GET uses NDB only
    SET uses NDB only
    DELETE uses NDB only.
The 2 explicitly defined key prefixes are "b:" (demo_table_large) and "t:" (demo_table_tabs)
Connected to "172.16.0.20" as node id 7.
Server started with 4 threads.
Priming the pump ... 
Connected to "172.16.0.20" as node id 8.
Scheduler: using 2 connections to cluster 0
Scheduler: starting for 1 cluster; c0,f0,t1
done [0.677 sec].
Loaded engine: NDB Memcache 5.5.19-ndb-7.2.4
Supplying the following features: compare and swap, persistent storage, LRU
<49 server listening (auto-negotiate)
<50 server listening (auto-negotiate)
<51 send buffer was 126976, now 268435456
<52 send buffer was 126976, now 268435456
<51 server listening (udp)
<52 server listening (udp)
<51 server listening (udp)
<52 server listening (udp)
<51 server listening (udp)
<52 server listening (udp)
<51 server listening (udp)
<52 server listening (udp)


When we go to the cluster management console ( ndb_mgm)  and type show, we should see something like this

ndb_mgm> show
Cluster Configuration
---------------------
[ndbd(NDB)] 2 node(s)
id=2 @172.16.0.21  (mysql-5.5.19 ndb-7.2.4, Nodegroup: 0, Master)
id=3 @172.16.0.22  (mysql-5.5.19 ndb-7.2.4, Nodegroup: 0)

[ndb_mgmd(MGM)] 1 node(s)
id=1 @172.16.0.20  (mysql-5.5.19 ndb-7.2.4)

[mysqld(API)] 24 node(s)
id=4 @172.16.0.21  (mysql-5.5.19 ndb-7.2.4)
id=5 @172.16.0.22  (mysql-5.5.19 ndb-7.2.4)
id=6 @172.16.0.21  (mysql-5.5.19 ndb-7.2.4)
id=7 @172.16.0.21  (mysql-5.5.19 ndb-7.2.4)
id=8 @172.16.0.21  (mysql-5.5.19 ndb-7.2.4)
id=9 @172.16.0.22  (mysql-5.5.19 ndb-7.2.4)
id=10 @172.16.0.22  (mysql-5.5.19 ndb-7.2.4)
id=11 @172.16.0.22  (mysql-5.5.19 ndb-7.2.4)
id=12 (not connected, accepting connect from any host)
id=13 (not connected, accepting connect from any host)


We are ready to do some test in java and we start with spymemcached java library ( in the memcachedclient I connect to my two memcached servers and use the default port 11211).
Just create a MemcachedClient and do your set or get operations.


With this as result
2012-03-31 17:29:33.190 INFO net.spy.memcached.MemcachedConnection:  Added {QA sa=/172.16.0.21:11211, #Rops=0, #Wops=0, #iq=0, topRop=null, topWop=null, toWrite=0, interested=0} to connect queue
2012-03-31 17:29:33.205 INFO net.spy.memcached.MemcachedConnection:  Added {QA sa=/172.16.0.22:11211, #Rops=0, #Wops=0, #iq=0, topRop=null, topWop=null, toWrite=0, interested=0} to connect queue
2012-03-31 17:29:33.221 INFO net.spy.memcached.MemcachedConnection:  Connection state changed for sun.nio.ch.SelectionKeyImpl@10c832d2
2012-03-31 17:29:33.221 WARN net.spy.memcached.MemcachedConnection:  Could not redistribute to another node, retrying primary node for greetings.
2012-03-31 17:29:33.221 INFO net.spy.memcached.MemcachedConnection:  Connection state changed for sun.nio.ch.SelectionKeyImpl@47808199
There is no message
Process exited with exit code 0.

Run it again.

2012-03-31 17:30:47.662 INFO net.spy.memcached.MemcachedConnection:  Added {QA sa=/172.16.0.21:11211, #Rops=0, #Wops=0, #iq=0, topRop=null, topWop=null, toWrite=0, interested=0} to connect queue
2012-03-31 17:30:47.678 INFO net.spy.memcached.MemcachedConnection:  Added {QA sa=/172.16.0.22:11211, #Rops=0, #Wops=0, #iq=0, topRop=null, topWop=null, toWrite=0, interested=0} to connect queue
2012-03-31 17:30:47.694 INFO net.spy.memcached.MemcachedConnection:  Connection state changed for sun.nio.ch.SelectionKeyImpl@10c832d2
2012-03-31 17:30:47.694 INFO net.spy.memcached.MemcachedConnection:  Connection state changed for sun.nio.ch.SelectionKeyImpl@47808199
Hello World!
Process exited with exit code 0.

We can see that the greetings key with its value is stored into the database ( you can also configure that this key is stored in memory instead of the database )


When we change the  key to b:greetings then the value will be stored in the large demo table which optimized for bigger values ( max 3mb) .

From clusterdb blogpost.
By default, the normal limit of 14K per row still applies when using the Memcached API; however, the standard configuration treats any key-value pair with a key-pefix of “b:” differently and will allow the value to be up to 3 Mb (note the default limit imposed by the Memcached server is 1 Mb and so you’d also need to raise that). Internally the contents of this value will be split between 1 row in ndbmemcache.demo_table_large and one or more rows in ndbmemcache.external_values.


Now let's try the same with JCache.

First create a javax.cache.spi.CachingProvider file in the following folder META-INF\services
This file must contain the JCache provider class name, in this case  net.spy.memcached.jcache.SpyCachingProvider
Then we need to create a SpyCachingProvider, set the Java parameter and configure the CacheManager & Cache.


In combination with CDI you can also use annotations. Enable CDI and inject this bean in your class.

Saturday, April 24, 2010

Super fast JPA with MySQL Cluster and with no JDBC or SQL

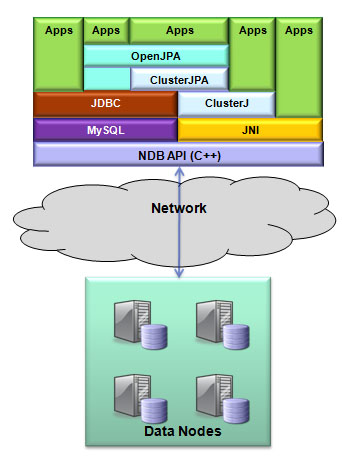
With Oracle / Sun MySQL Cluster 7.1 is it now possible to use JPA and without a JDBC driver and without any SQL conversion, this will give your java application or web application a great performance boot. With the 7.1 version you can use the ClusterJPA and ClusterJ libraries instead of the MySQL JDBC Driver. And the best thing, you still can use the JDBC driver or mysql utility. ( Best of both worlds )
With ClusterJPA is a query in this already fast memory cluster two times faster and an insert, update or delete at least three times faster. And the ClusterJPA library is cluster aware so no need for a Multi Datasource in Weblogic.
Ocklin's Blog and Andrew Morgan’s MySQL Cluster Database Blog already made some great articles about OpenJPA and MySQL Cluster 7.1 In my blog I go a little further by making a more complex example and deploy it in an EJB Session Bean on a Weblogic 10.3.2 ( WLS FMW 11g ) .server

I started with installing on  two machines Oracle Enterprise Linux version 5.5 ( Oracle edelivery ). Download in my case all the 32 bits Red Hat RPM's of the MySQL Cluster Community Edition. Install these packages on both servers and configure the cluster. it took me 30 minutes. I love this cluster , fast and easy.
ClusterJPA only supports for now, the Apache OpenJPA persistence.Oracle is working on other implementations like eclipselink / hibernate. You need to download the latest 1.2 release of OpenJPA ( I just 1.2.2 ) Version 2.0 is not working yet. Download the latest MySQL Connector/J jar and the ClusterJPA / ClusterJ jars from one of your Linux servers ( located in /usr/share/mysql/java/ ). And the last part is optional when your Weblogic server is also running on one of these linux servers. I am using JDeveloper 11g on my windows laptop so I also need to download the mysql cluster edition for Windows ( Windows edition is new ). I need the ndbclient.dll from the mysql lib folder and put this in one of my path folders.

open mysql  and create a clusterdb database: create database clusterdb;
create a test user on both mysql nodes: grant all on clusterdb.* to test@'%' identified by 'test';

I use JDeveloper 11g as my IDE so I first need to create a new java Application and add the following libraries to your project.


Next step is to create a persistence.xml which must be located in the META-INF folder. I add two persistence units one for the java application and one which uses the Weblogic JTA.
<persistence xmlns="http://java.sun.com/xml/ns/persistence" xmlns:xsi="http://www.w3.org/2001/XMLSchema-instance" version="1.0">
 <persistence-unit name="clusterdb" transaction-type="RESOURCE_LOCAL">
  <provider>org.apache.openjpa.persistence.PersistenceProviderImpl</provider>
  <class>nl.whitehorses.openjpa.mysql.cluster.entities.Employee</class>
  <class>nl.whitehorses.openjpa.mysql.cluster.entities.Department</class>
  <properties>
   <property name="openjpa.jdbc.SynchronizeMappings" value="buildSchema" />
   <property name="openjpa.ConnectionDriverName" value="com.mysql.jdbc.Driver" />
   <property name="openjpa.ConnectionURL" value="jdbc:mysql://10.10.10.50:3306/clusterdb" />
   <property name="openjpa.ConnectionUserName" value="test" />
   <property name="openjpa.ConnectionPassword" value="test" />
   <property name="openjpa.BrokerFactory" value="com.mysql.clusterj.openjpa.NdbOpenJPABrokerFactory" />
   <property name="openjpa.jdbc.DBDictionary" value="TableType=ndbcluster" />
   <property name="openjpa.ndb.connectString" value="10.10.10.50:1186" />
   <property name="openjpa.ndb.database" value="clusterdb" />
  </properties>
 </persistence-unit>
<persistence-unit name="clusterdbJTA" transaction-type="JTA"  >
  <provider>org.apache.openjpa.persistence.PersistenceProviderImpl</provider>
  <class>nl.whitehorses.openjpa.mysql.cluster.entities.Employee</class>
  <class>nl.whitehorses.openjpa.mysql.cluster.entities.Department</class>
  <properties>
   <property name="openjpa.jdbc.SynchronizeMappings" value="buildSchema" />
   <property name="openjpa.ConnectionDriverName" value="com.mysql.jdbc.Driver" />
   <property name="openjpa.ConnectionURL" value="jdbc:mysql://10.10.10.50:3306/clusterdb" />
   <property name="openjpa.ConnectionUserName" value="test" />
   <property name="openjpa.ConnectionPassword" value="test" />
   <property name="openjpa.BrokerFactory" value="com.mysql.clusterj.openjpa.NdbOpenJPABrokerFactory" />
   <property name="openjpa.jdbc.DBDictionary" value="TableType=ndbcluster" />
   <property name="openjpa.ndb.connectString" value="10.10.10.50:1186" />
   <property name="openjpa.ndb.database" value="clusterdb" />
  </properties>
 </persistence-unit>
</persistence>
The openjpa.ndb.connectString property need to have the management server url value.

Now you can create the example Entities: Department and Employee. You dont need to create these tables with mysql. ClusterJPA will do this for you.
the Department entity
package nl.whitehorses.openjpa.mysql.cluster.entities;

import java.io.Serializable;
import java.util.List;
import javax.persistence.*;

@NamedQueries({
   @NamedQuery(name = "Departments.findAll", query = "select o from department o")
,  @NamedQuery(name = "Departments.findByKey", query = "select o from department o where o.Id = :dept ")

})@Entity(name = "department")
public class Department implements Serializable {

    private int version;
    private int Id;
    private String Site;

    List<Employee> employees;


    public Department() {
    }


    @OneToMany(targetEntity = Employee.class, cascade = CascadeType.ALL,
               mappedBy = "department")
    public List<Employee> getEmployees() {
        return employees;
    }

    public void setEmployees(List<Employee> employees) {
        this.employees = employees;
    }


    @Id
    public int getId() {
        return Id;
    }

    public void setId(int id) {
        Id = id;
    }

    @Column(name = "location")
    public String getSite() {
        return Site;
    }

    public void setSite(String site) {
        Site = site;
    }

    @Version
    @Column(name = "version_field")
    // not required
    public int getVersion() {
        return version;
    }

    public void setVersion(int version) {
        this.version = version;
    }


    public String toString() {
        return "Department: " + getId() + " based in " + getSite();
    }
}
the Employee entity
package nl.whitehorses.openjpa.mysql.cluster.entities;

import java.io.Serializable;
import javax.persistence.*;

@Entity(name = "employee") //Name of the table
public class Employee implements Serializable {
    private int version;
    private int Id;
    private String First;
    private String Last;
    private String City;
    private String Started;
    private String Ended;
    protected  Department department;


    public Employee() {
    }

    @ManyToOne
    @JoinColumn(name="department", nullable=false)
    public Department getDepartment()
    {
        return department;
    }

    public void setDepartment(Department department)
    {
        this.department = department;
    }


    @Id
    public int getId() {
        return Id;
    }

    public void setId(int id) {
        Id = id;
    }

    public String getFirst() {
        return First;
    }

    public void setFirst(String first) {
        First = first;
    }

    public String getLast() {
        return Last;
    }

    public void setLast(String last) {
        Last = last;
    }

    @Column(name = "municipality")
    public String getCity() {
        return City;
    }

    public void setCity(String city) {
        City = city;
    }

    public String getStarted() {
        return Started;
    }

    public void setStarted(String date) {
        Started = date;
    }

    public String getEnded() {
        return Ended;
    }

    public void setEnded(String date) {
        Ended = date;
    }

    @Version
    @Column(name = "version_field")
    // not required
    public int getVersion() {
        return version;
    }

    public void setVersion(int version) {
        this.version = version;
    }


    public String toString() {
        return getFirst() + " " + getLast() + " (Dept " + getDepartment() +
            ") from " + getCity() + " started on " + getStarted() +
            " & left on " + getEnded();
    }
}
Now you can add a test class so you can test this. This will create the tables and add a department with an employee. Make sure you add the ndbclient library to your java path.
package nl.whitehorses.openjpa.mysql.test;

import java.util.List;

import javax.persistence.EntityManager;
import javax.persistence.EntityManagerFactory;
import javax.persistence.EntityTransaction;
import javax.persistence.Persistence;
import javax.persistence.Query;

import nl.whitehorses.openjpa.mysql.cluster.entities.Department;
import nl.whitehorses.openjpa.mysql.cluster.entities.Employee;

public class Main {

    public static void main(String[] args) throws java.io.IOException {

        EntityManagerFactory entityManagerFactory =
            Persistence.createEntityManagerFactory("clusterdb");
        EntityManager em = entityManagerFactory.createEntityManager();
        EntityTransaction userTransaction = em.getTransaction();

        userTransaction.begin();

        Department sales = em.find(Department.class, 10);
        if ( sales == null) {
            System.out.println("Create sales department");
            sales = new Department();
            sales.setId(10);
            sales.setSite("Amsterdam");
            sales.setEmployees(null);
            em.persist(sales);
        } else {
            System.out.println("Found sales department");
        }
        userTransaction.commit();

        userTransaction.begin();
        Employee edwin = em.find(Employee.class, 1);
        if ( edwin == null) {
            System.out.println("Create employee edwin");
            edwin = new Employee();
            edwin.setId(1);
            edwin.setDepartment(sales);
            edwin.setFirst("Edwin");
            edwin.setLast("Biemond");
            em.persist(edwin);
        } else {
            System.out.println("Found employee edwin");
        }
        userTransaction.commit();


        Query q = em.createQuery("select x from department x where x.id=10");
        for (Department dep : (List<Department>)q.getResultList()) {
            System.out.println(dep.toString());
            for (Employee emp : dep.getEmployees()) {
                System.out.println(emp.toString());
            }
         }

        em.close();
        entityManagerFactory.close();
    }
}

The next step is to make an EJB Session Bean with a remote interface where we do the same as the java test client.
package nl.whitehorses.openjpa.mysql.cluster.session;

import java.util.List;

import javax.ejb.Remote;
import javax.ejb.Stateless;

import javax.persistence.EntityManager;
import javax.persistence.PersistenceContext;

import nl.whitehorses.openjpa.mysql.cluster.entities.Department;

@Stateless(name = "HrSessionEJB", mappedName = "OpenJPACluster-model-HrSessionEJB")
@Remote
public class HrSessionEJBBean implements HrSessionEJB {
    public HrSessionEJBBean() {
    }
    @PersistenceContext(unitName="clusterdbJTA")

    private EntityManager em;


    public Object mergeEntity(Object entity) {
        return em.merge(entity);
    }

    public Object persistEntity(Object entity) {
        em.persist(entity);
        return entity;
    }

    public List<Department> getDepartmentsFindAll() {
        return em.createNamedQuery("Departments.findAll").getResultList();
    }

    public Department getDepartmentFindByKey(int dept) {
        return (Department)em.createNamedQuery("Departments.findByKey").setParameter("dept", dept).getSingleResult();
    }

}
Make a EJB deployment profile and an application deployment profile (EAR) where you also include the OpenJPA and MySQL jars.

With Weblogic 10.3 and higher, Oracle replaced the default JPA provider with Eclipselink. So when you deploy this to a Weblogic 10.3 server, this will not work with Apache OpenJPA. So you need to add an weblogic deployment descriptor ( weblogic-application.xml). With this you can control the class loading.
<?xml version = '1.0' encoding = 'windows-1252'?>
<weblogic-application xmlns:xsi="http://www.w3.org/2001/XMLSchema-instance"
                      xsi:schemaLocation="http://www.bea.com/ns/weblogic/weblogic-application http://www.bea.com/ns/weblogic/weblogic-application/1.0/weblogic-application.xsd"
                      xmlns="http://www.bea.com/ns/weblogic/weblogic-application">
  <prefer-application-packages>
    <package-name>com.mysql.*</package-name>
    <package-name>org.apache.*</package-name>
  </prefer-application-packages>
</weblogic-application>
Before you can test it you need to add the ndbclient.dll to a weblogic path. ( wlserver_10.3\server\native\win\32 )
and the part is the EJB Session bean client.
package nl.whitehorses.openjpa.mysql.cluster;

import java.util.Hashtable;
import java.util.List;

import javax.naming.Context;
import javax.naming.InitialContext;

import javax.naming.NamingException;

import nl.whitehorses.openjpa.mysql.cluster.entities.Department;
import nl.whitehorses.openjpa.mysql.cluster.session.HrSessionEJB;

public class HrSessionEJBClient {

    private static Context getInitialContext() throws NamingException {
        Hashtable env = new Hashtable();
        // WebLogic Server 10.x connection details
        env.put( Context.INITIAL_CONTEXT_FACTORY, "weblogic.jndi.WLInitialContextFactory" );
        env.put(Context.PROVIDER_URL, "t3://localhost:7101");
        return new InitialContext( env );
    }

    public static void main(String [] args) {
        try {
            final Context context =  getInitialContext();

            HrSessionEJB hRSessionEJB = (HrSessionEJB)
                context.lookup("OpenJPACluster-model-HrSessionEJB#nl.whitehorses.openjpa.mysql.cluster.session.HrSessionEJB");
            for (Department departments : (List<Department>)hRSessionEJB.getDepartmentsFindAll()) {
                System.out.println( "department = " + departments.getId());
                System.out.println( "location = " + departments.getSite());
                System.out.println( "employeesList = " + departments.getEmployees() );
            }

        } catch (Exception ex) {
            ex.printStackTrace();
        }
    }

}

Thats all, here you can download my JDeveloper 11g Workspace.

Tuesday, September 16, 2008

Building a MySQL Cluster

I am now building a Mail Handling System for a customer and one of the customer non functional requirement is high availibility. So I made a MySQL cluster. Now I can run at the same time two instances of this Mail Handling System in different sites. Now one site can fail and the other site can still work on. The MySQL cluster software make sure that the data is always stored, available and in sync on two nodes. Off course you can use Oracle Data guard or RAC but this is much easier and a lot cheaper.
I was suprised how easy it is to make a cluster. This blog entry will show you the steps.
I will use three x86 sun solaris 10 servers. Two servers are the storage nodes and one is the management node (The load of the management node is very low so you can easily add this to a existing server).

First I downloaded the MySQL 6.2.15 cluster edition from
http://dev.mysql.com/downloads/cluster/index.html#solaris_tar in my case the solaris software.

I don't use the default mysql folders. This are my mysql folder locations.
mysql folder /mysql/mysql
mysql data folder /mysql/mysql/data
mysql cluster folder /mysql/cluster

And I changed the default mysql parameters because we need to support big xml files.

Just change it or remove these parameters.

First step, installation of the mysql software.

Storage node ac-mhs20 (193.176.63.50)
mysql-ndb-1# mkdir /mysql
mysql-ndb-1# cd /mysql
mysql-ndb-1# put the mysql software in the /mysql folder
mysql-ndb-1# gunzip *.gz
mysql-ndb-1# tar xvf *.tar
mysql-ndb-1# rm *.tar
mysql-ndb-1# ln –s mysql-cluster-gpl-6.2.15-solaris10-i386 mysql
mysql-ndb-1# vi /etc/profile add PATH=$PATH:/mysql/mysql/bin

Let's make the mysql configuration file
mysql-ndb-1# vi /etc/my.cnf

[mysqld]
basedir=/mysql/mysql
datadir=/mysql/mysql/data
max_allowed_packet=64M
key_buffer_size=192M
table_cache=512
sort_buffer_size=12M
read_buffer_size=8M
wait_timeout=172800
interactive=172800


mysql-ndb-1# groupadd mysql
mysql-ndb-1# useradd -g mysql mysql
mysql-ndb-1# cd mysql ( /mysql/mysql )
mysql-ndb-1# scripts/mysql_install_db --user=mysql
mysql-ndb-1# chown -R root .
mysql-ndb-1# chown -R mysql data
mysql-ndb-1# chgrp -R mysql .
mysql-ndb-1# cp support-files/mysql.server /etc/init.d/mysql.server

change the mysqld_safe file located in /mysql/mysql/bin

first change
if test -f ./share/mysql/english/errmsg.sys -a -x ./bin/mysqld
to
if test -f ./share/english/errmsg.sys -a -x ./bin/mysqld

second change
elif test -f ./share/mysql/english/errmsg.sys -a -x ./libexec/mysqld
to
elif test -f ./share/english/errmsg.sys -a -x ./libexec/mysqld

Do the same steps for storage node two
Storage node ac-mhs21 (193.176.63.51)

Now we can put the mysql management software to the management server
Management server ac-mhs22 (193.176.63.52)

mysql-ndb-mgt # mkdir /mysql
mysql-ndb-mgt # cd /mysql
mysql-ndb-mgt # mkdir cluster
mysql-ndb-mgt # cd cluster
mysql-ndb-mgt # ftp or rcp /mysql/mysql/bin/ndb_mgm and ndb_mgmd from storage node A or B to /mysql/cluster folder of the management server
mysql-ndb-mgt # chmod u+x ndb_


Step 2 Add the cluster configuration

Management server ac-mhs22 (193.176.63.52)
Create a new file called config.ini and put this in the /mysql/cluster folder

[NDBD DEFAULT]
NoOfReplicas=2
DataDir=/mysql/cluster
DataMemory=80M
IndexMemory=18M

[MYSQLD DEFAULT]
[NDB_MGMD DEFAULT]
[TCP DEFAULT]

# Management Server
[NDB_MGMD]
id=1
HostName=193.176.63.52 # IP address of this server

# Storage Nodes
[NDBD]
id=2
HostName=193.176.63.50 # IP address of storage-node-1
DataDir= /mysql/cluster

[NDBD]
id=3
HostName=193.176.63.51 # IP address of storage-node-2
DataDir=/mysql/cluster

[MYSQLD]
[MYSQLD]
[MYSQLD]
[MYSQLD]

Storage node ac-mhs20 (193.176.63.50)
mysql-ndb-1# vi /etc/my.cnf and add this to it

ndbclusterndb-connectstring='host=193.176.63.52' # IP address of the management server
default-table-type=NDBCLUSTER
[mysql_cluster]ndb-connectstring='host=193.176.63.52' # IP address of the management


Storage node ac-mhs21 (193.176.63.51)
mysql-ndb-2# vi /etc/my.cnf and add this to it

ndbclusterndb-connectstring='host=193.176.63.52' # IP address of the management server
default-table-type=NDBCLUSTER
[mysql_cluster]ndb-connectstring='host=193.176.63.52' # IP address of the management


Step 3 Let's start the cluster

Management server ac-mhs22 (193.176.63.52)
mysql-ndb-mgt # cd /mysql/cluster
mysql-ndb-mgt # ./ndb_mgmd

Storage node ac-mhs20 (193.176.63.50)
mysql-ndb-1# cd /mysql/cluster
mysql-ndb-1# /mysql/mysql/bin/ndbd --initial
mysql-ndb-1# /etc/init.d/mysql.server start

Storage node ac-mhs21 (193.176.63.51)
mysql-ndb-2# cd /mysql/cluster
mysql-ndb-2# /mysql/mysql/bin/ndbd --initial
mysql-ndb-2# /etc/init.d/mysql.server start

Step 4 Check the cluster status

Management server ac-mhs22 (193.176.63.52)
Start the management console

mysql-ndb-mgt # cd /mysql/cluster
mysql-ndb-mgt # ndb_mgm
ndb_mgm> show

Step 5 Create a new database

Storage node ac-mhs20 (193.176.63.50)

mysql-ndb-1# mysql -u root
mysql-ndb-1# create database foo;
mysql-ndb-1# use foo;
mysql-ndb-1# create table test1 ( i int );
mysql-ndb-1# insert into test1 () values (1);

Storage node ac-mhs21 (193.176.63.51)

mysql-ndb-2# mysql -u root
mysql-ndb-2# use foo;
mysql-ndb-2# select * from test1;


That's all the cluster is working

For more info check this great white paper. http://www.lod.com/whitepapers/mysql-cluster-howto.html

Friday, March 21, 2008

MySQL with BC4J need to knows

If you want to use MySQL with BC4J and you are only familiar with Oracle databases then you should know the following. Read for all MySQL details my previous blog over MySQL too. If you know more tricks how you can use mysql with bc4j let me know.
If you want use bind variables then you should use ? and not named bind variables like :1 or :customerId. For example in viewobject impl

public void selectById(BigDecimal id, boolean executeQuery)
{
setWhereClause("ID = ?");
setWhereClauseParams(new Object[]{id});
if (executeQuery) {
executeQuery();
}
}

MySQL does not know sysdate you have to use Now()
select A.text from A where A.date_from > now()

In Oracle SQL you can outer join a table bij adding (+) at the right place in the where clause. In MySQL you have to use Left join or Right Join. For example
select A.text
, B.text
, C.text
from A left join B on B.ID = A.B_ID
, C
where A.C_ID = C.ID

If you have a date as column type in MySQL table then BC4J generates the entity attribute as string. You have to change this to timestap.

If you have a blob as table data type then BC4J uses a string as java type. You can change this to BLOBdomain but this doesn't work. You have to program a workaround here some which you can use to store a blob and how to retrieve.


public BigDecimal putBlobData (File file) throws FileNotFoundException,
IOException {
BigDecimal blobId = null;
PreparedStatement stmt = applicationModule.getDBTransaction().createPreparedStatement("SELECT last_insert_id()",1);
try {
Connection conn = stmt.getConnection();
stmt.close();
stmt = conn.prepareStatement("insert into Blobdata(BLOBDATA,CRE_USER_CODE,CRE_DT) values (?,?,?)");
InputStream isFile = new FileInputStream(file);
stmt.setBinaryStream(1,isFile, (int)(file.length()));
stmt.setString( 2,"mhs");
stmt.setDate( 3,new Date(new java.util.Date().getTime()));
int count = stmt.executeUpdate();
conn.commit();
stmt.close();
isFile.close();
stmt = conn.prepareStatement("SELECT last_insert_id()",1);
stmt.execute();
ResultSet rs = stmt.getResultSet();
if ( rs != null ){
rs.first();
blobId = rs.getBigDecimal(1);
}
stmt.close();

} catch ( SQLException e) {
e.printStackTrace();
} finally {
}
return blobId;
}

To retrieve a blob use this

public static InputStream getBlobInputStream(BigDecimal id, MhsServiceImpl service){

String sqlQuery = "SELECT blobdata FROM blobdata WHERE id = ?";
byte[] bytes = null;
String description = "";
ResultSet rs = null;
Blob blob = null;
InputStream is = null;

PreparedStatement stmt = service.getDBTransaction().createPreparedStatement("SELECT last_insert_id()",1);
try {
Connection conn = stmt.getConnection();
stmt = conn.prepareStatement(sqlQuery);
stmt.setBigDecimal(1,id);
rs = stmt.executeQuery();
ResultSetMetaData md = rs.getMetaData();
while (rs.next()) {
blob = rs.getBlob("blobdata");
is = blob.getBinaryStream();

}

} catch(SQLException e){
e.printStackTrace();
}
return is;

}

Saturday, March 1, 2008

Use MySQL with ADF BC ( BC4j)

In this blog I will explain how you can use MySQL as database in an adf bc web application. You don't have to use a Oracle database with BC4J as model. I use the MySQL Cluster database because the high availability of MySQL is better ( master / slave or make a cluster ) then the Oracle XE database. To have the same options in Oracle you need to have the standard or enterprise database.
There are lot of things you should know if you want to use mysql as database. You have to configure the connection in jdeveloper and configure the datasource in the embedded oc4j. You have to know the difference between oracle and mysql ddl. The last point how to deal with the missing sequence and rowid features in the mysql database.
To make a connection from jdeveloper we have to download the mysql jdbc driver . This driver is called Connector/J. Add this library to the jdeveloper libraries so you can add this to the projects and add this to the embedded oc4j libraries.
Now create a new database connection in jdeveloper. Use com.mysql.jdbc.Driver as driver class. The url is jdbc:mysql://localhost/test where test is the database and localhost is the server where mysql database is installed.


Add the mysql jdbc driver to the libraries of the embedded oc4j container. Go to Tools / Embedded OC4J Container preferences menu item and add the connector/j jar to the libraries. The next step is to add the mysql datasource in the embedded oc4j container. You have to use the datasource for the webapp else you get strange errors. Go to the jdevstudio10133\jdev\system\oracle.j2ee.10.1.3.41.57\embedded-oc4j\config folder and change the datasources.xml.

We have to change to configuration of the bc4j application modules to define the right datasource.


The mysql ddl is a bit different then oracle , I have to use bigint data type for a oracle number data type. Because there is no support for sequence I have to use auto_increment. Here is an example of a oracle and mysql ddl
oracle
create table SERVER
(
ID             NUMBER(10) not null,
NAME           VARCHAR2(60) not null,
DESCRIPTION    VARCHAR2(255),
HOSTNAME       VARCHAR2(60) not null,
CRE_USER_CODE  VARCHAR2(60) not null,
CRE_DT         DATE not null,
LAMU_USER_CODE VARCHAR2(60),
LAMU_DT        DATE
)

mysql
create table SERVER
(
ID             bigint  not null  AUTO_INCREMENT,
NAME           VARCHAR(60) not null,
DESCRIPTION    VARCHAR(255),
HOSTNAME       VARCHAR(60) not null,
CRE_USER_CODE  VARCHAR(60) not null,
CRE_DT         DATE not null,
LAMU_USER_CODE VARCHAR(60),
LAMU_DT        DATE
, primary key(id)
)

In our model project we can create a new entity on the server table. Mysql does not have the rowid feature so you can not use retrieve after insert or update on the entity attributes. If you do you can get errors after inserting or updating. This is the Oracle way to get the primary key ( if you use triggers to fill in the pk). In mysql you have to commit the transaction and after that you can use last_insert_id to get primary key. Because we don't want the user to fill in the primary key attribute we have to uncheck the mandatory option. The last step is to create our own entityimpl and extend every entity in your to this impl.
We use the create method to fill our default attributes like the user and the current time. The second method is doDml. This is the method where we retrieve the primary and update the primary attribute with this value. If you don't do this you can not update the just created record. You have to requery first and find your just created record. In the doDML we have to execute super.doDML first else there is no commit and you can not retrieve the primary key. After that you can use preparedstatement to execute the following sql SELECT last_insert_id(). Retrieve the results and use setAttribute to update the primary key.
public class MhsEntityImpl extends EntityImpl {
protected void create(AttributeList attributeList) {
super.create(attributeList);
setAttribute("CreUserCode", "mhs");
setAttribute("CreDt",new Date(new java.util.Date().getTime()));
}

protected void doDML(int i, TransactionEvent transactionEvent) {
String  currentViewName = getEntityDef().getName();
super.doDML(i, transactionEvent);      
if ( i == DML_INSERT) {
if (   currentViewName.equalsIgnoreCase("Server")
currentViewName.equalsIgnoreCase("Property")
currentViewName.equalsIgnoreCase("Service")
) {
PreparedStatement stmt = this.getDBTransaction()
.createPreparedStatement("SELECT last_insert_id()",1);
try {
stmt.execute();
ResultSet rs = stmt.getResultSet();
if ( rs != null ){
rs.first();
setAttribute("Id",rs.getBigDecimal(1));
}
} catch ( SQLException e) {
e.printStackTrace();
}
}
}
}
}

Now we have to extend all the entities to this impl. You can do this by editing the entity and go to Java / class extends and update Row with the new entityimpl


If you have some master detail views in combination with an autonumber primary key column then you can better do the following. Else you need to commit every record.

Create a PK table and a function which gives the latest Keu
CREATE TABLE `pk_keys` (
  `TABLE_NAME` varchar(50) NOT NULL DEFAULT '',
  `TABLE_VALUE` bigint(20) unsigned DEFAULT NULL,
  PRIMARY KEY (`TABLE_NAME`)
)

CREATE FUNCTION `get_pk_value`(`P_TABLE` VARCHAR(50))
RETURNS BIGINT
DETERMINISTIC
BEGIN  
  DECLARE pk_value BIGINT DEFAULT 0;
  DECLARE pk_found INT DEFAULT 0;
               
  SELECT 1 INTO pk_found FROM pk_keys WHERE TABLE_NAME = P_TABLE;
               
  IF pk_found = 1
  THEN  
    UPDATE pk_keys SET TABLE_VALUE = (TABLE_VALUE + 1 ) WHERE TABLE_NAME = P_TABLE;
  ELSE
    INSERT INTO pk_keys VALUES ( P_TABLE, 1 );
  END IF;
               
  SELECT TABLE_VALUE INTO pk_value FROM pk_keys WHERE TABLE_NAME = P_TABLE;
               
  RETURN pk_value;
               
END

The matching EntityImpl
public class MhsEntityImpl extends EntityImpl {
 
 
    protected void create(AttributeList attributeList) {
        super.create(attributeList);
        String  currentViewName = getEntityDef().getName();
 
        if (       currentViewName.equalsIgnoreCase("Relation")
               || currentViewName.equalsIgnoreCase("Relationship")
        ) {
            PreparedStatement stmt = this.getDBTransaction().createPreparedStatement("select getPkValue('"+currentViewName+"')",1);
            try {
                stmt.execute();
                ResultSet rs = stmt.getResultSet();
                if ( rs != null ){
                  rs.first();
                  System.out.println("id: "+rs.getBigDecimal(1));
                  setAttribute("Id",rs.getBigDecimal(1));
                }
            } catch ( SQLException e) {
                e.printStackTrace();
            }
           
        }
    }
}