Pages

Saturday, February 23, 2008

JNDI connections lookup with RMI and LDAP

In java you can lookup connections and datasources with JNDI. The Oracle java libraries enables you to do this against the OC4J Container with rmi or against the OID server with ldap ( probably this will work with other ldap servers too). The first part of this blog is about the ldap jndi lookup and second part is about the rmi lookup.
I use the ldap server of Oracle Identity Management 10g (10.1.4.0.1) to register the connection, which you can download at otn. First we have to rename the object OracleDBConnection and its cn attribute to lowercase. Now we can register the connection with java. We have to set server_dn so java can find the oracledbconnection object. In all the Oracle examples they use searchbase but this is not going to work then you get the following error message cn=oracledbconnections,null.

Hashtable env = new Hashtable(5, 0.75f);
// env.put(Context.INITIAL_CONTEXT_FACTORY, AQjmsConstants.INIT_CTX_FACTORY);
env.put(Context.INITIAL_CONTEXT_FACTORY, "com.sun.jndi.ldap.LdapCtxFactory");
env.put(Context.PROVIDER_URL, "ldap://win2003_2:389");
env.put("server_dn", "cn=IDENT, cn=OracleContext");
env.put(Context.SECURITY_AUTHENTICATION, "simple");
env.put(Context.SECURITY_PRINCIPAL, "cn=orcladmin");
env.put(Context.SECURITY_CREDENTIALS, "Welcome01");

String url = "jdbc:oracle:thin:@XPCND7010XMP:1521:orcl";
Properties properties = new Properties();
properties.setProperty("user","scott");
properties.setProperty("password","tiger");

try {
AQjmsFactory.registerConnectionFactory(env, "scott", url ,properties, "queue");

} catch ( JMSException e) {
e.printStackTrace();
}

This is how it looks in ldap.


Now we can try to lookup the scott connection and create a queueconnection so we can dequeue the scott.JMS_IN queue

Hashtable env = new Hashtable(5, 0.75f);
DirContext ctx;
QueueConnectionFactory queueConnectionFact;

env.put(Context.INITIAL_CONTEXT_FACTORY, "com.sun.jndi.ldap.LdapCtxFactory");
env.put(Context.PROVIDER_URL, "ldap://win2003_2:389");
env.put(Context.SECURITY_AUTHENTICATION, "simple");
env.put(Context.SECURITY_PRINCIPAL, "cn=orcladmin");
env.put(Context.SECURITY_CREDENTIALS, "Welcome01");

try {
ctx = new InitialDirContext(env);
ctx = (DirContext)ctx.lookup("cn=oracledbconnections,cn=IDENT,cn=OracleContext");
queueConnectionFact = (QueueConnectionFactory)ctx.lookup("cn=scott");
// Start QueueConnection
try {
connection = queueConnectionFact.createQueueConnection();

session = connection.createQueueSession(true, QueueSession.CLIENT_ACKNOWLEDGE);
connection.start();
queue = ((AQjmsSession)session).getQueue("scott", "JMS_IN");
sender = ((AQjmsSession)session).createSender(queue);

String xmlData = "1111";
TextMessage message = session.createTextMessage(xmlData);
sender.send(message);
session.commit();
} catch (JMSException e) {
// TODO
e.printStackTrace();
}
} catch (NamingException ee) {
// TODO
ee.printStackTrace();
}


We can also lookup the jdbc/scott datasource with JNDI and rmi. First we have to create a datasource in the oc4j container. You can do this with the em webapp or go the datasources.xml in the config folder. You need a lot of oc4j container libraries to get this working. ( oc4jclient.jar , oc4j-internal.jar, connector.jar, bcel.jar, pcl.jar, jazn.jar and adminclient.jar )

Context ctx;
try {
Properties parm = new Properties();
parm.setProperty("java.naming.factory.initial","com.evermind.server.rmi.RMIInitialContextFactory");
parm.setProperty("java.naming.provider.url","ormi://localhost:23791/");
parm.setProperty("java.naming.security.principal","oc4jadmin");
parm.setProperty("java.naming.security.credentials","welcome");

ctx = new InitialContext(parm);
DataSource ds = (DataSource)ctx.lookup("jdbc/scott");
//Bepaal dbUser:
Connection conn = ds.getConnection();
dbUser = conn.getMetaData().getUserName();
conn.close();
factory = AQjmsFactory.getQueueConnectionFactory(ds);
// Maak QueueConnection
connection = factory.createQueueConnection();
// Maak QueueSession
session = connection.createQueueSession(true, Session.CLIENT_ACKNOWLEDGE);
// Start QueueConnection
connection.start();
// Haal Queue op
queue = ((AQjmsSession)session).getQueue(dbUser, queueTable);
// Maak QueueSender
sender = ((AQjmsSession)session).createSender(queue);
} catch (NamingException e) {
throw new RuntimeException("Fout opgetreden bij het starten ",
e);
} catch (JMSException je) {
throw new RuntimeException("Fout opgetreden bij het starten ",
je);
} catch (Throwable t) {
throw new RuntimeException("Fout opgetreden bij het starten ",
t);
}

Now you can store your connection in the ldap or Application Server.

Here is the example project. My jdeveloper home is D:\oracle\jdevstudio10133. This is voor j2ee rmi libs
Thursday, February 21, 2008

JAXB 2.0 in JDeveloper 10g and 11g

If you know jaxb 1.0 then you know that xjc generates many classes. With the coming of jaxb 2.0 this is a lot less thanks to annotations and the 2.0 version supports now more xml schema types. In this blog I will show how you can use jaxb 2 in JDeveloper 10.1.3 and in 11g and give some tips how to use it.
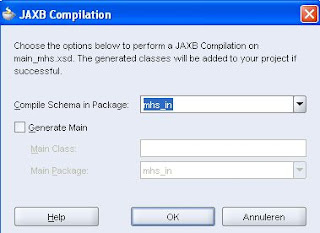
JDeveloper 10.1.3 supports jaxb 1 and JDeveloper gives you a wizard where can generate the classes by selecting a xml schema. Go for the wizard to the menu tools and then go the jaxb compilation menu item.

If you want to use jaxb 2 then you should read this blog, this explains how to get jaxb 2 support in jdeveloper 10.1.3.
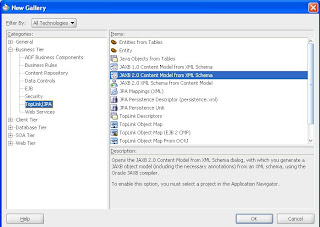
In JDeveloper 11G you can use jaxb 1 and 2. If you do New and go to business tier / toplink jpa then you see the jaxb 1 and 2 options.

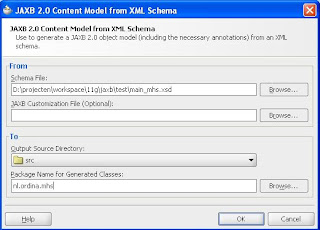
If you use JAXB 2.0 Content model from XML schema then we see the following wizard.

Here is some code where I first generate a xml from java then I read this generated xml back in to initialize java objects. I also use the property jaxb.formatted.output to have a nice formatted xml. With the property Marshaller.JAXB_ENCODING I can control the encoding of the xml

DataMessage msg = new DataMessage();
msg.setRecipient("123");
msg.setRecipient("321");
msg.setRunid(run);
msg.setContentlist(conList);

try {
JAXBContext jaxbContext=JAXBContext.newInstance("nl.ordina.mhs");
Marshaller marshaller=jaxbContext.createMarshaller();


File file = new File("c:/temp/1.xml");
marshaller.setProperty("jaxb.formatted.output", true);
marshaller.setProperty( Marshaller.JAXB_ENCODING, "UTF-8" );

marshaller.marshal(msg,file);

Unmarshaller unmarshaller = jaxbContext.createUnmarshaller();
DataMessage msg2 = (DataMessage) unmarshaller.unmarshal(file);


} catch ( JAXBException e) {
e.printStackTrace();
}

If you use anyType in your schema like this <xs:element name="data" type="xs:anyType"/> You may not be so happy with the jaxb generated code. It generates setData(Object data) The marshaller generates the output of this element not to xml but to text(it converts the xml characters)
You can better change the element to xs:any.
<xs:element name="data">
<xs:complexType>
<xs:sequence>
<xs:any processContents="skip"/>
</xs:sequence>
</xs:complexType>
</xs:element>
Now jaxb generates setData(Data value) where Data is a class where you can set an Element. Now the marshaller generates a nice xml with an embedded xml.

Sunday, February 17, 2008

Business Rules in Soa Suite 11g

With the new soa suite patch ( 4 feb ) for the jdeveloper 11g TP3 release we can test the business rules. The 11g version is a totally different then the 10.1.3 version. The first thing is a lot easier to make business rules and you can expose these rules as web services so you can use it in other applications. In 10.1.3 you have a binary br repository which you can use. Now you create service in the BR to expose a particular ruleset or function. You can also use business rules to create advanced approval routing in the workflow component.
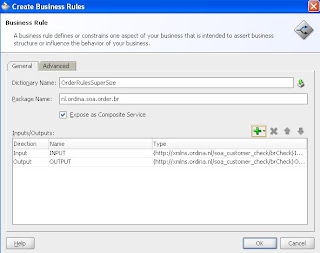
The first step is to drag the business rule to the composite.xml. Now you get a wizard to create a new business rule. In my case I made a simple schema with a element total order amount which I use as input and as output boolean element supersize order. You can also check expose as composite service so you can use this br in other applications

Because I checked the expose as composite service you can see that soa suite creates a webservice.

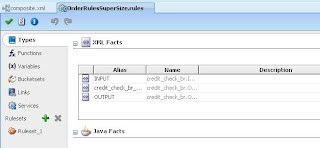
If we open the new BR then we see that soa suite has created xml facts of the input and output element. This is done with jaxb.

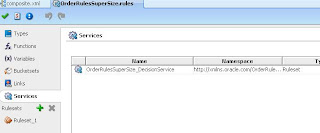
Soa suite also creates a service which calls the empty created ruleset. You can add more services based on br functions or other rulesets.

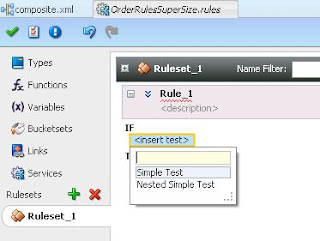
To the created the ruleset we can add a new rule. We select a simple test where we check if the total order is greater then 2000.

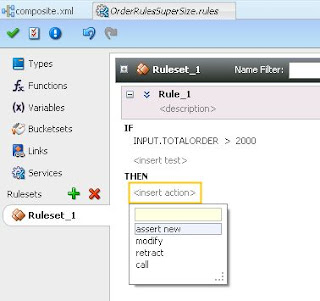
Next I select the input element, > and 2000. Now we can add the return value. Choose assert new.

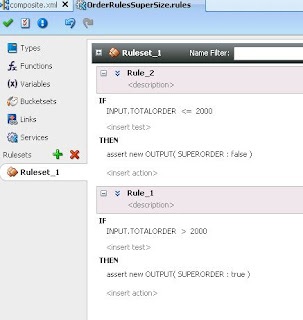
We have to select the output element and in the output element we select true. Now we can make a second rule where the outcome is false when the input is lower then 2000

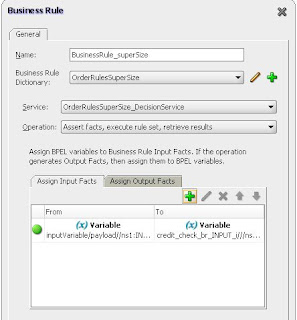
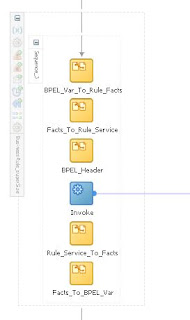
We are ready with the composite part now we can go to bpel where we add a business rule to the right place in the bpel designer. We have to select the just created br and the right operation, in my case assert facts , execute and retrieve result. We also have to assign the input and output variable of the br.

This is how it looks when we open the business rule scope.

You are ready to deploy this to soa container and test this

Thursday, February 14, 2008

ESB adapter failover

For 24 uptime systems is it very important to have an easy and quick failover. In this blog I will explain how you can implement an ESB failover without creating adapter for the primary and secondary systems. In this example I use jdeveloper 10.1.3 and I use jms adapters but you can implement this with other out adapters too. To do this I use a xslt to change the header of the jms adapter to set JMSDestinationName with the primary or secondary resource. To know if the backoffice system are in failover I use a domain value map.
The first step is to create two jms queues in the scott schema. The first is called jms_in and the failover queue is called jms_in2. Here is the code to create the queues in plsql

begin
sys.dbms_aqadm.create_queue_table(
queue_table => 'JMS_IN_TABLE',
queue_payload_type => 'SYS.AQ$_JMS_MESSAGE',
sort_list => 'PRIORITY, ENQ_TIME',
compatible => '10.0.0',
primary_instance => 0,
secondary_instance => 0,
storage_clause => 'tablespace users pctfree 10 initrans 1 maxtrans 255 storage ( initial 64K minextents 1 maxextents unlimited )');
end;
/
begin
sys.dbms_aqadm.create_queue(
queue_name => 'JMS_IN',
queue_table => 'JMS_IN_TABLE',
queue_type => sys.dbms_aqadm.normal_queue);
end;
/
begin
dbms_aqadm.start_queue( queue_name =>'JMS_IN' ,enqueue => true ,dequeue => true );
end;
/

Now we can add the jms adapters to the oc4j-ra.xml of the oc4j soa container ( folder application-deployments\default\JmsAdapter )

<connector-factory location="eis/Jms/scott" connector-name="Jms Adapter">
<config-property name="connectionFactoryLocation" value="java:comp/resource/jms_scott/QueueConnectionFactories/myQCF"/>
<config-property name="factoryProperties" value=""/>
<config-property name="acknowledgeMode" value="AUTO_ACKNOWLEDGE"/>
<config-property name="isTopic" value="false"/>
<config-property name="isTransacted" value="true"/>
<config-property name="username" value="scott"/>
<config-property name="password" value="tiger"/>
<connection-pooling use="none">
</connection-pooling>
<security-config use="none">
</security-config>
</connector-factory>

<connector-factory location="eis/Jms/scott2" connector-name="Jms Adapter">
<config-property name="connectionFactoryLocation" value="java:comp/resource/jms_scott2/QueueConnectionFactories/myQCF"/>
<config-property name="factoryProperties" value=""/>
<config-property name="acknowledgeMode" value="AUTO_ACKNOWLEDGE"/>
<config-property name="isTopic" value="false"/>
<config-property name="isTransacted" value="true"/>
<config-property name="username" value="scott"/>
<config-property name="password" value="tiger"/>
<connection-pooling use="none">
</connection-pooling>
<security-config use="none">
</security-config>
</connector-factory>


We have to change the application.xml to add the two resource adapters


<resource-provider name="jms_scott" class="oracle.jms.OjmsContext">
<description>oc4j-jms loop back resource provider</description>
<property name="url" value="jdbc:oracle:thin:scott/tiger@localhost:1521:orcl" />
</resource-provider>
<resource-provider name="jms_scott2" class="oracle.jms.OjmsContext">
<description>oc4j-jms loop back resource provider</description>
<property name="url" value="jdbc:oracle:thin:scott/tiger@localhost:1521:orcl" />
</resource-provider>

Now we can add the jms adapter to esb project. I use jms as a outgoing adapter and use a file adapter as incoming.

It is important to name the resource provider jms_scott because we added this resource to the application.xml. The destination name is primary location url, in my case java:comp/resource/jms_scott/Queues/SCOTT.JMS_IN . jms_scott is the primary resource and SCOTT.JMS_IN is the schema name with the queue name. The secondary location url looks like this java:comp/resource/jms_scott2/Queues/SCOTT.JMS_IN2.

Connect the router to the file router. It looks like this

The next step is to create a domain value map in the esb console. With this domain we can control the esb to use the failover adapter resources.

the xml looks like this

<?xml version="1.0" encoding="UTF-8"?>
<dvm name="Failover" isNew="null">
<description>failover description</description>
<columns>
<column name="System"/>
<column name="failover"/>
<column name="primary"/>
<column name="secondary"/>
</columns>
<rows>
<row>
<cell>esb</cell>
<cell>Yes</cell>
<cell>java:comp/resource/jms_scott/Queues/SCOTT.JMS_IN</cell>
<cell>java:comp/resource/jms_scott2/Queues/SCOTT.JMS_IN2</cell>
</row>
</rows>
</dvm>

The last step is to create transformation between the router and the jms out adapter. In this xslt I also set the priority on the jms queue. Add the variables above xsl:template match

<xsl:variable name="failover"
select="orcl:lookup-dvm('Failover','System','esb','failover','No')"/>
<xsl:variable name="location">
<xsl:choose>
<xsl:when test="starts-with($failover, 'Yes')">
<xsl:value-of select="orcl:lookup-dvm('Failover','System','esb','primary','No')"/>
</xsl:when>
<xsl:otherwise>
<xsl:value-of select="orcl:lookup-dvm('Failover','System','esb','secondary','No')"/>
</xsl:otherwise>
</xsl:choose>
</xsl:variable>
<xsl:variable name="outJMSDestinationName"
select="ehdr:setOutboundHeader('/jhdr:JMSOutboundHeadersAndProperties/jhdr:JMSOutboundHeaders/jhdr:JMSDestinationName', $location, 'jhdr=http://xmlns.oracle.com/pcbpel/adapter/jms/;')"/>
<xsl:variable name="priority" select="/imp1:Message/imp1:Priority"/>
<xsl:variable name="tracking" select="/imp1:Message/imp1:RunID"/>
<xsl:variable name="outCorrelationID"
select="ehdr:setOutboundHeader('/jhdr:JMSOutboundHeadersAndProperties/jhdr:JMSOutboundHeaders/jhdr:JMSCorrelationID', $tracking, 'jhdr=http://xmlns.oracle.com/pcbpel/adapter/jms/;')"/>
<xsl:variable name="outJMSPriority"
select="ehdr:setOutboundHeader('/jhdr:JMSOutboundHeadersAndProperties/jhdr:JMSOutboundHeaders/jhdr:JMSPriority', $priority, 'jhdr=http://xmlns.oracle.com/pcbpel/adapter/jms/;')"/>
<xsl:template match="/">

The first step is to know if the system is in failover. Then we now which resource we need and set this value on the JMSDestinationName.
If we change the domain value of the failover column to Yes then the message is added to the jms_in2 queue and if the value is No then the messages is added to the jms_in queue.

Tuesday, February 5, 2008

Make the internal 10.1.3 ESB jms queues persistent

Standard are the internal esb queues jms memory queues. This is perfect for normal use but if you want to make an oracle esb cluster or make your own esb error handling then you can better make the esb queues database persistent. In this blog I will explain what to do.
I installed the 10.1.3.1 soa suite and upgrade this to 10.1.3.3. Then I apply patch 10.1.3.3.1. (patchset 6492514). You have to apply this patch if you want to use the esb_error queue.
First step is to update parameters of the esb repository so it uses the new jms database queues. Login with sqlplus to the oraesb schema and run the following script

delete esb_parameter where param_name = 'PROP_NAME_DEFERRED_TOPIC_JNDI';
delete esb_parameter where param_name = 'PROP_NAME_INITIAL_CONTEXT_FACTORY';
delete esb_parameter where param_name = 'ACT_ID_RANGE';
insert into esb_parameter values('PROP_NAME_DEFERRED_TOPIC_JNDI','ESBTopics/Topics/ESB_JAVA_DEFERRED');
insert into esb_parameter values('PROP_NAME_INITIAL_CONTEXT_FACTORY', 'com.evermind.server.rmi.RMIInitialContextFactory');
insert into esb_parameter values('ACT_ID_RANGE', '400');
update esb_parameter set param_value ='OracleOJMS/TCF' where param_name = 'PROP_NAME_DEFERRED_TCF_JNDI';
update esb_parameter set param_value ='OracleOJMS/XATCF' where param_name = 'PROP_NAME_DEFERRED_XATCF_JNDI';
update esb_parameter set param_value ='ESBTopics/Topics/ESB_CONTROL' where param_name = 'PROP_NAME_CONTROL_TOPIC_JNDI';
update esb_parameter set param_value ='OracleOJMS/XATCF' where param_name = 'PROP_NAME_CONTROL_TCF_JNDI';
update esb_parameter set param_value ='ESBTopics/Topics/ESB_ERROR' where param_name = 'PROP_NAME_ERROR_TOPIC_JNDI';
update esb_parameter set param_value ='OracleOJMS/TCF' where param_name = 'PROP_NAME_ERROR_TCF_JNDI';
update esb_parameter set param_value ='OracleOJMS/XATCF' where param_name = 'PROP_NAME_ERROR_XATCF_JNDI';
update esb_parameter set param_value ='ESBTopics/Topics/ESB_ERROR_RETRY' where param_name = 'PROP_NAME_ERROR_RETRY_JNDI';
update esb_parameter set param_value ='OracleOJMS/XATCF' where param_name = 'PROP_NAME_ERROR_RETRY_TCF_JNDI';
update esb_parameter set param_value ='ESBTopics/Topics/ESB_MONITOR' where param_name = 'PROP_NAME_MONITOR_TOPIC_JNDI';
update esb_parameter set param_value ='OracleOJMS/TCF' where param_name = 'PROP_NAME_MONITOR_TCF_JNDI';
update wf_agents set tcf_jndi='OracleOJMS/XATCF' where queue_type='DEFERRED';
update wf_agents set name ='ESBTopics/Topics/ESB_JAVA_DEFERRED' where queue_type='DEFERRED';
update wf_agents set queue_name ='ESBTopics/Topics/ESB_JAVA_DEFERRED' where queue_type='DEFERRED';
commit;
select * from esb_parameter;
select tcf_jndi, name, queue_type from wf_agents;

Make sure that you enable enqueue / dequeue on the esb queues

Second step we have configure the oc4j server
We have to make a new OracleOJMS resource provider
1. Go to the Administration tab, Enterprise Messaging Service, then Database Persistence.
2. On the Database Persistence configuration page, click Deploy.
The Deploy Database Persistence Provider screen appears.
3. Make the following entries and selections:
Resource Adapter Module Name: OracleOJMS
Select Add a new resource provider to be used by this connector
Resource Provider Name: esbRP
Datasource JNDI Location: jdbc/esbaqdatasource

restart the soa suite server

1. Click the default application, Now you see the adapter, click on the OracleOJMS Resource Adapter Module
2. Click Create to create a connection factory.
Select javax.jms.XATopicConnectionFactory from the Connection Factory and click Continue.
3. The Create Connection Factory screen appears.
In the JNDI Location field, enter OracleOJMS/XATCF. Click Finish.
4. Click Create to create a connection factory.
Select javax.jms.TopicConnectionFactory from the Connection Factory and click Continue.
5. The Create Connection Factory screen appears.
In the JNDI Location field, enter OracleOJMS/TCF. Click Finish.
6. Click the Administered Objects tab and click Create.
Select oracle.j2ee.ra.jms.generic.AdminObjectTopicImpl and click Continue.
In the JNDI Location field, enter ESBTopics and in the resourceProviderName field enter esbRP
Now you can query the esb queue tables for errors.

Sunday, February 3, 2008

re-use components with ADF Taskflow

With ADF Taskflow you can make page fragments or pages with navigation and re-use this many times in your own applications. Build ones and implement many times. Oracle is doing this too with the webcenter components. These webcenter taskflows are isolated litte programs with its own page fragements and model. If you want to make your own re-usable taskflows then you have to know some things. In this blog I will explain the things you should know. First you have to create a fusion web application. You can ignore the adfc-config.xml this is an unbounded taskflow. Unbounded taskflow don't have a fixed beginning and ending, so it can't be used for the ADF library jar. You have to create a bounded taskflow. There are three different bounded taskflows. The first is the page fragments option. You can use page fragments to add functionality to your page. For example you make a customer info page fragment and include this on the order page or in your marketing application. The others two bounded taskflows are a bit different. This is the train taskflow ( A train is a wizard to help the user to complete the transaction ) and the other is the normal taskflow with pages and methods like a logon flow or a order entry flow. With these two options you have to leave your page and the taskflow pages are shown and when you are ready then you can return to your page.
First we create a bounded taskflow with page fragments. We open this taskflow and add a view from the taskflow menu. Create a page fragment on this view.


<?xml version="1.0" encoding="windows-1252" ?>
<adfc-config xmlns="http://xmlns.oracle.com/adf/controller" version="1.2">
<task-flow-definition id="page1">
<default-activity>page1</default-activity>
<view id="page1">
<page>/page1.jsff</page>
</view>
<use-page-fragments/>
</task-flow-definition>
</adfc-config>

The next step is to create a bounded taskflow without the option page fragements.
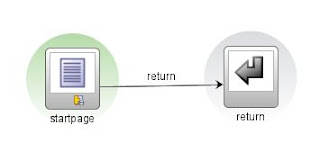
Here we also can create a view but now we create a page and we also create a taskflow return. Between the view and the return we add a flowcase with the name return.


<?xml version="1.0" encoding="windows-1252" ?>
<adfc-config xmlns="http://xmlns.oracle.com/adf/controller" version="1.2">
<task-flow-definition id="page">
<default-activity>startpage</default-activity>
<input-parameter-definition>
<name>param1</name>
<value>#{pageFlowScope.inputParam1}</value>
<class>java.lang.String</class>
</input-parameter-definition>
<view id="startpage">
<page>/page.jspx</page>
</view>
<task-flow-return id="return">
<outcome>
<name>return</name>
</outcome>
</task-flow-return>
<control-flow-rule>
<from-activity-id>startpage</from-activity-id>
<control-flow-case>
<from-outcome>return</from-outcome>
<to-activity-id>return</to-activity-id>
</control-flow-case>
</control-flow-rule>
</task-flow-definition>
</adfc-config>

Open the jsf page and add a button with an action "return" else we can't go back to original page. To make this more interesting we add an input parameter to this taskflow and display the parameter on the jsf page.
It is very important to give the page, taskflow and the package name unique names else you can get errors that it finds for example two datacontrols in the same package location or it uses the wrong page.
The last step is to create an ADF library jar deployment profile. This deployment profile add all the bounded taskflows to the jar. This jar you can add as library to other fusion web applications. When you do this and you create or open a jsf page then in the component panel your new taskflow are displayed.

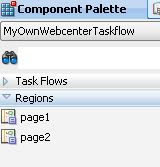
Now you see there are two types. Taskflow and Regions, Regions are the taskflows with the page fragments option.
When you drag one of your region taskflows on the jsf page is gives you the option to create a (dynamic) region. You see the page fragment on your page. Jdeveloper adds the following code to the jsf page
<af:region value="#{bindings.page11.regionModel}" id="page11"/>
and this code to the pagedef
<executables>
<taskFlow id="page11"
taskFlowId="/WEB-INF/page1-task-flow-definition.xml#page1"
xmlns="http://xmlns.oracle.com/adf/controller/binding"/>
</executables>
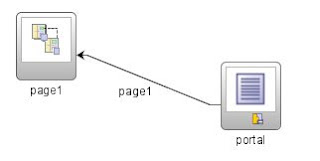
You can also drag your own taskflow to the page. What now happens depends if the jsf page is part of an unbounded taskflow or not. If so then jdeveloper create a button with an action <af:commandButton text="page" action="page1"/> and update the unbounded taskflow. It adds a taskflow call and a control flow case.


<?xml version="1.0" encoding="windows-1252" ?>
<adfc-config xmlns="http://xmlns.oracle.com/adf/controller" version="1.2">
<view id="portal">
<page>/portal.jspx</page>
</view>
<task-flow-call id="page1">
<task-flow-reference>
<document>/WEB-INF/page-task-flow-definition.xml</document>
<id>page</id>
</task-flow-reference>
<input-parameter>
<name>param1</name>
<value>#{'hello'}</value>
</input-parameter>
</task-flow-call>
<control-flow-rule>
<from-activity-id>portal</from-activity-id>
<control-flow-case>
<from-outcome>page1</from-outcome>
<to-activity-id>page1</to-activity-id>
</control-flow-case>
</control-flow-rule>
</adfc-config>

JDeveloper automatically detects the input parameters.
If you don't use the unbounded taskflow (adfc-config.xml) then jdeveloper create a gobutton with a destination. The value is adf.task-flow?_id=page&_document=/WEB-INF/page-task-flow-definition.xml . If you want to add parameters to this url you have to add param1=hello param1 is the parameter of my taskflow. You can also add a return url by adding _return-url. Here an example of the gobutton. <af:goButton text="page" destination="adf.task-flow?_id=page&amp;_document=/WEB-INF/page-task-flow-definition.xml&amp;param1=hello&amp;_return-url=/webcenter_portal-ViewController-context-root/faces/portal2.jspx"/>
That's all

Friday, February 1, 2008

Dynamic jsf page with ShowDetailFrames

The 11g webcenter edition add customizable panels and Show Detail frames to jdeveloper. In this blog I use these frames to add some data to the header and right side of the page (like a homepage). I generate these frames from a backing bean. This ShowDetailFrame component is like a portlet window. You can drag these, re-order these panels or close them. You can use this for example to display some text from the database. This is how it looks.

This is how I did it. First I create a jsf page where I add Panel Stretch Layout then I add a Customizable Panel to the top which has horizontal layout and one on the end which has a vertical layout. In the beforePhase of the view I add the init method which adds the ShowDetailFrames to the Customizable Panels.

<?xml version='1.0' encoding='windows-1252'?>
<jsp:root xmlns:jsp="http://java.sun.com/JSP/Page" version="2.0"
xmlns:h="http://java.sun.com/jsf/html"
xmlns:f="http://java.sun.com/jsf/core"
xmlns:af="http://xmlns.oracle.com/adf/faces/rich"
xmlns:cust="http://xmlns.oracle.com/adf/faces/customizable"
xmlns:pe="http://xmlns.oracle.com/adf/pageeditor">
<jsp:directive.page contentType="text/html;charset=windows-1252"/>
<f:view beforePhase="#{PortalBean.initPage}">
<af:document customizationId="document70">
<af:form id="form">
<af:panelStretchLayout inlineStyle="width:642px; height:487px;" topHeight="120px"
endWidth="250px">
<f:facet name="center">
<af:activeOutputText value="Main Window"/>
</f:facet>
<f:facet name="top">
<cust:panelCustomizable id="panelCustomizableHorizontal"
layout="horizontal"
displayScrollBar="true"/>
</f:facet>
<f:facet name="end">
<cust:panelCustomizable id="panelCustomizableVertical"
layout="vertical" displayScrollBar="true"/>
</f:facet>
</af:panelStretchLayout>
</af:form>
</af:document>
</f:view>
</jsp:root>

Now we can create the backing bean

package nl.ordina.backing;

import javax.faces.component.UIComponent;
import javax.faces.context.FacesContext;
import javax.faces.event.PhaseEvent;
import oracle.adf.view.rich.component.customizable.PanelCustomizable;
import oracle.adf.view.rich.component.customizable.ShowDetailFrame;
import oracle.adf.view.rich.component.rich.output.RichOutputText;

public class Portal {

PanelCustomizable panelHorizontal = (PanelCustomizable) getUIComponent("panelCustomizableHorizontal" );
PanelCustomizable panelVertical = (PanelCustomizable) getUIComponent("panelCustomizableVertical" );

public Portal() {
}

public String initPage(PhaseEvent phaseEvent) {
ShowDetailFrame window = null;

for ( int i = 1 ; i < 7 ; i++ ) {
if ( i % 2 == 0 ) {
window = addWindow ("horizontal_dynamic"+i,panelHorizontal);
addText("horizontal is great" ,window);
} else {
window = addWindow ("vertical_dynamic"+i,panelVertical);
addText("vertical is the best" ,window);
}
}
return null;
}
private void addText (String text,ShowDetailFrame frame) {
RichOutputText output = new RichOutputText();
output.setValue(text);
output.setId("out1");
frame.getChildren().add(output);
}

private ShowDetailFrame addWindow (String name,PanelCustomizable panel) {
ShowDetailFrame window = new ShowDetailFrame();
window.setId(name);
window.setText(name);
window.setDisplayShadow(true);
panel.getChildren().add(window);
return window;
}

private UIComponent getUIComponent(String name) {
FacesContext facesCtx = FacesContext.getCurrentInstance();
return facesCtx.getViewRoot().findComponent(name) ;
}
}

Now we only have to add the bean to the adfc-config.xml

<managed-bean>
<managed-bean-name>PortalBean</managed-bean-name>
<managed-bean-class>nl.ordina.backing.Portal</managed-bean-class>
<managed-bean-scope>request</managed-bean-scope>
</managed-bean>