Pages

Wednesday, January 30, 2008

Scheduling processes in soa suite 11g

A new feature in soa suite 11g is the scheduling of processes. You can schedule different types of code. The schedular exists of 4 types. First is the schedular where you can change the frequency, the second is the job type. There are 3 different types, one to run a java class, plsql procedure and to run a binary file. The last two are the job set and the job definition. With these two you can run job type(s). With the job set you can run multiple job types and job definitions parallel or serial.

In the jobtype you can first define the java class file, priority, parameters and system properties

Now we can add a job set or a job definition to the project. With the job set you can run job types or job defintions parallel or serial.

In the job definition you must select a job type.

The last picture is of course the schedular. Too bad in TP3 you can't add job sets and job definitions to the schedular.

Thursday, January 24, 2008

Oracle JMS with ESB and BPEL

In the esb server for the customer we want to use queues between the message handling system and the backoffices databases. In the Oracle database you can do this with Oracle AQ or with Oracle jms. We want to use the jms queue because we don't know in the future we still want to use Oracle esb and then it is easier in an other program to connect to the Oracle jms implementation then to connect to Oracle AQ. So we don't have to change the queues. You can easily create a jms queue in the database
First we give the schema user scott permission to create a queue.
grant aq_user_role to scott;
grant execute on DBMS_AQADM to scott;
We can create the queue table

begin
sys.dbms_aqadm.create_queue_table(
queue_table => 'JMS_IN_TABLE',
queue_payload_type => 'SYS.AQ$_JMS_MESSAGE',
sort_list => 'PRIORITY, ENQ_TIME',
compatible => '10.0.0',
primary_instance => 0,
secondary_instance => 0,
storage_clause => 'tablespace users pctfree 10 initrans 1 maxtrans 255 storage ( initial 64K minextents 1 maxextents unlimited )');
end;
/

What important is that we use 'SYS.AQ$_JMS_MESSAGE' as payload type and the dequeue order is first priority and then the enqueue time.
Now we can create the queue

begin
sys.dbms_aqadm.create_queue(
queue_name => 'JMS_IN',
queue_table => 'JMS_IN_TABLE',
queue_type => sys.dbms_aqadm.normal_queue);
end;
/

If you want to dequeue and enqueue this queue we have to enable this first

begin
dbms_aqadm.start_queue( queue_name =>'JMS_IN' ,enqueue => true ,dequeue => true );
end;
/

With this plsql code we can add a message to the queue

declare
l_message clob := '';
v_enqueue_options dbms_aq.enqueue_options_t;
v_msg_props dbms_aq.message_properties_t;
v_msg_id RAW(16);
v_message SYS.AQ$_JMS_MESSAGE := SYS.AQ$_JMS_MESSAGE.construct(DBMS_AQ.JMS_TEXT_MESSAGE);
begin
l_message := '<data-message><runid>210</runid></data-message>';
v_message.set_text(xmltype(l_message).getstringval());

dbms_aq.enqueue(queue_name => 'JMS_IN'
,enqueue_options => v_enqueue_options
,message_properties => v_msg_props
,payload => v_message
,msgid => v_msg_id);
commit;
end;
/

Now we are ready to use this in the ESB. We can add a new JMS adapter in the composite view.
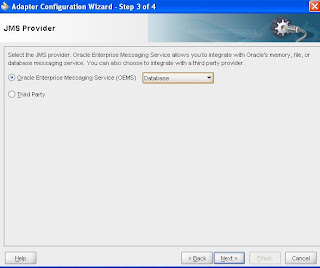
Choose database as oems jms provider

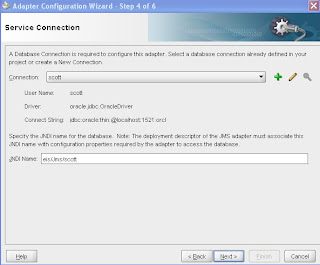
Create a new database connection to scott.

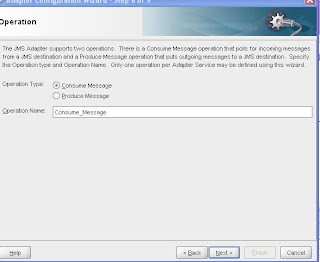
If you want to enqueue a message then choose produce and if you want to dequeue choose consumer

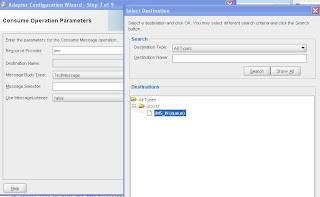
Give the resource provider a name ( we need this name later )and select the destination.

Now we add the resource provider in the application.xml in the config folder, use the same name as above

<resource-provider class="oracle.jms.OjmsContext" name="jms">
<description>oc4j-jms loop back resource provider</description>
<property name="url" value="jdbc:oracle:thin:scott/tiger@localhost:1521:orcl"/>
</resource-provider>

The last step is to configure the jms adapter. Go to the deployment folder then to the default and JmsAdapter folder. Here we edit the oc4j-ra.xml where we add a new connection
Location is the database connection name and change the user and password properties. We have to change the value of connectionFactoryLocation property. Between /resource and /QueueConnectionFactoryLocation we have to add the resource provider name.

<connection-factory connector-name="Jms Adapter" location="eis/Jms/scott">
<config-property name="connectionFactoryLocation" value="java:comp/resource/jms/QueueConnectionFactories/myQCF" encoded-credential="false"/>
<config-property name="factoryProperties" value="" encoded-credential="false"/>
<config-property name="acknowledgeMode" value="AUTO_ACKNOWLEDGE" encoded-credential="false"/>
<config-property name="isTopic" value="false" encoded-credential="false"/>
<config-property name="isTransacted" value="true" encoded-credential="false"/>
<config-property name="username" value="scott" encoded-credential="false"/>
<config-property name="password" value="tiger" encoded-credential="false"/>
</connection-factory>

Now we can use the jms queue in the esb.

Monday, January 21, 2008

Tuscany SCA java and JDeveloper 11g

This weekend I was testdriving the Tuscany SCA java release, this release works very well. I hope there will be an Oracle implementation of SCA JAVA soon. The development of SCA and SDO are very important to make better and less complex soa applications. Gartner's vice president of application integration and middleware analysis says "SDO does for data in a SOA application what SCA does for service components, it abstracts the developer's view of the data in an effort to simplify the design and maintenance of data-handling application functions." With Tuscany it is very easy to expose new Services. Use components written in other languages then Java ( script, bpel, spring etc) or use ws, rmi, ejb or jms components. All you have to do is to configure the composite file. So you can use every component in your application. That is enough theory for this blog.
JDeveloper 11G TP3 does not supports SCA Java. It is not know if it will support it in the 11g release but with 11g you can make SDO services. This is very easy, for more info see my previous blog . Let's try to use a jdev sdo service as a component in a tuscany application. I create a new jdeveloper project and add all the tuscany libraries to this project. Then create a composite file called customer.composite and put it in the root of src folder.

<?xml version="1.0" encoding="UTF-8"?>
<composite xmlns="http://www.osoa.org/xmlns/sca/1.0" targetNamespace="/nl/ordina/hr/model/service/common/"
xmlns:dbsdo="http://tuscany.apache.org/xmlns/sca/databinding/sdo/1.0" name="customer"
xmlns:tns="/nl/ordina/hr/model/service/common/"
xmlns:types="/nl/ordina/hr/model/service/common/types/"
xmlns:errors="http://xmlns.oracle.com/adf/svc/errors/"
xmlns:soap="http://schemas.xmlsoap.org/wsdl/soap/"
>
<component name="CustomerServiceComponent">
<implementation.java class="nl.ordina.soa.sdo.CustomerServiceComponent" />
<reference name="customerService"/>
</component>
<reference name="customerService" promote="CustomerServiceComponent/customerService">
<interface.java interface="nl.ordina.hr.model.service.common.serviceinterface.CustomerService" />
<binding.ws uri="http://XPCND7010XMP.work.local:8989/EJB-sdo_hr-Model-context-root/CustomerService" />
</reference>
</composite>

Here I defined a component which I can use in my app and this component uses the web service reference to connect to the sdo webservice.
Now add the sdo customer service jars to this project. We have to create a class which implements the sdo customerservice.

package nl.ordina.soa.sdo;

import java.util.List;
import nl.ordina.hr.model.dataaccess.common.CustomersViewSDO;
import nl.ordina.hr.model.service.common.serviceinterface.CustomerService;
import oracle.jbo.common.service.types.FindControl;
import oracle.jbo.common.service.types.FindCriteria;
import oracle.jbo.common.service.types.ProcessControl;
import oracle.jbo.common.service.types.ProcessData;

import org.osoa.sca.annotations.Reference;

public class CustomerServiceComponent implements CustomerService {

private CustomerService customerService;

@Reference
public void setCustomerService(CustomerService customerService) {
this.customerService = customerService;
}

public CustomerService getCustomerService() {
return customerService;
}

public CustomersViewSDO getCustomersView(Integer customerId){

System.out.println("Called getCustomersView");
return customerService.getCustomersView(customerId) ;
}

public CustomersViewSDO createCustomersView(CustomersViewSDO customersView) {
return customerService.createCustomersView(customersView);
}

public CustomersViewSDO updateCustomersView(CustomersViewSDO customersView) {
return customerService.updateCustomersView(customersView);
}

public void deleteCustomersView(CustomersViewSDO customersView){
customerService.deleteCustomersView(customersView);
}

public CustomersViewSDO mergeCustomersView(CustomersViewSDO customersView) {
return customerService.mergeCustomersView(customersView);
}

public List findCustomersView(FindCriteria findCriteria,
FindControl findControl) {
return customerService.findCustomersView(findCriteria, findControl);
}

public List processCustomersView(String changeOperation,
List customersView,
ProcessControl processControl) {
return customerService.processCustomersView(changeOperation,customersView, processControl);
}

public ProcessData processCSCustomersView(ProcessData processData,
ProcessControl processControl) {
return customerService.processCSCustomersView(processData, processControl);
}
}


Now we can test it. Create a test class where we load the composite file and call a method of the customerservice.

package nl.ordina.soa.sdo;

import nl.ordina.hr.model.dataaccess.common.CustomersViewSDO;
import nl.ordina.hr.model.service.common.serviceinterface.CustomerService;
import org.apache.tuscany.sca.host.embedded.SCADomain;

public class Launch {
public final static void main(String[] args) throws Exception {
SCADomain scaDomain = SCADomain.newInstance("customer.composite");

CustomerService customerService = scaDomain.getService(CustomerService.class, "CustomerServiceComponent");

Integer custId = 147;
CustomersViewSDO cust = customerService.getCustomersView(custId);
System.out.println(cust.getCustFirstName()+" "+cust.getCustLastName());

scaDomain.close();
}
}

I got an error but Simon of tuscany helped me, I forgot the add @Reference to the customerService Setter.

Thursday, January 17, 2008

anyType xml message routing in ESB

For a customer I had to route the several different xml messages of a message handling system to the right backoffice database. I want to do this with the esb soa suite, so I need xml schema's of these message to map the data. I can use for every xml message type a different queue so I can use this specific message schema and maps this with xsl to the right db adapter. Or I can make one big schema where all messages types are included, but this is not so right because with every change in one of schema's I have to test the whole system.
Let's use xs:anyType for the xml messages. Now I don't know in the esb the structure of the xml messages. The solution is to make a main router where we use the filters and a specific xsl to extract anytype and map this to the right xsd in the next router, This router maps the data with a xsl to the db adapter.
The example main schema looks like this.

Here are two xml messages examples.

<ns1:Message xsi:schemaLocation="http://ordina.nl/esb message.xsd" xmlns:ns1="http://ordina.nl/esb" xmlns:xsi="http://www.w3.org/2001/XMLSchema-instance">
<ns1:RunID>100</ns1:RunID>
<ns1:MessageType>A</ns1:MessageType>
<ns1:Data>
<MessageA>
<Text>this message A</Text>
</MessageA>
</ns1:Data>
</ns1:Message>


<ns1:Message xsi:schemaLocation="http://ordina.nl/esb message.xsd" xmlns:ns1="http://ordina.nl/esb" xmlns:xsi="http://www.w3.org/2001/XMLSchema-instance">
<ns1:RunID>200</ns1:RunID>
<ns1:MessageType>B</ns1:MessageType>
<ns1:Data>
<MessageB>
<Text>this message B</Text>
<SubMessageB>
<Text>this message B</Text>
</SubMessageB>
</MessageB>
</ns1:Data>
</ns1:Message>

Let's do this in the 10.1.3 esb. I use for this example file adapters. Make a esb project and start by dragging the file adapter to the esb file. The file adapters reads the xml's in a directory and this file adapter is based on the anytype message schema.

Now we need to make a xsl where we extract the anytype to a new xml. This is how the xsl looks.

<xsl:stylesheet version="1.0" xmlns:xsl="http://www.w3.org/1999/XSL/Transform" xmlns:n="http://ordina.nl/esb" xmlns="http://ordina.nl/esb">
<xsl:template match="/n:Message">
<xsl:for-each select="n:Data">
<xsl:copy>
<xsl:attribute name="RunID"><xsl:value-of select="//n:RunID"/></xsl:attribute>
<xsl:attribute name="MessageType"><xsl:value-of select="//n:MessageType"/></xsl:attribute>
<xsl:copy-of select="@*|node()"/>
</xsl:copy>
</xsl:for-each>
</xsl:template>
</xsl:stylesheet>

Let's apply this xsl to the two mail handling messages and generate ( I use Altova xmlspy) two new schema's on the new xml's, we need these schema for the specific routers. Now we can make the outgoing message A file adapter, use the new schema message A and make a messageA Router too. Use for this router also the new schema message A. Make a routing rule between the message A router and the message A file adapter.

We can do the same for the xml message B.

Now we have to make the routing rules on the main router. First we set the filters. We test the ns1:MessageType element if it equals A or B.
Then we make a xsl where we add the namespaces of the above xsl and replace the standard xsl:template with the xsl:template of the above xsl. See picture below for the xsl. This xsl can we use by all the main router rules.

The esb diagram looks like this, you can deploy it to the esb server and put xml message A or message B in the In folder. The esb puts now the messages in the right Out folder.

Here you can download the esb example project

Tuesday, January 15, 2008

external application in webcenter 11g

In Webcenter you can already use the pdk webclipper portlet to include some external web content in your own portal, but now you can also use external content in your portal page where you have to provide credentials like your corporate webmail or an external site with a corporate login account. This is called external application.
Oracle creates for this an own credential store where it store your credentials and Oracle also provides a taskflow to manage these accounts. Too bad in TP3 you can configure it and run it in Webcenter but you can't login somehow. It looks very promising. But how can you use it in webcenter 11g? First we select the viewcontroller and right click -> New. Now we can select external application item under the General Category. Let's use otn forums as example.

Now we have to look at the page source of the otn login page to find the login url and the type of action. The next step is to find the name of the login and the password field. If you at the page source of the login page. We see that the action = https://login.oracle.com/sso/auth and the method is post etc.

Now we can add the hidden fields to the external application. With the otn site we have v,site2pstoretoken and locale as additional fields.

The next step is shared credentials for logged in user. If you leave this empty every user have to provide its own credentials and the last step is the public credentials for not authenticated users. With shared and public credentials you don't have to log in, you see the external direct. Now we have to create a new pdk java producer

We have to provide an url endpoint use http://localhost:6688/jpdk/providers/external and select associate producer with external applicatin and select otn.

In the application resourcez we can see now the otnForums producer with the flight portlet.

Now we can drag the flight portlet to the jsf page. Make sure you add security to the project and to the page. The last step is to add the extapp-change-password-taskflow from the webcenter resource view to the jsf page so we can change passwords for these external applications and with this taskflow you can use the personal credential store. We can run now the jsf portal page

Sunday, January 13, 2008

ADF taskflow method call with complex return types

In one of my projects I used a bounded taskflow where I called a bpel web service with a taskflow method call which had a complex return type. You have to do something more to evaluate the results then I described in this blog.

Process is the method call with its own pagedef. In the router I check the return status attribute so it knows to return the taskflow with a succes or abort.
To call the bpel web service I use an ADF web service datacontrol. This generates a datacontrol see picture below.
Now we can drag the process method of the creditcheck datacontrol to the taskflow. We get the following wizard where we can define the values of the input variables.

It generates the following pagedef.

 
MethodName="process" IsViewObjectMethod="false"
DataControl="CreditCheck" InstanceName="CreditCheck"
ReturnName="CreditCheck.methodResults.process_CreditCheck_process_result">
NDValue="${data.items_trainPageDef.CustomerId.inputValue}"
NDType="java.lang.Integer"/>
NDValue="${data.items_trainPageDef.OrderId.inputValue}"
NDType="java.lang.Integer"/>
NDValue="${data.items_trainPageDef.OrderTotal.inputValue}"
NDType="java.lang.Float"/>


The return = CreditCheck.methodResults.process_CreditCheck_process_result. To evaluate the status we must add a methoditerator on the result. We do this in the pagedef.
Now we can add the status attributevalue to pagedef.We have to click "add" button to generate an accessorIterator first
Now we select the process_Result of the process method
We return to the create attribute binding dialog and now we can select the status attribute. The method call pagedef looks like this
 
version="11.1.1.47.96"
id="WEB_INF_order_task_flow_definition_order_task_flow_definition_process"
Package="nl.ordina.order.view.pageDefs">


RangeSize="25"
BeanClass="nl.ordina.order.view.CreditCheck.process"
id="processIterator"/>
RangeSize="25" DataControl="CreditCheck"
BeanClass="nl.ordina.order.view.CreditCheck.process_Result"
id="process_ResultIterator"/>


MethodName="process" IsViewObjectMethod="false"
DataControl="CreditCheck" InstanceName="CreditCheck"
ReturnName="CreditCheck.methodResults.process_CreditCheck_process_result">
NDValue="${data.items_trainPageDef.CustomerId.inputValue}"
NDType="java.lang.Integer"/>
NDValue="${data.items_trainPageDef.OrderId.inputValue}"
NDType="java.lang.Integer"/>
NDValue="${data.items_trainPageDef.OrderTotal.inputValue}"
NDType="java.lang.Float"/>


Now we can use the status attributevalue in the router. If status is true then the outcome is succes else the default outcome is used ( abort)

Wednesday, January 9, 2008

Tagging and searching in Webcenter 11G

What is tagging in webcenter 11G? With tagging we can add keywords (tags) to pages. These tags can be found with the search taskflow. See below for the pictures. The great thing of these webcenter taskflows you can use it in a normal adf application too. You don't need a webcenter application server ( wsrp ). I don't know about the license details to use these components in normal adf applications.
What do you need to get tagging working. First you have to use taskflow ( adfc-config.xml ) In this unbounded taskflow we create the pages. We have to do this so we can click on tagged item and then it re-directs to the right page. On the jsf page we add the tagging button from the component palette ( Webcenter tagging service) . Now we have to fill in the resourceId #{facesContext.viewRoot.viewId} , this is important to link the page to the tag. In my case #{facesContext.viewRoot.viewId} = document . If I click on a tagged item then the unbounded taskflow knows which page this is and redirects to document page.

Now we add from the resource palette the tagging-launch-dialog taskflow. This is needed for the tagging popup. Add the search-toolbar taskflow to the page too.

We have to add security to the page by using the adf security wizard then open the pagedef of the jsf page so we can add view rights to the jsf page. Go to the structure window of the pagedef and start edit autorization and give the roles oc4j-administrator and oc4j-app-administrators customize, personlize and view rights.

The last step is to create the webcenter database schema and create a database connection named WebCenter in jdeveloper and we are ready to give it a testdrive.

Here you see the search toolbar and a Tags link (tagging button) Now if I click on the Tags link, the tags dialog pops up. Here we can add tags. Use the shared tag option if you want to share the tags with others
Now it's time to search for a tag. In this case I add java to the search input and start searching. A search dialog pops up and it shows the tag java and the items where it is found. In my case are that the document and search page. I can click this and it jumps to this page. Because I have a content repository connection it searches in this too.

Here we can click on More. This shows a more complex search page. Here we can save our search entries.

If we click on the tag "java" then we see this more detail search page. Here we can see who has created this tag

Tuesday, January 8, 2008

Todo tasks in soa suite and webcenter 11g

A new feature of jdeveloper 11g TP3 is a ( personal ) todo task. You can create this in the bpm worklist application of the soa suite. But it is now also possible from a webcenter taskflow. This is very nice because you don't want to have the bpm worklist application all day open. Let's see how easy it is to create a to do task from your own jsf page. I use the oc4jadmin user for this example because I have two jdeveloper installations. One for the soa suite and one for adf ,webcenter projects. Because oc4jadmin user default in jazn.com. In production you should have Active Directory or OID so your company user are known by all systems.
We start first the soa suite server. Create a new webcenter project in jdeveloper. On the just created viewcontroller project we start the adf security wizard. Create a jsf page and drop from the resource panel the taskflow-task-service component on the jsf page.
Go to the pagedef definition of this jsf page and add by the page security the view action to the view.
The last security step is to configure the role permissions. Go the to the structure window of the pagedef and start edit autorizations. Let's give the roles oc4j-administrator and oc4j-app-administrators customize, personalize and view rights.
We have to create a new worklist service connection. We only have to fill in the soa suite url and we are done.
Now we can start the webcenter jsf page and log in as oc4jadmin. Here we can see all the oc4jadmin tasks. We can create a new task.
Let's log in as oc4jadmin in the bpm worklist application ( http://localhost:8988/integration/worklistapp/ ). Here we can see the new to do task which we created from the webcenter page.
We can create in this worklist application a new To do task. If we refresh the webcenter jsf page we don't see this task. We have to tweak this a little bit. Log in with sqlplus to the soa schema and execute the following sql statement, update wftask t set t.textattribute2 = 'oc4jadmin' where t.owneruser = 'oc4jadmin' . Now refresh the webcenter page and we see the task which we created in the bpm application.

Sunday, January 6, 2008

Using links in the document library service Webcenter 11g

Links is an another out of the box option what works in Webcenter 11g TP3. But what is Links? With links you can create relations between items. An item can be a document, discussion, announcement or a url. I will show you how it works in webcenter. I use the document library service of my previous blog as base for this blog. I added security to the page so I have the rights to customize / personalize (adf security wizard, pagedef).

The first step is to install the webcenter database schema see chapter 9.2.2 of the webcenter developer guide and create a database connection named WebCenter in the application see chapter 9.2.3. JDeveloper creates now a datasource jdbc/WebCenterDS. This is the datasource for the links service.

Now drop from the component palette the Links Detail Button and the Links Detail Popup on the jsf page. These components are availible when you select WebCenter Links Service in the choice list of the component palette for details see chapter 12.2 of the webcenter developer guide.

We are ready to see links in action.

First we click on the link button
Now we get a popup to create a new link to an existing document
We can select or search an other document and link this to the first document
Now we see the relation between the two documents.
And if you only have view right you will see this. You don't get link buttons

Friday, January 4, 2008

Create taskflows or portlets in Webcenter 11g

In the webcenter 11g release I noticed that Oracle use taskflows for their webcenter services like document library, worklist etc. I know already that taskflow is very important for the adf and jsf development. But it surprises me that don't create only portlet applications like in the 1o.1.3.2 version. I don't complain about this because I like taskflow more because I don't need the webcenter container to run my portal page. With taskflow I make a specific connection and drag a taskflow from my onw or webcenter catalog. Fill the taskflow mds parameters in and let's run it. If I make a portlet I have to deploy it first to the webcenter container and then I have to make in my portalpage a producer to this portlet and configure it and drag this to the jsf page.
If your company only uses Oracle technology then you should use taskflow and you can always deploy it as a portlet to the webcenter container. The portlet bridge works fine now( PPR and Popup works now) and we can use mds to customize the taskflow. If you want to build portlets because you don't know if you want to use the oc4j container then make sure that you don't use specific oracle technology else you get errors on the other j2ee containers.

Wednesday, January 2, 2008

Document library service in webcenter 11g

One of nice working webcenter TP3 features is document library service. This is standard taskflow which gives a overview of your documents on your file system or content (db) server. Too bad the file system option is limited to search and view. If you use the content db connection then you get all the options like add, move, copy, delete and checkout of documents. This is how it looks.

In this blog I will show how easy it is to have this working on your own file system. First we make a content repository connection. I use file system as repository type and my ebooks folder as base url.
We drag the doclib-document-library taskflow from the resource palette on a jsf page. Go to Webcenter Services Catalog and open the task flow folder.
Now we need the name of the content repository connection, in my case ${'MyEbooks'} and the start folder ${'/'}.
We are finished and ready to run the jsf page. Here is an another picture of a search action on my ebooks.